Glen Affric Glen Affric (Gleann Afraig in Gaelic) has often been described in the press as "The Most Beautiful Glen in Scotland" |
 |
|
|
Setting The Scene - Glen Affric in ancient Gaelic folklore, is said to be the home of the “Cailleach” or “Great Witch”, who was once hailed throughout Scotland as the “Mother of all Gods” and who is said to be older than time itself. It is also said, that while you are wandering through the glen, if you are unfortunate enough to see her gliding through the forest mist towards you, then you will soon come to realise, just how bad the situation has become for you and how you are now in the presence of pure evil. She is said to have only one functioning eye, but with which she can stare directly into the very depths of your soul. She is also said to have a face that is covered in pallid, tightly shrunken skin of a deathly blue, not unlike that of a long dead corpse and that her flowing white hair glistens with icicles and frost, as well as being adorned with the many bleached white finger bones of her victims, that she likes to take and keep as trophies. I hope you are enjoying this…? Because it is definitely starting to send more than a few shivers down my spine I can tell you. And I am the one writing it, and I am doing so in broad daylight, and in the middle of the day, and at the height of summer… Glen Affric contains the third largest untouched area of ancient Caledonian pinewood forest in Scotland and which was classified as a national nature reserve in 2002. The pinewood forest that grows around the entire length of Glen Affric, is mainly made up of of Scots pines, but also includes Birch, Rowan, Aspen, Willow and Alder. The forest floor also contains many other rare species of plants and vegetation, such as Creeping Ladies Tresses, Lesser Twayblade, Twinflower and four different species of Wintergreen, as well as many other uncommon types of lichen, that grow and hang from the trees. |
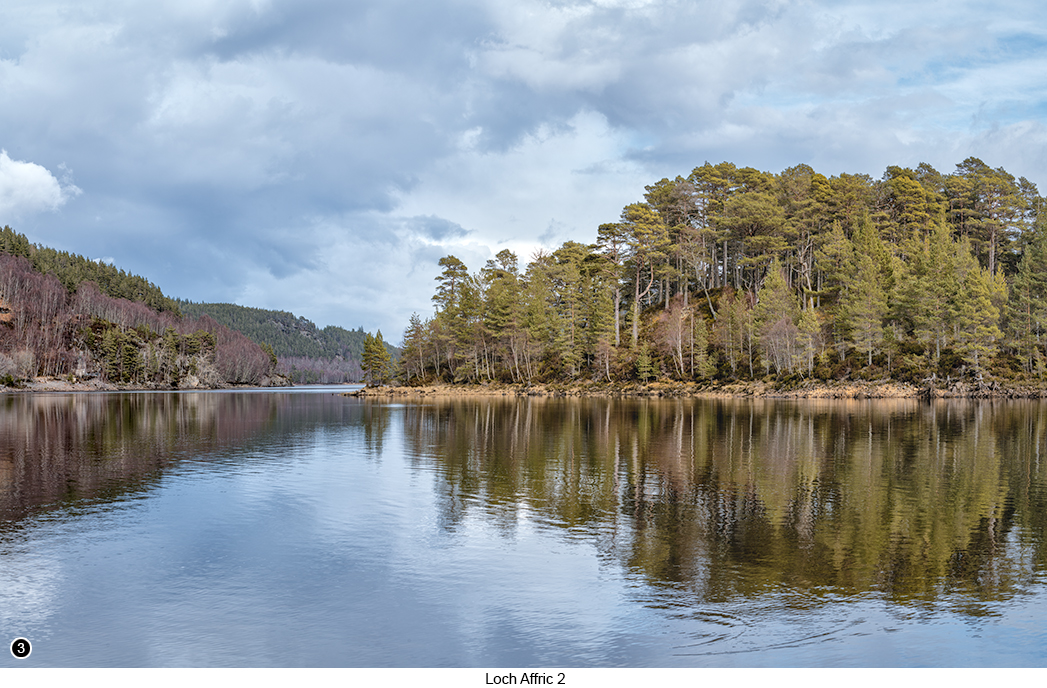
How to get there - Glen Affric is a large steep sided glen, that can be easily reached after only a 1 hour drive from the shores of Loch Ness. To get there, drive all the way up along the shores of Loch Ness heading North West from the town of Inverness, as you follow the main A82 road, until you finally reach the outskirts of the medium sized village of Drumnadrochit. Then continue to follow the main A82 road, until the road meets a sharp left handed ‘T’ junction bend, with a stone bridge crossing the river Enrick to your left, but that also meets up with the smaller A831 road heading North out of the village, so take the A831. Street View, Map View. Then continue along the A831 for another 15 miles or so, until you reach a tight a 'T' junction, with the A831 continuing off to your right and a signpost directing you to Glen Affric 10 miles to your left, take a left here and continue on towards Glen Affric Street View, Map View. A few miles further on, you then arrive at a tight right hand bend, with an unnamed single track road heading off to your left signposted got Glen Affric, take this left turn Street View, Map View. This single track road now continues all the way through the length of the glen, as it follows alongside the River Affric to your left. Then as you drive further into the glen for a few miles, you will first arrive at the 'Dog Falls' car park (a. k. a. Coille Ruigh na Cuilleige car park) Street View, Map View, where I couldn't find anything worth photographing at the time I was there, although you might find otherwise. But which none the less has a very enjoyable scenic walk, that follows along the left side of the river all the way down to the falls, about a mile further on. So, back in your vehicle, continue driving further along the unnamed road into the glen for another 5 miles or so, until you arrive at a second large car parking area at Coille Ruigh na Cuilleige Street View, Map View, that overlooks Loch Affric and is where I took SHOT 1 and 2 shown above and SHOT 3 below. |
|
 |
|
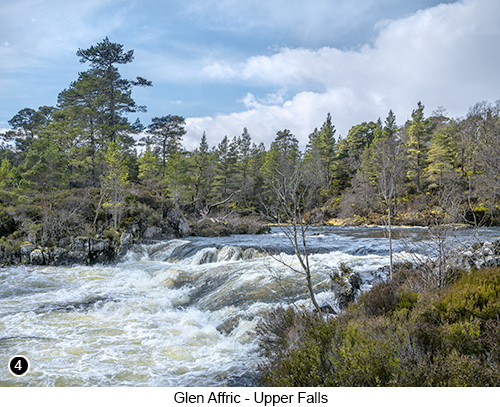
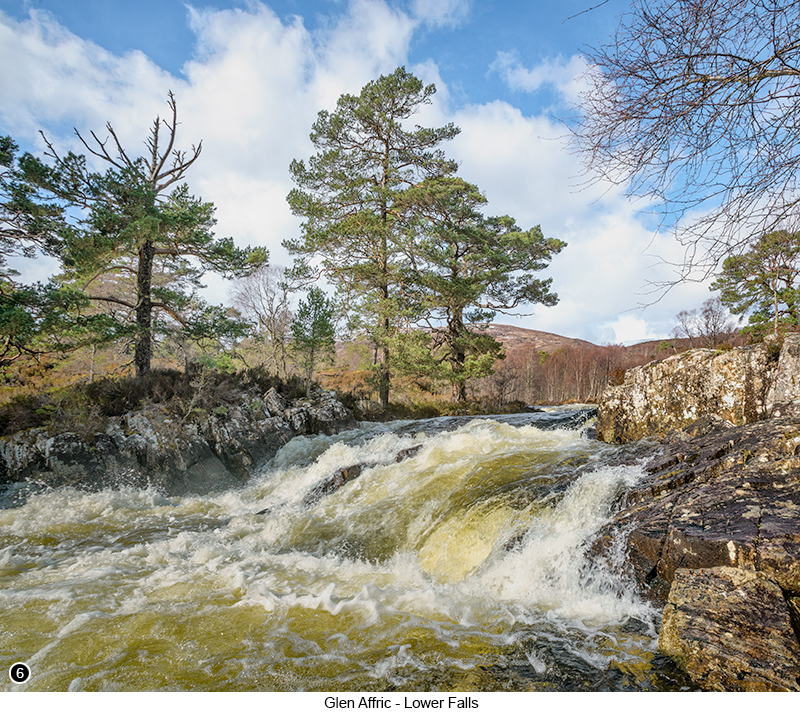
| Then a few miles further on as you continue to drive through this very scenic glen, you will finally arrive at the main car park for Loch Beinn a' Mheadhain, Street View, Map View and the official path, that you will find (even though it is sort of semi hidden towards the back left of the car park, Street View) near to an information board. Once you have located the path, follow it all the way down to the edge of the large, fast flowing River Affric and the River Affric upper and lower Falls, just a few hundred yards below. The best time of year to be here I have found, is any time after the beginning of autumn through to late spring. Because in autumn the whole glen along the side of the road, is absolutely covered in beautiful autumn foliage and colour. In winter the surrounding mountains are pretty much always capped with fresh snow and look really great as a backdrop to any composition. But in late spring, the mountains snow caps start to melt and swell the already large river into what I can only describe as a raging torrent - as shown in SHOT 4 to the right and SHOTS 5 and 6 below. Also during these times (well perhaps not so much in autumn), there are going to be very few tourists visiting this relatively remote area of Scotland, so you are pretty much guaranteed to have the whole place to yourself and if you are anything like me, then you very much enjoy working in both peace and quiet. So no kids trying to throw as much stuff as they can lift into the tranquil lochs at the side of you and breaking up that mirror like reflection, that I am obviously trying to photograph - been there, done that, got the 'T' shirt, wore the 'T' shirt out until it had several holes in it, then used it to clean the engine of the car until it became an unusable oily rag, then burned it and danced on it's ashes etc... I am sure if I was a youngster now, then I would probably be doing the same, but isn't it just so flipping annoying when it is happening to you? |
|
So when we were last there at the Loch Affric car park, I had quickly found my spot next to the tranquil loch and was busying myself setting up my kit for a long sweeping pano, when a young family arrived with a picnic and started to lay it all out on a nearby picnic table directly behind me. They had a young girl and boy with them, who both looked to be around 8 or 9 years of age. The little girl was happily helping her mom to lay out the plates and the tea cups etc., while the little boy immediately charged off into the edge of the woods making Conan the Barbarian type noises and where he then proceeded to try and rip out, as many young saplings and small trees, from the banks of the loch as he could with his bare hands and then throw them out into the water as far as possible. So I quickly realised my mirror like reflection opportunity had been lost, so reluctantly packed all my gear away again and then wandered off into the woods towards my left, looking for something else to shoot instead. |
|
|
|
|
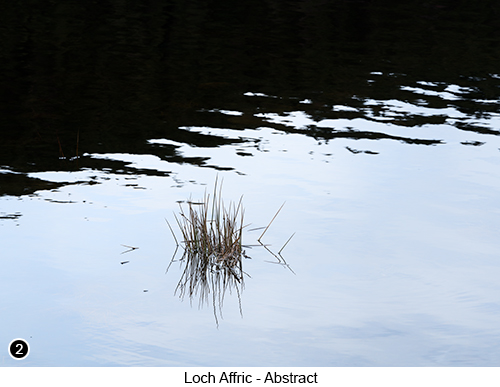
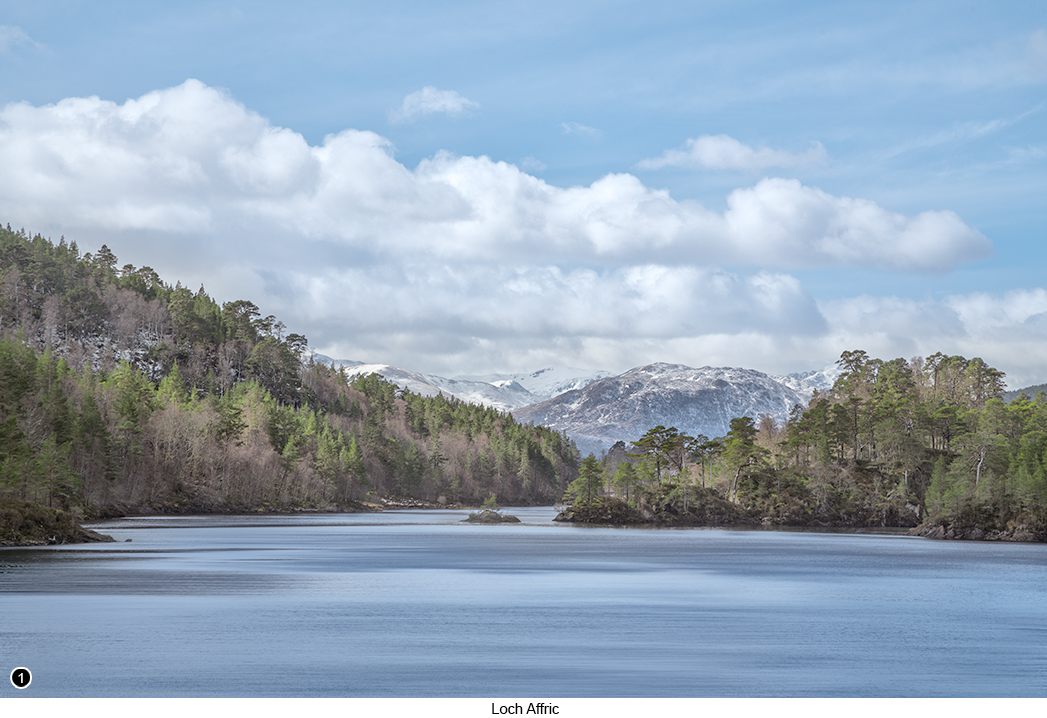
SHOTS 1 and 2 of Loch Affric, were taken from near to the car park, just around the edge of the loch and further into the woodlands to your left. So once you arrive in the car park, try to park at the lower parking area nearest to the loch if you can, then look for a path through the woods that will lead you around to the left of the parking area and beyond. There is actually an interesting little waterfall, that runs under an old road bridge at the furthest point that you can walk through these woods, but when I was there, the river was full of tree debris from a previous storm, so was completely cluttered up with ugly twigs and branches, so no shot there for me on that occasion unfortunately. I then started to walk back towards the car and saw another short path leading down to the edge of the loch, that passed between two large bushes and some stunted trees. So I followed this second path down to the edge of the loch, to setup there for my vertical pano (the camera was oriented into the vertical and which I then swept from left to right) and finally managed to grab a pano that I was very satisfied with, as shown in SHOT 1. As I then continued to enjoy being as far away from Conan and his all out war on young tree saplings as I could be. I began to look around for what else I could shoot, but nothing was immediately jumping out at me, except the reflection of a clump of some type of grass near to the edge of the loch. I could see that the shadows from the trees on the left hand side of the loch, were throwing an interesting shaped shadow over part of the scene as I looked at it and how the slow moving ripples, had the potential to look very 'artistic'. But I really didn't like the clump of grass that would inevitably become my focal point and wished it had been something a lot more interesting, such a single pretty flower, or a nice gnarly tree branch sticking up out of the water or something, but it was never going to be that, so I ignored it. So I left the camera mounted onto the tripod, as I continued to wander around for a little while longer, looking for something else to shoot, until I realised that nothing was grabbing my attention. So as I already had the camera setup on the tripod and there was nothing else I could see, I decided what the heck, why not just take the shot of the clump of grass and its reflection just for the clicks. Now I am not trying to say that SHOT 2 is anything more than what it is, a clump of straggly grass with a high contrast shadow reflection artistically placed behind it. But I really did enjoy taking it and working on it and thought it was worth adding to this chapter, just as an idea of what to look out for when you are here, or working with any type of reflections at any other location next to water. But is is a wall hanger? Nope! For SHOT 3, I wandered back towards the car park from the left hand side of the woods and as I got closer to it, I could hear nothing but complete silence and noticed that Conan was now sat at the picnic table with his arms crossed and his bottom lip sticking out about as far as it would go and wearing a face that was so sullen, it would instantly curdle milk. I deduced that he must have just been scolded by his dad, for all the wanton destruction he was unleashing onto the picnic area. So the original reflection shot I had wanted to take from this viewpoint, had once again become available to me, so I took it - although the reflection wasn't quite as good, but hey ho, grab what you can when you can I say. I then walked back towards my vehicle and on past the picnic table where they were sitting, as I wished them all a cheery hello and suggesting what a beautiful day it was and how lucky we were to see it etc. But the destroyer of planets was having none of it and just continued to glare down at his feet, with a face like a freshly slapped arse. Oh well I thought, this glorious day is definitely getting better and better with each passing minute. |
|
 |
|
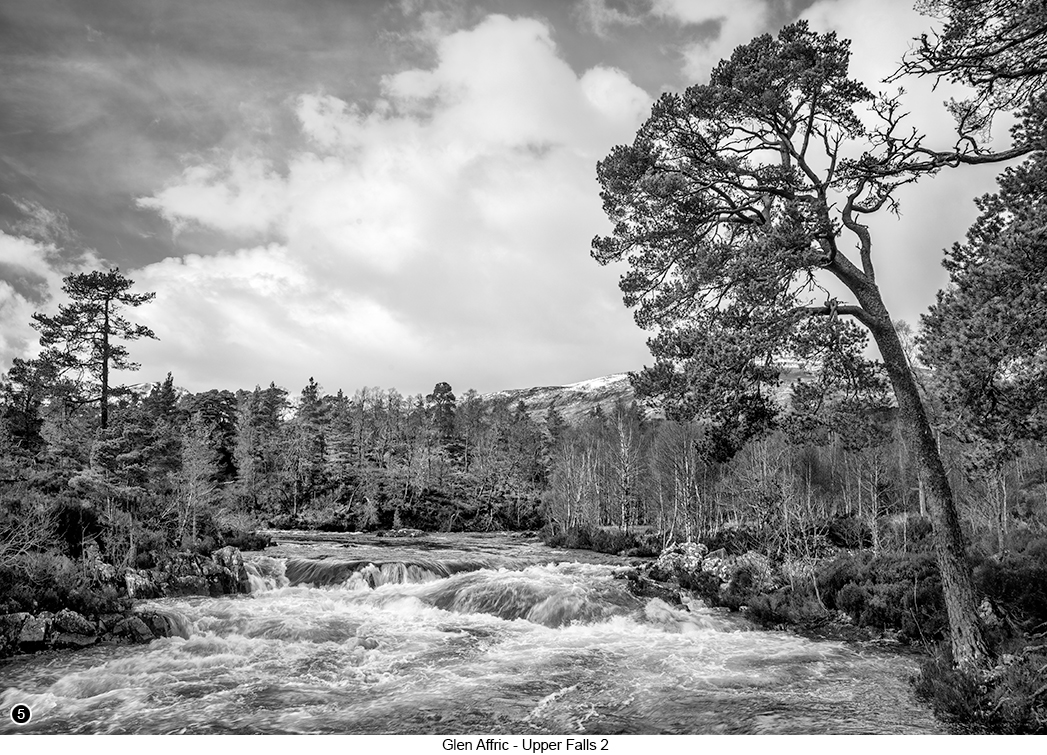
We then drove further on into the the glen for several more miles from the Loch Affric car park, with lots more beautiful views all around us, until we finally arrived at the Loch Beinn a' Mheadhain car park (with toilet facilities should you need them) and parked at the farthest end of the car park, looking over towards a modern bridge in the near distance Street View. We then set off down to the falls area along the designated path, which is probably only about a half mile easy walk, until we arrived at the falls and what I believe is the main photographic attraction in the glen. There really are lots of photographic opportunities for you to feast on this area and especially if you come here when the river is in spate and the mountains are still capped with snow in the background, as it was when I was last there and took SHOTS 4, 5 and 6 as shown above. So it really is just a matter of wandering around with your camera and pointing it at whatever features that you find the most interesting and of course trying not to fall in. SHOT 4, was taken just past the upper bend in the falls, from a stone laid path that goes around a large tree and which is very easy to find. I took several shots of this scene from this location, as it was just such an obvious shot and then chose the one where the light looked at its best - the sun is mostly going to be over to your left from this location, for most of the day outside of dawn and sunset, so should always be front lighting the scene and making the distant details stand out clearly. And I do not think this is going to be a good location for either dawn or sunset, simply because the sides of the glen will obscure the sun for several hours after suns rise and again several hours before sunset. But of course you can always try if you have the time and inclination to do so and I would be more than happy if you prove me wrong on this. I then continued to scout around until I found SHOT 5, which is just a little way past the large tree from which I took SHOT 4 and where I was then standing on top of a large flattish rocky area - the official path continues over this area and so has been well laid out and maintained, although it may become quite slippery if it is raining or wet, so be careful. I then continued down to where the second lower part of the falls is located and where I found it to be a little more tricky to shoot, as shown in SHOT 6 above. So as I wanted the second part of the falls to be front and centre in my shot, I knew I would have to get as close to it and as low down as I could. So as the official path continues around to the left, you will then see a smallish rocky island next to a more jagged rocky area, that has a few straggly bushes and stunted trees growing on top of it. I knew I wanted to shoot from this rocky island area as soon as I saw, but which required that I then had to cross over a small part of the edge of the falls and push through the scrub to get to it, and where I hoped I would then be able to grab a few handheld shots of the lower falls, as I sat on the rocks next to it. If you do decide to take this shot for yourself, then I would advise that only take your camera with you, with a wide angle lens already mounted on to it and a lens cloth, as a tripod and camera bag is going to be of no use to you, because there just isn't enough room to set it up at this location. You really do need a wide angle lens to capture the width of the lower falls from this lower viewpoint, as you are now going to be sitting very close to it, so that anything wider than 16mm, just isn't going to be able to capture it all in one go. And you will definitely need to take along your lens cloth with you, because the front element of your lens will be constantly being hit with spray from the falls. So keep checking your lens for droplets of water before each shot, as you do not want to make all this effort getting into this position, only to find out later, that all of your shots have been ruined by water droplets running down the front of your glass. You will also need to shoot the lower falls at a reasonably fast shutter speed when hand holding your camera, so setup for an ISO and fast exposure setting combination, that will allow you to do this correctly - although some modern cameras and lenses, have such good image stabilisation these days, that you may well be able to get away with shooting this scene at anything up to 1/8th, or even 1/5th of a second. So if you are fortunate enough to have such a camera and lens combo, then my advice would be to go for the 1/8th or even 1/5th of a second option if you can, as this really does seem to create a very artistic effect with moving water - in my humble opinion! Although as you can see in the Exif data below for SHOT 6, I just went for the easiest, widest and fastest settings - so I suppose what I am saying, is do as I say and not as I did. |
|
--Exif information for each of the numbered shots shown throughout this chapter --1 - Canon EF24-105mm f/4L IS USM, 1/400th Sec, f/11, ISO 100, Focal Length 105mm, taken on 7th Apr at 12:23 --3 - Canon EF70-200 f2.8L IS USM, 1/15th Sec, f/11, ISO 50, Focal Length 75mm (6 shot vertical pano), taken on 7th Apr at 12:49 --4 - Canon EF24-105mm f/4L IS USM, 1/160th Sec, f/16, ISO 100, Focal Length 32mm, taken on 7th Apr at 14:09 --5 - Canon EF24-105mm f/4L IS USM, 1/160th Sec, f/16, ISO 100, Focal Length 24mm, taken on 7th Apr at 14:13 |
|
If you have enjoyed reading these 'Extra' chapters to my Guide Book and think you might also enjoy reading 79 more chapters across 270 pages, that also includes more than 340 Fine Art quality images, along with detailed descriptions and large scale maps to guide you to the exact location of where I took each and every one of them and which then goes onto discuss the techniques and tools I used to process them, but where everything is written in plain easy to understand English? Then please consider buying the Book. |
|