Dunnottar Castle and the Crawton Burn Falls |
Dunnottar Castle, or " Dùn Fhoithear" in Scottish Gaelic, which is most commonly translated into: "The fort on the shelving slope". Is what remains of a 16th century castle, built over the ruins of a much earlier 6th century fortress. Which can be found on the north east coast of Scotland, two miles South of the Aberdeenshire town of Stonehaven. There are also other, slightly different interpretations, of the Scottish Gaelic name "Dùn Fhoithear". Such as the "The fortress on the sloping bank". Where the word "Dùn" is a Gaelic/Pictish term, meaning a fort, castle, or fortified hill. And " Fhoithear", meaning a shelving slope, sloping bank, steep cliff, terraced slope, or sloping ground. However the term "Fhoithear", could also refer to the original Fort's location, being situated in the Scottish low country, in an area once referred to as the "Mearns". Which in ancient times, was the term used to describe the flat area of land, to the East of the Grampian Highlands. |
|
|
|
Setting the scene: The original medieval Dunnottar Fort, was constructed on top of this large, steep sided 160 foot high rocky outcrop (as shown above), so it could be more easily defended from all sides. Then during the reign of King William the Lion (1165–1214), Dunnottar became the administrative centre for The Mearns Family, who ruled over this region, for many years. King William of Scotland, is said to have been given the nickname "King of the Lion", because he kept a lion as a pet. The castle is also mentioned by a poet of the time, called " Blind Harry". Who tells how William Wallace, recaptured Dunnottar from the English in 1297, during the Wars of Scottish Independence. Where Wallace is said to have imprisoned, 4,000 defeated English soldiers in the castle church, before setting fire to it and burning them all to death. Therefore a fire was brought speedily: |
|
|
|
Dunnottar Castle, also became the place where the Scottish crown jewels, or as they were originally called in the 17th century, "the Honours of Scotland". Which were hidden here, to avoid being captured by Oliver Cromwell's invading army. The castle then fell into ruin once again, after its owner Earl Marischal, took part in the Jacobite rebellion of 1715. Who soon after his and their defeat, was made to forfeit his titles and his birthright to the land. The castle was then sympathetically restored in the late 20th century and is now open to the public. |
|
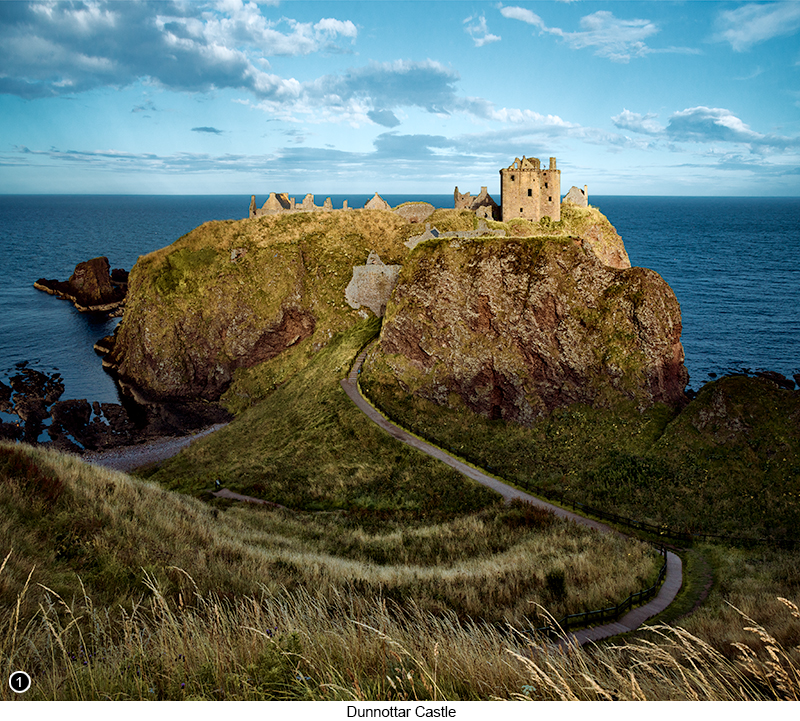
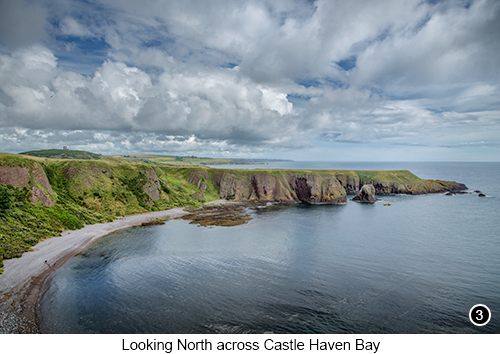
How to get there - Dunnottar Castle: The nearest large urban area to Dunnottar Castle, is the city of Dundee. So head towards Dundee on the North East coast of Scotland. Then get onto the A92 North, heading towards the towns of Arbroath and then Stonehaven, about 1 1/2 hours away, Map View. And continue driving all the way up to Stonehaven. But just before you reach the outskirts of Stonehaven itself, you will see a right turn from the A92, pointing towards Dunnottar Castle on your right. Take this right turn, Street View, Map View. Continue down this short coastal tourist route, until you come to the official Dunnottar Castle car park and park wherever you can in here, Street View, Map View. Once in the car park, you will see to the right of the burger van ahead of you (and very good they are too). There is a couple of hundred yards long path, that leads you down to the castle. So grab your kit, with your mid range zoom and wide angle lens and walk down the path to the top of the cliffs. For a view looking out over to the castle ruins, as shown in SHOTS 1 and 2 above. As well as a fantastic view, across Castle Haven Bay to your left. As shown in SHOT 3, here on the right. To get to the point where I took SHOT 1 of Dunnottar Castle. Walk around the clifftop a little way to the left of the steps, that lead down to the castle entrance. Then down a slight incline to a small grassy bank, overlooking a wide, uncluttered view of the castle. Where you can setup your tripod and work form there. |
 |
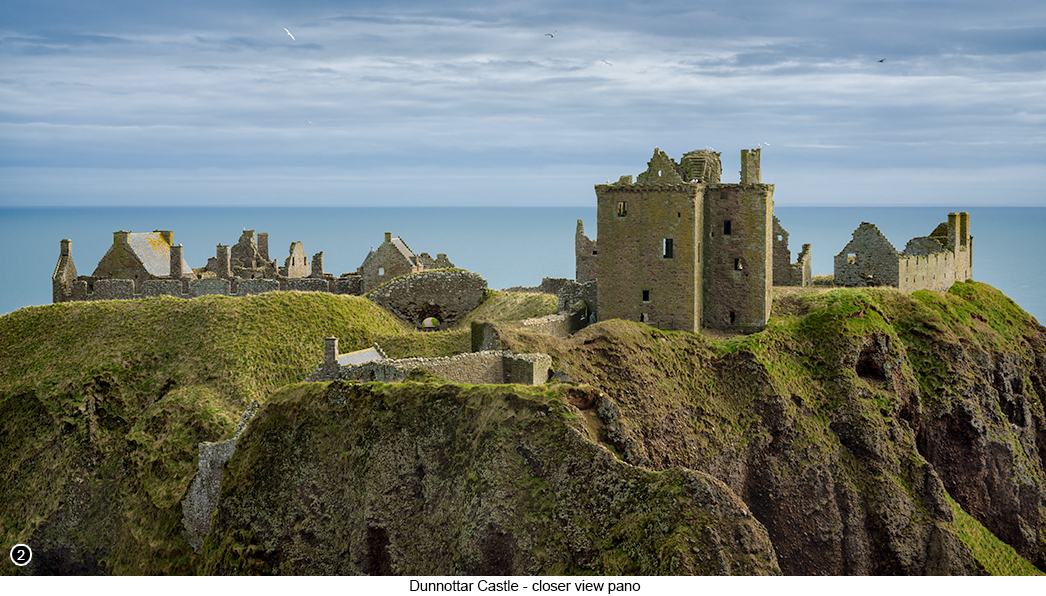
The best time to be here, for this particular shot of the castle, as shown in SHOT1 above. Is around 30 minutes before the sun goes down, behind the low hills and buildings to your rear. Where you can then capture the castle, with the midground cliff below it in full shade. Yet with the castle itself, still in direct sunlight. This will give a very nice contrasty feel to the shot, as well as point the viewers attention towards the castle, as it sits highlighted on top of the rocky ouotcrop. Especially when set against a darker sky. For SHOT 2, which I took on another visit to this location. I stayed on top of the grassy bank above the cliff, next to the main path and just to the left, of the last wooden bench along the clifftop to the left. Where I could then frame up a 'pseudo-pano' (meaning a single, normal aspect ratio shot, that I knew I was going to crop into a pano later) and which allowed me to zoom in closer for the detail. |
|
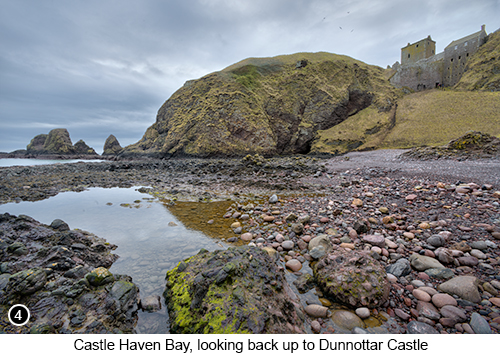 |
Tip: This whole area around Dunnottar Castle, is facing almost directly East , so should be good for dawn shots, at any time of the year. For SHOT 3 above, I then walked a little further to the left of where I took SHOT 2 and then out onto a very narrow ridge, overlooking the Castle Haven Bay to my left. Now I am not going to tell you, exactly how to get to this tiny, hair raising ridge, or to go and stand on it to take your shot. Because as soon as I saw it I thought. You really would have to a complete idiot, to want to walk out there, onto such a small, 18 inch narrow piece of ground, jutting out from the cliff edge. With sheer, instant death drops, on either side of it. Just to take an uncluttered shot of the bay. So off I toddled, like a complete idiot to take the shot, as shown in SHOT 3 above. So having survived that, I then walked down the steps, towards the castle entrance and then further down into the bay to the left of it. Where I took SHOT 4, as shown here to the left. Which OK I know, SHOT 4 is no work of art, due to the tide being fully out and the light looking so flat in the shade. But what the heck, I wanted a shot that would show you the bay and the group of seastacks beneath the castle, so here it is. I even wandered over to those sea stacks, you can see to the left of SHOT 4 and gave them try and really good they looked too. But the light was just too flat and the tide was still out way to far for my liking. So maybe this is a shot I need to come back to? |
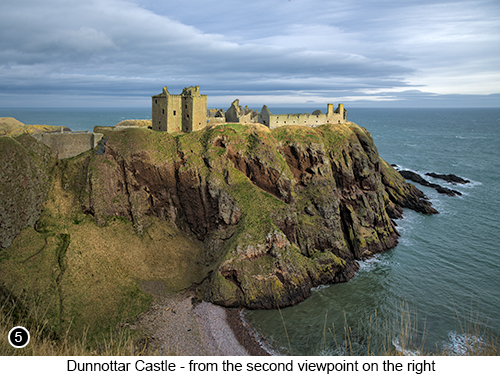
But hopefully for you when you are here, the light down in the bay will be much better and allow you to get something more, than just a 'record shot' of the sea stacks. If you now walk back up from the bottom of Castle Haven Bay and all the way back up to the top of the cliffs - which wasn't an easy thing to do, for an old photographer like me, carrying far too much gear. With lots of huffing and puffing and having to take, about a dozen or so rests to complete the climb. You will then come back up to the top of the cliffs and the view of the castle, as shown in SHOTS 1 and 2 above . So having caught your breath. Head off back towards the car park, until you see a left hand fork in the path, that takes you down and around to a second, right sided view of the castle, as shown in SHOT 5 below right. |
|
You will also pass by a view of a waterfall at this point, which after heavy rain, can look good for a shot or two. But unfortunately, on all three of the visits I have made to Dunnottar Castle so far, it was just a dribble. So not worthy of a shot. But hopefully you will have more luck, on your visit to Dunnottar Castle. So take a left and walk down over the bridge. Then up the other side, to this second viewpoint and setup your camera, as far as you can, into the top righthand corner. Tip: The view of the castle from this second, righthand viewpoint, as shown in SHOT 5 to the right. Is not easy, if you want a clean shot of the castle. As there is a lot of grass and foliage, growing up the cliff face in front of you, which is difficult to shoot over. So you will either have to setup your camera, as high on the tripod as it will go, to shoot over these grasses. Or you could shoot lower and try to incorporate these grasses (artistically), into the foreground of your shot. Which is what I did for the main view of the castle, as shown in SHOT 1 above. But which didn't seem to be working for me here. So I setup my camera on the tripod as high as it would go, to take it from there. However if you don't own a really high tripod, then what you can do at a pinch handheld, is the following: Turn on autofocus, select a high shutter speed and turn on image stabalisation. Flip out your view screen at 90 degrees to the camera and then rotate your camera 180 degrees, until it is upside down. Then hold the camera as high as you can over your head, to frame up the shot using your flipped out view screen. Then fire off your shots using your left thumb to hit the shutter release, instead of your right finger. Then rotate the image 180 degrees back to normal, before you process it. |
|
|
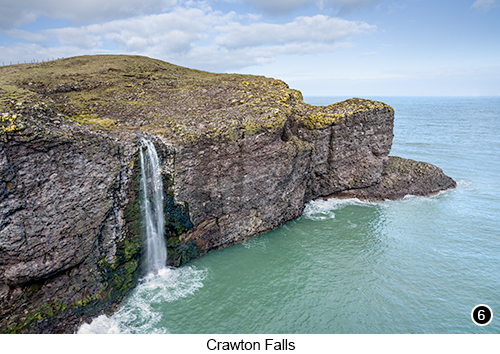
How to get there - Crawton Falls: To get to the Crawton Falls viewpoint, from Dunnottar Castle. Return back to the main A92 road and turn immediately left, heading back South towards Dundee, but only for 2.7 miles, Map View. Until you see a small left turn, signposted for the tiny village of Crawton 1 mile ahead, Street View, Map View. Then drive down this short road, until you come to a parking area on your right, Street View, Map View and park wherever you can there - you will also see several parking spaces, that have been designated for RSPB memebers only. So if you are a member, then use one of those, if not, you can still park in the limited amount of none designated spaces, at the side of the road. Then grab your gear (with both your 20-105 and 70-200 lenses) and head off walking down the road, for just a couple of hundred yards, past a few scattered houses on your right. Then keep going, until the public road ends at a private driveway. But where you will then see a wooden walkers gate on your left. With a narrow path leading out to the headland, just a couple of hundred yards further on and a view of the Crawton Falls to your left, as shown in SHOT 6 below left. |
|
|
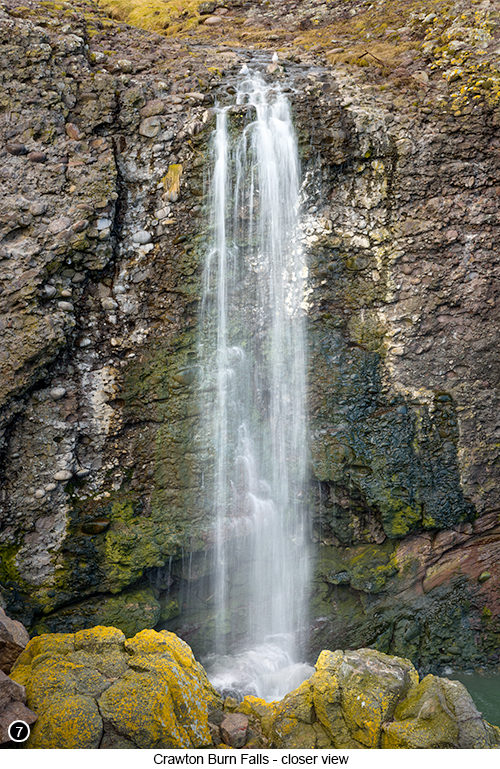
The Crawton Burn Falls, is located in a beautiful and secluded area, on the North East coast of Scotland, just south of Dunnottar Castle. Where the falls are set within a dramatic, seascape viewpoint, that is easy to access, as well as to photograph. Where the Crawton Burn drops 157 feet, straight down the side, of an ancient volcanic rock formation, directly into the sea. These cliffs and the area of land that surrounds them, have now been designated, as the RSPB Fowlsheugh Nature Reserve. Due to this area being such a hotspot for birdwatching. Where in sprinig, you will commonly find hundreds of nesting birds all around these cliffs. Such as Puffins, Razorbills, Kittiwakes, Northern Gannet, Fulmar, Manx Shearwater, Cormorants and Shags. It is also a place that is often described, as being a "permanently moody landscape", that has a feeling of magic and mystery about it. So continue on down the path heading towards the sea, with the Crawton Burn Falls on your left. Until the path takes you up and onto the top of a thin ledge, overlooking the edge of the gorge. But you have to be careful here, as there is a 150 foot drop, immediately to the side of this path. So this is definitely not a shooting location for the faint of heart, or if you are photographer that suffers from vertigo. You must be very careful down here. Because even though this is the designated path, to the Crawton Falls viewpoint. It is still very dangerous, as the path takes you right up next to the cliff edge and should be treated with all the respect it deserves. |
Once on top of the thin ridge at the end of the path, you will find there is just enough room to setup your tripod, for a view of the falls, the headland and the sea beyond, as shown in SHOT 6 above. You may need to bracket your shots from this veiwpoint, as the dynamic range from the dark areas of the cliff, against the brightness of the sky above, is probably going to require that. Unless it is a flat, overcast day when you are here. Then having taken all your shots of the falls from this first viewpoint, or if you would simply prefer not to shoot, from this sphincter twitching location. If you continue a little further down the grassy bank to your right and away from the edge. You will see there is a wide, flat ledge of land, that you can easily and safely walk down to. For a second, alternative view of the falls, but from a much safer viewpoint, as shown in SHOT 7 below right. | |
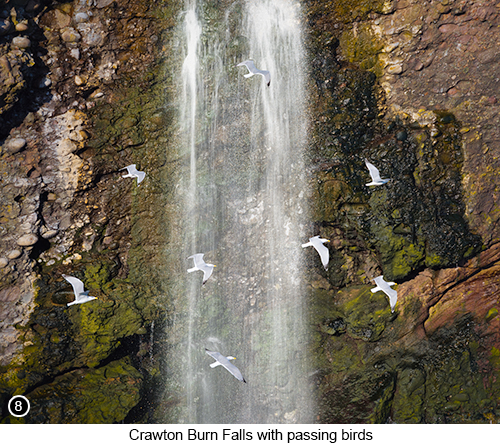
Once down on this lower ledge of ground, you will find that you can now frame up your shots, so that the falls take up most of your composition. Or if you like how I shot the scene, as shown here in SHOT 7 to the right. You can frame the waterfall, so it looks like it's falling, straight into a hole in the rocks. Which of course it isn't, as those rocks are on my side of the inlet and the opposite side from the falls. But as soon as I saw, how I could line up the falls, against the dent in the rocks, on my side of the inlet. I thought ooh, I like that. So that's how I shot it, as shown here on the right. I then noticed how birds from further up in the gorge to my left. Kept flying out towards the sea to my right and passing in front of the falls. So me not being a wildlife photography in anyway whatsoever and knowing that this is a type of photography, I really suck at big time. I thought what the heck, I will see if I can catch them flying past the front of the falls anyway. And so this is how I did it, as shown in SHOT 8 below. Tip: So as my camera was already setup on the tripod, I grabbed a 1/8th of a second shot of the scene at f/11 using my 3 stop ND filter. Just to make sure I had, a well exposed shot of the falls and the cliff detail behind. I then opened up my aperture to f5.6, dialled in the fastest shutter speed and ISO combination I could, to get me to 1/2000th of a second. I then switched the camera into high speed burst mode, reset my focus point and waited, with my finger twitching on the remote release, ready to go. ..and I waited, and I waited and I waited some more. Sure, the odd bird would fly through my shot occasionally. But mostly over the top of the falls, or too high up the falls, or too low. Or even on my side of the gorge and therefore outside of my depth of field. But what the heck I thought, I am enjoying myself just being here, soaking up the atmosphere. So I stuck with it, enjoying the day. I continued doing this for at least an hour (how you wildlife photographers have the patience to do this, is beyond me?) and only managed to grab a couple of shots, with a single, not very well placed bird within it. Then suddenly out of the blue, alarm calls began to ring out around me, as all the birds were spooked into the air at the same time. Apparently (my birdwatching wife told me a few moments later), a White Tailed Eagle, had just flown overhead. Which made them all come out together screeching loudly, as they rushed through the mouth of gorge, to fend off the predator. By grouping together and mob attacking the White Tailed Eagle, to force it out of their airspace. Which was obviously very alarming for them, but good for me. As it finally allowed me to get, the shot I had been waiting over an hour to take. I never saw the White Tailed Eagle of course, as I was too busy photograhing all the birds, flying in front of the falls. I then blended the best shot of the birds, with my original shot of the falls, to make SHOT 8, as shown directly below. Also, as I had been stood there, twiddling my thumbs for over an hour, waiting for the birds to fly into my shot. I'd had more than enough time, to look all around me, for any other interesting subjects I could photograph. Which leads me to the next image in this chapter. Of a second, lower plateau, covered in sea eroded volcanic rocks, just below the small grassy upper plateau I was standing on. As shown in SHOT 9 below right. |
 |
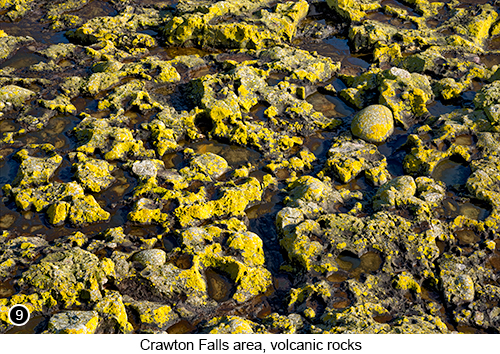
Which at first, I didn't think was going to be worth shooting, as it was nothing more than some unusually shaped rock formations. But as I stood there waiting for the birds to do their thing. These rocks kept catching my eye, especially when the sun was hitting them and lighting up the bright yellow lychen, they all seemed to be covered in. So the more I looked at them, the more interesting they became. As I began to realise, that this wonderfully weird rock formation, must have been created, by a softer material (mud?), having flowed over an ancient beach, covered in large, smooth rounded boulders. Which then over many millions of years, turned the mud into stone. But which was now being eroded at a faster pace than the boulders, by the corrosive effects of the sea spray washing over it. |
|
|
Until the much harder rounded boulders, began to roll out of softer rock sockets that had held them in place. Which if you look at SHOT 7 above. Must be what had happened, to make the round shape in the rocks, I used for the bottom of the falls. Isn't it amazing what we can see, if only we give ourselves the time to look?
|
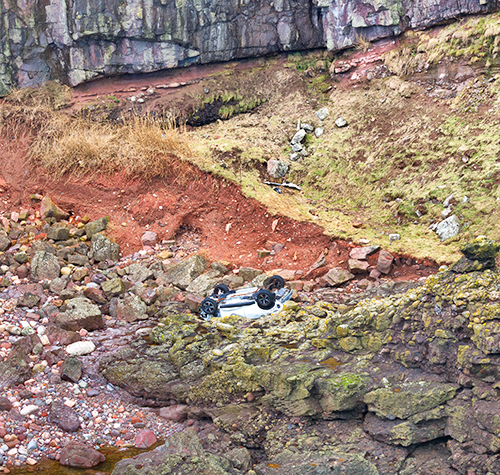
...and finally. You will probably notice, as you walk around shooting in the Crawton Falls area. How there is the wreck of a brand new vehicle, at the bottom of the cliffs, at the top of the gorge next to the road, as shown in the image below. Which if they haven't removed it by the time you get here (which I don't think they ever will), then you will probably think, OMG, someone must have died here, because surely no one could survive a fall like that? Well apparently they did, after being winched to safety by a helicopter and then rushed off to hospital. |
|
 |
|
I looked in the local press, to see if there was any explanation of what happened. But couldn't find anything, other than reference to the incident and when it occured. So I can only speculate, as to what took place. Such as perhaps the car was being driven, by someone on vacation from another country. Who had hired a car, but wasn't used to driving on the left side of the road, while at the same time using a manual gear shift. Who perhaps lost control, panicked and stamped on the accelerator pedal, instead of the clutch. Which made the car smash through the fence and over the edge of the cliff. Yet as I say, I don't know if this is what happened, so perhaps it was something else. Like the result of the driver, suffering a medical emergency. Who knows? But anyway, they did at least live to tell the tale. |
|
Exif information for each of the numbered shots shown throughout this chapter --1 - Sigma 24-105mm F4 DG OS HSM | Art, 1/400 Sec, f/11, ISO 320, Focal Length 24mm, taken on 29th Jul at 18:28 --3 - Canon EF24-105mm F4L IS USM, 1/250 Sec, f/16, ISO 160, Focal Length 24mm, taken on 30th Jul at 09:24 --4 - Canon EF16-35/2.8L USM, 1/50 Sec, f/16, ISO 100, Focal Length 16mm, taken on 6th Mar 10:29 --5 - Sigma 24-105mm F4 DG OS HSM | Art, 1/60 Sec, f/13, ISO 50, Focal Length 68mm, taken on 6th Mar at 11:26 --6 - Sigma 24-105mm F4 DG OS HSM | Art, 1/30 Sec (-/+ 2 stop bracket), f/16, ISO 50, Focal Length 24mm, taken on 6th Mar at 14:07 --7 - Sigma 24-105mm F4 DG OS HSM | Art, 1/10 Sec, f/11, ISO 50, Focal Length 105mm, taken on 6th Mar at 14:35 --8 - Sigma 24-105mm F4 DG OS HSM | Art, 1/2000 Sec, f/10, ISO 320, Focal Length 105mm, taken on 6th Mar at 13:45 --9 - Sigma 24-105mm F4 DG OS HSM | Art, 1/50 Sec, f/16, ISO 50, Focal Length 105mm, taken on 6th Mar at 13:20 |
|
If you have enjoyed reading these 'Extra' chapters to my Guide Book and think you might also enjoy reading 79 more chapters across 270 pages, that also includes more than 340 Fine Art quality images, along with detailed descriptions and large scale maps to guide you to the exact location of where I took each and every one of them and which then goes onto discuss the techniques and tools I used to process them, but where everything is written in plain easy to understand English? Then please consider buying the Book. |
|