
Falkirk - The Kelpies and the Falkirk Wheel |
What are the Kelpies? Well I suppose the best way I can describe them to you and what they were originally meant to represent to the people of Scotland, is to quote a couple of paragraphs directly from my own photographer's guide book, as I describe an unusual phenomenon that can sometimes be seen taking place, across a loch that my guide takes you to and which you can read about on page 74, route 3: "It is also worth keeping an eye out for a strange sight that can sometimes be seen taking place across this Loch, which if you are lucky enough to witness it, then you will wonder just what the heck is going on when you do. There are known to be many deep caverns and fissures in the bedrock below this sea loch, so after a very low tide and as the sea begins to return, large pockets of air become trapped beneath the loch. Then when the tide becomes high enough to force the weight of seawater back into the air locked caverns, the trapped air then rushes back out at high pressure and pushes up through the waters of the loch, to create a large and continuous fountain. But unfortunately this doesn’t seem to happen very often, as it must also need the right atmospheric conditions for it to take place. But when it does, it is a very strange sight to behold and is perhaps where the myth of the ‘Kelpie’ in ancient Scottish folklore came from. Which describes the Kelpie as a shape shifting demon, that rises up from the loch in the form of a huge white horse, that soon after rearing its head above the foaming waters, will then prey on anyone it can find near to the loch and drag them down with it into the darkness of the ‘Other world’, hidden deep beneath." It is also known to be true, due to historical evidence from the period, that such a fear of the Kelpies then began to take hold across the entire population of Scotland, that local healers and religious leaders, even began to offer up human sacrifices, in an attempt to appease these supposedly extremely malevolent "Water Gods". So even though the myth was probably created in all innocence in the ancient past by a worried parent, simply as a means to frighten their children away from playing too near to the edge of the loch and drowning, it none the less quickly took hold in the psyche of the entire population of Scotland and created a myth, that was so terrifying and enduring, that even now the Kelpies are still believed to exist by many and ready to burst out of the water and drag you down with them, into the inky blackness of the underworld below. |
|
 |
|
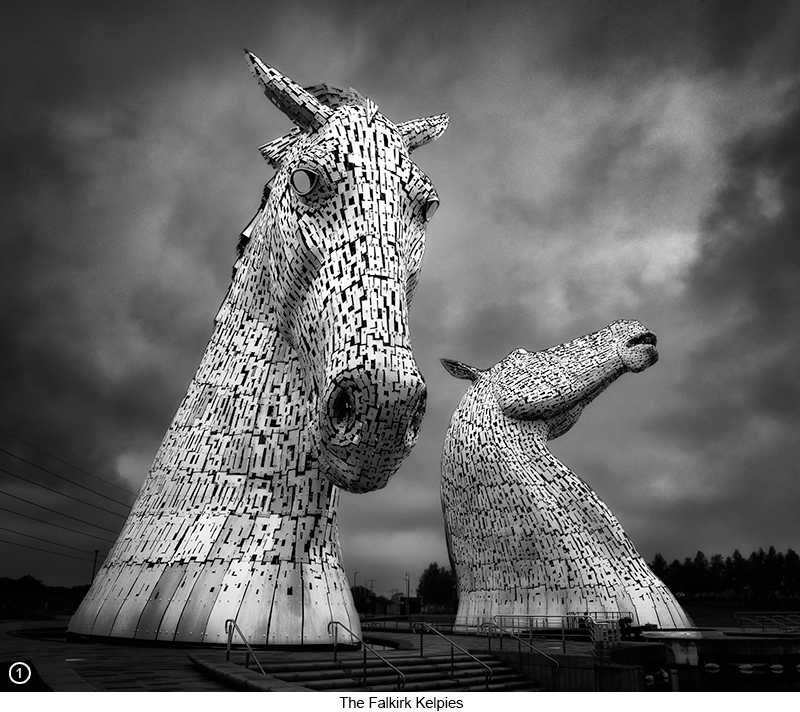
| Setting the scene: The Kelpies are two 90 foot high sculptures that depict ancient shape shifting water demons, which were then constructed alongside the new extension to the Forth and Clyde Canal, located between Falkirk and Grangemouth next to the River Carron. The sculptures (and engineering marvels, because this is what they are) were designed by Andrew Scott and were finally completed in October 2013, before then being opened to the public during April 2014. The sculptures form a gateway to the eastern entrance to the Forth and Clyde canal network and are also said to be an historical reference to the horse powered heritage of Scotland and were designed to show, two real life Scottish bred Clydesdale horses called Duke and Baron and who it is said, can still be seen regularly pulling a plough through a farmers field in Pollock. | |
 |
|
How to get there: Falkirk is a large and very busy industrialised Town, situated on the North East coast of Scotland and which can be reached by first getting onto the M9 from Glasgow and then continuing to head North - Map View. The Kelpies and the Falkirk Wheel are then signposted regularly throughout the Town of Falkirk, as the main part of the "Visitor Attractions" route guide, so it's just a simple matter of following these signs all the way to their respective car parks and which are situated only about 5 miles apart. So you really shouldn't be able to get lost when driving to either of these locations (famous last words eh?). Having now reached the Kelpies car park, you will see the monuments a couple of hundred yards off to your right, down at the other end of a restricted access road, which runs parallel to the higher built up bank side of the canal, so grab your gear and set off walking down towards the Kelpies. Now you do have to pay to use this part of the car parking area and you are also restricted to how long you can stay in it before it closes each day at dusk. So if you are a bit of a tight wad and wish to avoid paying the parking fees, which are used to help maintain these structures, or (and this is a totally legitimate excuse you can give yourself...) you wish to continue being able to photograph the Kelpies in the evening light and when they are then being lit by their internal multicoloured lights (which seems to be constantly rolling between several primary colours) and after the car park is closed, then you can actually park for free in a designated area at the side of the road and just before the main car park entrance barriers, which are then lowered at dusk to indicate that the car park is closed and thereby trapping any vehicles inside until the following morning. So having walked down towards the Kelpies, I first setup using my 70/200 near to the reception centre and cafe on your right, but this didn't seem to work as well as I hoped for, so I began to walk into the scene shooting as I went and then further on towards the monuments themselves, before heading to my left and then up the side of the canal to the top of the bank next to the lock gates, to take SHOT 2 of Duke as shown above left.
|
|
 |
|
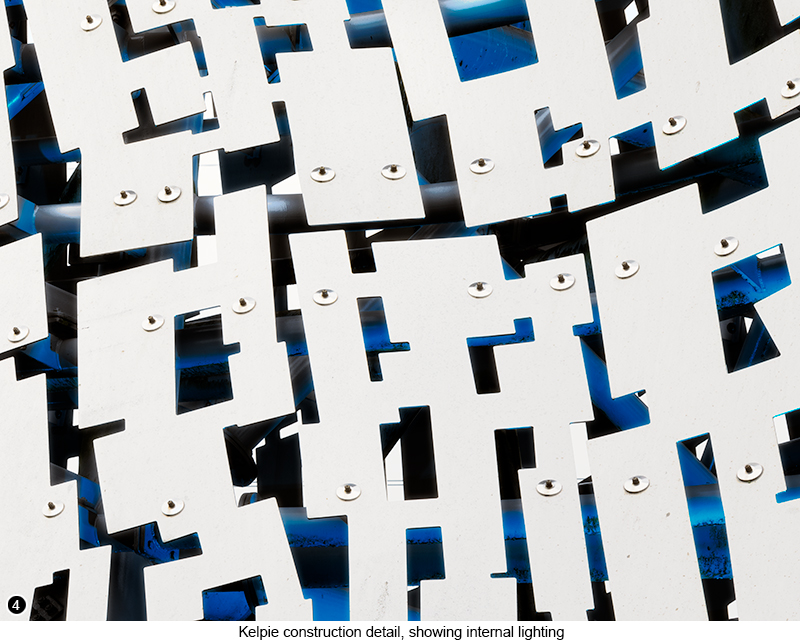
I then continued to work the scene with my 70/200, but as I was now so close to Duke, I couldn't really get all of him into the frame as much as I wanted to, so I threw on my 16/35 to allow me to get in much closer for some tighter compositions. But just before I began swapping lenses, I noticed that the internal coloured lights had now been switched on for both of the Kelpies, so I got in a little closer and then zoomed in with my 70/200 to grab a close-in abstract style of shot of Baron, to show you the inner working details, as shown directly above in SHOT 4. Yet now whenever I look at SHOT4 shown above, for some reason the Simpson's theme tune starts playing in my head, which is weird isn't it? I then switched lenses to my 16/35 and grabbed a second shot of Baron, to show you the delicate but repeating structure of his mane, as shown in SHOT 3. I then noticed that the light in the sky had really begun to fade quickly and the clouds were going black and also that I was getting very close to the time I would have to pack up and go, so that I wouldn't get locked into the car park. So with only around 10 minutes left for me to photograph, I started to take a few quick shots of them both using my 16/35, but where I was then pointing the lens up as much as I could, yet still keeping both of the Kelpies in the frame, but at the same time emphasising the wide angle distortion effect (keystoning), that I can create using this lens at 16mm and that is how I captured SHOT1 shown at the top of the page. Capturing your emotions within the shot: Now I do not know if what I am about to tell you, became a major influence for how I was shooting this scene or not, but when I look at my Kelpie shots now, taken across the limited amount of time I was actually there (only 1 hour from start to finish), then I hope you will agree with me that there is a definite and visible shift between what I will now call my 'Happy Shots' and my 'Foreboding Shot'. You see when I first arrived at the Kelpies, it was sunny and the other people I saw milling around the monuments, were mostly families with grandparents, kids and dogs etc,. The kids where eating ice cream and the dogs were running around fetching sticks and sniffing at various blades of grass. But then as the hour went on and I became totally absorbed in what I was doing (I had obviously dropped into the ZONE man..!), when I next looked up to glance at my watch and realised that I only had about 10 minutes left before my car became locked into the main car park, I also took a moment to look around me and all the families seemed to have faded away without me noticing, but at the same time they had been replaced with groups of youths dressed in dark clothing drinking from cans, as they passed around a highly perfumed hand rolled cigarette - if you know what I mean? With another group of skateboarders now also appearing on the scene from under the canal bridge and who I could see had lots of tattoos. And that is when I thought to myself, yes, it is time to move on and move on quickly, so I grabbed my last shot and which is shown in SHOT1 at the top of the page. Now I am sure they were all innocent youngsters just minding their own business and doing what all youngsters seem to do these days, but none the less the mood had changed for me in an instant, from bright and sunny with happy families and barking dogs, to dark and gloomy with gangs of youths that were all watching me, as I continued to wander around on my own, with my expensive lens on an expensive tripod and I think it was this sudden feeling of foreboding, that was directly influencing how I took this last shot, but which I have now used as the first image in this chapter, simply because it is my favourite from this shoot. So I suppose what I am trying to say here, is if you have read any of my writings before, then you will already know how I think you can boost your creativity, by trying to incorporate your emotional response to a scene, within the compositions you take of that scene and that the series of shots shown above, does indeed show you this effect and proves how what I was feeling had a very direct and influential effect, on everything I was creating. I also only used two of my lenses for both of the shooting locations described throughout this chapter, my ancient but still very much loved Canon 16/35 - f/2.8 and my equally much loved and almost as ancient Canon 70/200 - f/2.8 (see the Tip section at the bottom of this page). |
|
| The Falkirk Wheel | |
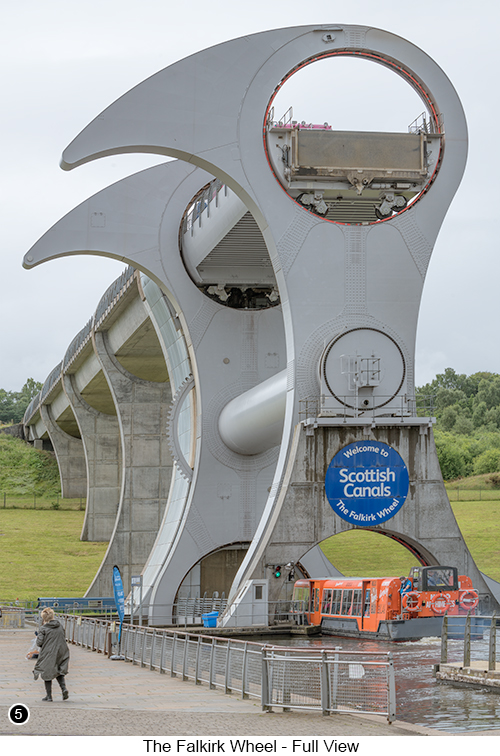 |
The Falkirk Wheel is an amazing modern miracle of engineering, that really is a pleasure to see working so effortlessly and silently and which applies modern day technology, science and engineering, to a very old mode of transport and method of commerce, namely the old industrial canal network from the early 19th century. The Falkirk Wheel was created to replace the original 11 lock stairway that used to connect the Forth and Clyde canal with the Union canal, being 115 feet above the Forth and Clyde canal, but which were both allowed to fall into serious disrepair back in the 1930's. This type of rotating wheel lock mechanism, was then seen as the only way that these two canals could ever be reconnected again, without major building work and the removal of several new housing estates and district drainage systems. So it was decided by the board of the British Waterways group, with the involvement of seven local authorities in the area, along with the Scottish Enterprise Network, the European Regional Development Fund and the Millennium Commission, to design and replace what remained of the 11 locks system at the end of each canal, with this modern wheel lock structure. The Morrison Bachy Soletanche Joint Venture design team, who were then tasked with coming up with a new and innovative design for the lock mechanism, originally came up with an idea that looked like a Ferris wheel with four hanging gondolas, which was seen as a "Good functional design", but that wasn't the showstopper that the board of the British Waterways group were looking for. So they went back to the drawing board until one of the designers had a eureka moment and came up with a design, based on a structure he had created using his 8-year-old daughter's Lego set. The design was then described as "incorporating the look of a double headed Celtic axe head", along with the shape of a moving propeller on a large ship and the ribcage of a whale and which the Royal Fine Art Commission for Scotland then went on to describe positively, "as a form of contemporary sculpture." The Falkirk Wheel mechanism works, by lifting boats (or is that barges?) between the upper and lower locks in one single rotational movement, through a self balancing water filled boat lift canal section, but which at the same time also minimises the amount of water being exchanged between the two canals. But it was soon realised that due to the changing loads within the structure, as the wheel rotates to lift and lower its cargo in alternate directions, that some sections would experience stress loads in different directions, each time the structure rotated under its own weight. So in order to avoid these constant pushing and pulling stresses, that the engineers knew would eventually lead to fractures and cracks, it was decided it would be both stronger and easier to maintain, if all the individually parts were bolted together, rather than welded. Which meant that by the time the wheel was finally completed, some 5 years after the initial construction began, over 14,000 bolts had been used to hold the wheel together and over 45,000 accurately placed bolt holes had been drilled. The Falkirk Wheel was then constructed at a total cost of a whopping £78 million, before finally being opened for use to the public on the 24th of May 2002 by Queen Elizabeth II, as part of the Millennium Link project and which still remains as the only rotating boat lift of its kind in the world - so well worth a visit with your camera I think.
|
|
Tip: if you are just starting out as a landscape photographer and you want to know what is the best kit to buy first, or even if you are a seasoned pro, who is getting tired of lugging all that heavy kit around everywhere you go and you would like to minimise your load, yet still maintain the biggest photographic bang for the buck? Then here is what I do to get around this problem.. In this chapter, I mention how I only used two lenses for both of the locations described throughout and here is the reason why: When I am photographing around the Isle of Skye where I live, I can happily put all of my camera gear and lenses etc., in the back of the car and then setup and select whichever combination I prefer to use for each shot. Now this works really well when I am working relatively close to home and close to the car, but if I am venturing further afield and especially if we are staying over for several nights, then lugging around a multitude of lenses and other expensive photographic equipment, as well as having to keep a beady on it at all times and never feeling comfortable or confident enough, to leave it alone in a hotel room or the back of the car unattended. So instead I will travel as light as I can and where I can then keep all of my kit with me at all times - and yes that does mean even if we go out for a meal, where I just shove it under the table - but with my tripod left hidden in the boot of my car - I mean there's only so much of your kit you can shove under a restaurant table, without starting to look like a complete and utter doofus isn't there?. So to achieve this, but at the same time continue to maximise the optical range of my travelling kit, I have come up with the following 2 lens combination - a 16/35 f/2.8 and a 70/200 f/2.8, but where I also bring along a 1.4x Mk II Canon converter (if you are not using Canon, then I am sure whatever kit you are using, the manufacturer will also have a 1.4x etc., converter). I can then use the converter with my 16/35 if ever I want a little more midrange reach, thereby making it into a 23/50 - f4.0. And if I wanted something between that and the 70mm end of my 70/200 such as 60mm for instance, then I can easily achieve this by cropping into the shot slightly, to give me an equivalent 60mm focal range image. I can also use the 1.4 converter on my 70/200 f/2.8 if I want to, so I can reach out further than its normal 200mm limit, thereby making it into 98/280 - f4.0. But what do I do if did want to go wider than the 16mm end of my two lens setup? Well I can always create a short stitched pano, with the camera set into the vertical or portrait orientation. Which will then allow me to easily capture a super wide angle scene using 16mm, which will give me a stitched image that looks as though I was using something as ridiculous as a rectilinear 6mm super wide angle lens, but without as many of the difficult to remove lateral distortion effects. OK that's all well and good I hear you say, but what do I do if I want to zoom out further than the 280mm limit of the 70/200 and 1.4 converter combination gives me? Well once again I can always crop into the shot just a little and without too much loss of data, to select out a 400mm equivalent frame from the sharpest centre portion of the shot and perhaps even a little further than that if I really wanted to. So by carrying only a 16/35, a 70/200 and a 1.4 converter, I can access pretty much any focal length that I like, from around 6mm or wider and all the way out to a 400mm equivalent, with just a little bit of cropping. Which with most modern high megapixel cameras, means instead of being able to print the file out at a size that would easily cover the gable end of my house, I might only be able to print it out at a size that would cover my entire living room wall. |
 |
|
|
So my advice to you is this, instead of spending a small fortune on buying all those interchangeable lenses and primes (which I admit, are still better than modern zoom lenses, but not by so much these days, other than to those anally retentive pixel peeper types, comparing your shot at 400% perhaps ) and then having to lug them all around with you wherever you go and constantly worry about them being stolen, or getting damaged. Then just buy a couple of good quality zoom lenses like those I have just described above, along with the best quality 1.4 converter you can afford, because for 99% of the time you are out shooting, this is all the kit you will ever need. |
|
--Exif information for each of the numbered shots shown throughout this chapter --1 - Canon EF16-35/2.8L IS USM, 0.7 Sec, f/11, ISO 100, Focal Length 19mm, taken on 4th Jul at 20:52 --3 - Canon EF16-35/2.8L IS USM, 0.7 Sec, f/11, ISO 100, Focal Length 16mm, taken on 4th Jul at 20:41 --4 - Canon EF70-200/2.8L IS USM, 1 Sec, f/16, ISO 100, Focal Length 148mm, taken on 4th Jul at 20:32 --5 - Canon EF70-200/2.8L IS USM, 1/160th Sec, f/11, ISO 100, Focal Length 73mm, taken on 5th Jul at 09:53 --7 - Canon EF16-35/2.8L IS USM, 1/200th Sec, f/16, ISO 250, Focal Length 16mm, taken on 5th Jul at 10:37 |
|
If you have enjoyed reading these 'Extra' chapters to my Guide Book and think you might also enjoy reading 79 more chapters across 270 pages, that also includes more than 340 Fine Art quality images, along with detailed descriptions and large scale maps to guide you to the exact location of where I took each and every one of them and which then goes onto discuss the techniques and tools I used to process them, but where everything is written in plain easy to understand English? Then please consider buying the Book. |
|
