Morar, Taigh and the Hogwart's Express |
 |
|
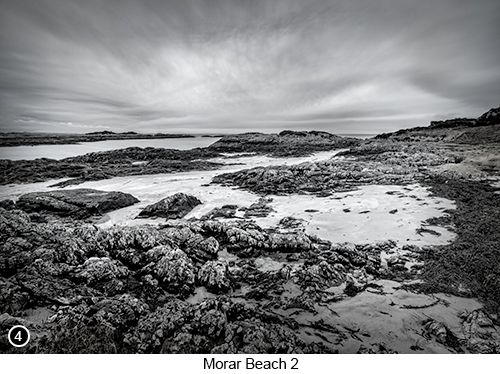
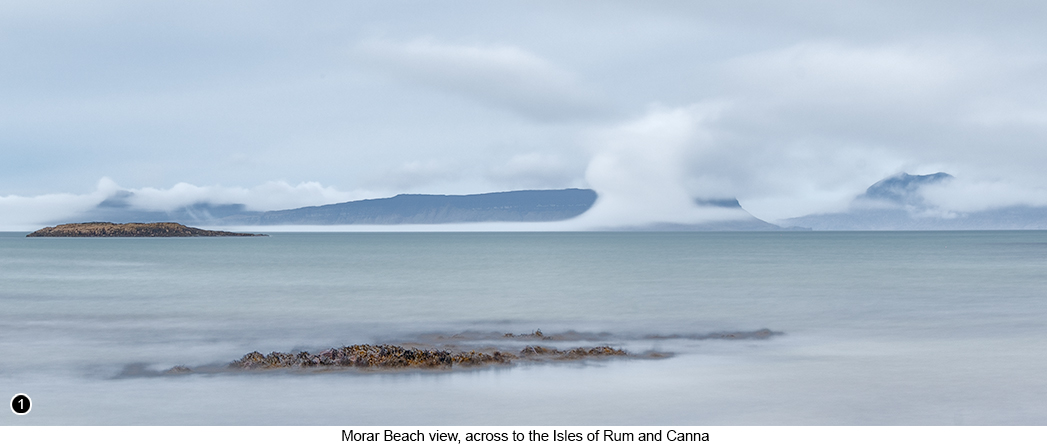
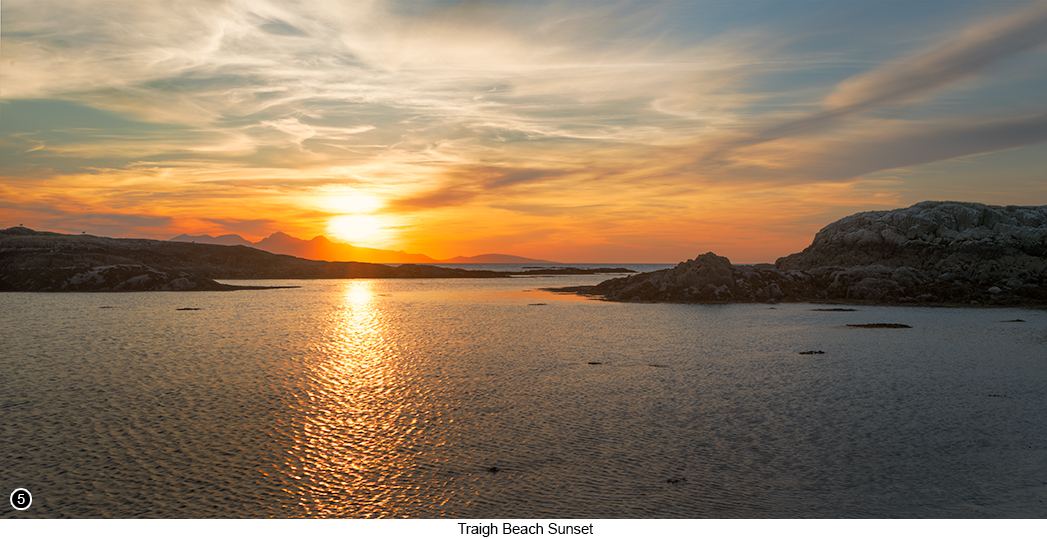
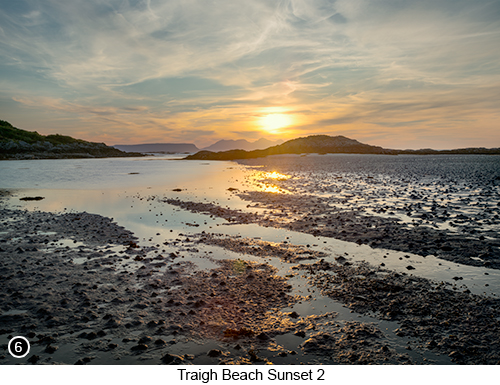
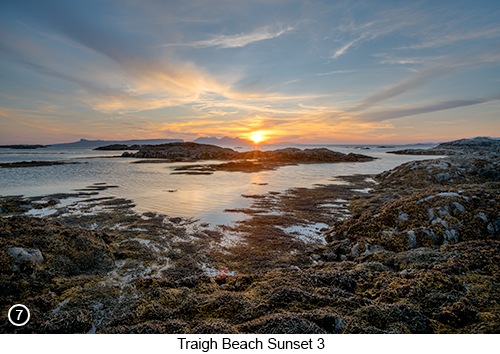
The Silver Sands of Morar and the beaches at Taigh and Camusdarach - The views all along this short but very impressive drive along the North West coastal region of Scotland are amazing, with sparkling clean silver sands, surrounded by a gin clear sea, with a string of islands (see above and below), cliffs and mountains in the distance, that form a wide and very photogenic background and all looking directly West, for the best chance of a jaw dropping sunset (see images 5, 6 and 7 below.) . Also most of the beaches and viewpoints along the Morar Peninsula, are easily accessible directly from the side of the road and with many other less visited beaches and bays, easily accessible after only a short hike. However, the fact that these beaches are so pristine and clean and also having now been voted the best beaches in the whole of the UK, means they have also become quite popular with campervanners, kayakers and swimmers etc. So if you do decide to visit this area outside of the tourist season (as I suggest you do), then these beaches will remain pretty much untouched and empty of visitors day after day. But in summer, they do get quite busy, but when I say busy, I mean there could be up to a dozen or so people with their kids and dogs etc., walking across them at any given time, unlike the hordes that you would see much further South. |
|
 |
|
Setting the Scene - But of course this being a remote area of Scotland, that even to this day has only a very small but widely dispersed population and that up until relatively recently, has never featured on any of the tourist maps (until the Harry Potter movies and the Hogwart's Express of course, but more on that later), then lot's of local legends and stories of evil sea monsters and mermaids etc, still persist, having been passed down verbally as 'Folklore' from generation to generation. The most notorious of which is "Morag", who is said to be a female sea monster of about 30 feet in length and who has been seen in this area and officially reported dozens of times over the last hundred years, as being a large shiny black animal that having been disturbed from the depths, has then risen up out of the loch, to stare down menacingly at the occupants of smaller vessels and fishing boats and with many of these sightings, coming from people both onboard and onshore, who all reported seeing the same creature at the same time. There is even a documented report of two local fishermen, who claimed to have accidentally run their boat into Morag as she rose from the depths, which prompted her to attack them and try to sink their vessel and how they managed to escape, by hitting her repeatedly around the head with their oars, until she swan away. There are even more documented sightings of Morag dating back to 1902, written by an Edinburgh University academic called Alexander Carmichael, who was a prolific collector of ancient Scottish folklore and scripts. But where these scripts contain many conflicting accounts of Morag and what type of creature she might be. From a beautiful mermaid with long flowing locks of golden hair, to the grim reaper and the bringer of death to anyone who sees her. Alexander Carmichael also wrote about Morag in the following way: “Like the other water deities, she is half-human half-fish. The lower portions of her body are in the form of a large salmon and the upper in the form of a woman with highly developed breasts, with long flowing yellow hair falling down her snow-white back." So my advice to you is this, if while you are scouting around this area looking for shots and you happen to catch sight of a scantily clad young lady, with long flowing hair, oversized chesticles and sat on a rock next to the sea and it all looks and feels a bit too fishy (oh dear!!) for your liking, then run - a - WAYYYY...! |
 |
|
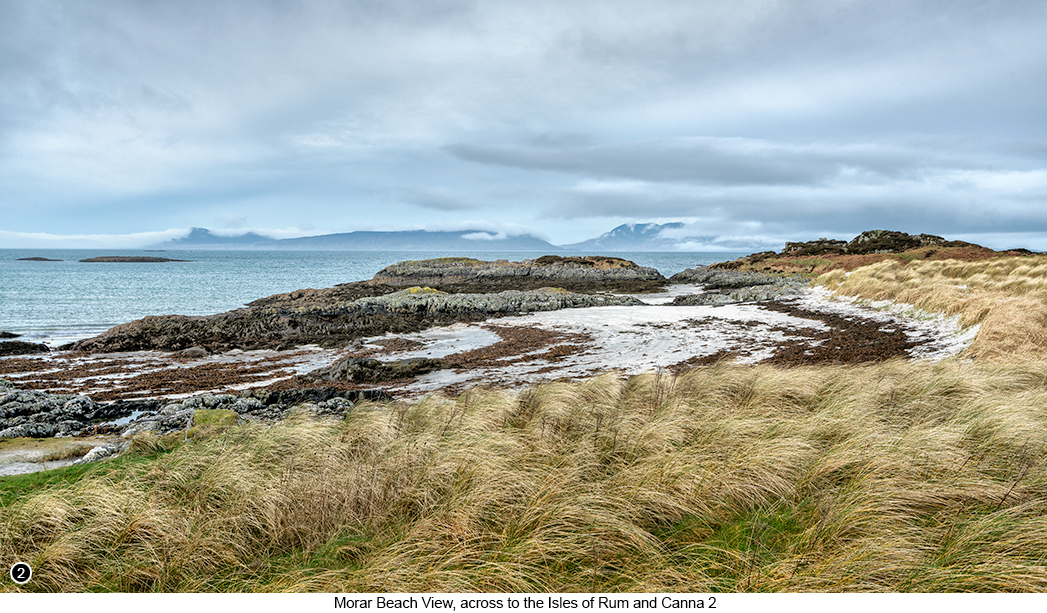
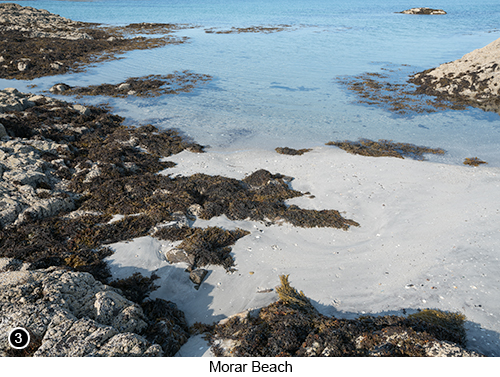
How to get there - from the Isle of Skye, you need to drive to the South West of the Island to the tiny village of Armadale Map View, Street View and the small ferry terminal (with a tiny but really good wooden hut Cafe - where I suggest you order a bacon butty and a cup of coffee - go on treat yourself, you are on holiday remember), that will take you back over to the mainland and the village of Mallaig Map View, Street View. Then having arrived at Mallaig, which has cafes, shops and a few other things to see and do, take the main A830 road South towards Fort William for about 4 miles, until you see a right hand turn signposted as the B8008 heading towards "Camusdarrach" (one and a quarter miles), as well as the Traigh Golf Course and Silver Sands and turn right here Map View, Street View. Now continue driving on down towards the coast, until only a few minutes later, you will arrive at the edge of the bay, on the road that now runs alongside the "Silver Sands of Morar, then Camusdarach Beach and Traigh Beach" for the next few miles, until you eventually reach a small muddy car park on your right, that is large enough to accommodate around 6 vehicles at a squeeze and park here - if the car park is full, then continue on a little further until you see lots of unofficial roadside parking spaces on your right Map View, Street View. I then walked down onto the beach and towards the sea as far as I could go, then up onto some slippery seaweed covered rocks for shot 3 as shown above. I then scouted around along the edge of the seaweed line, for the shot shown on the left. |
 |
|
Once you have taken (or Made, if you are one of those serious photographer types, who takes everything far too seriously) your shots of the Morar Beach area, if you now continue driving along the B8008 as it heads further down the coast and around to the next bay, you will then arrive at Taigh Beach and a small(ish) caravan park Map View, Street View. Park your vehicle wherever you can near here, then walk through the campsite as you follow the path to the beach, where I then setup and worked my way across the bay to the left, taking shots 5, 6 and 7, as shown above, right and below. Now the area of beach around the campsite, is always going to be covered in footprints and paw prints (unless you are really lucky), but if you continue walking around the bay to your left, you will find that not many people, kids or dogs, seem to venture around into this area of the bay. Which might be because the beach at low tide in this part of the bay (as shown on the right) becomes more like mud than sand and also has a strong sulphurous odour to it, which could be gases still escaping from beneath the bedrock from the last volcanic upheavals, that took place in this area several hundred million years ago, or it could just be the nature of this type of sand, which has lots of fragments of rotting vegetation mixed in with the mud. But either way, the further you walk along the bay to your left, the stronger the smell gets, although I must admit that after several minutes working in it and concentrating on my shots, I stopped noticing it. Tip: I think the best time to be here, is at a low or three quarter receding tide and about an hour before sunset, so you can then photograph all the way through to a sunset as the tide ebbs to its lowest point, but where you will then not have to worry about too many footprints in the sand nearest to the sea ruining your shots. |
 |
 |
All the three sunset shots shown above and left were exposure bracketed, so I could fully control all the light levels across the entire scene, which I know I could have tried to do by capturing the scene in a single shot using a grad, but even though I do always carry a 2 stop around with me, I find it is much easier to do this with a three shot bracket and then use what I am calling 'luminosity selections' (not masks) back on the computer. And the reason I do this, is because I know it will always give me far more control over the light levels throughout the scene, any scene, and allow me to easily blend them back into a seamless whole. Now it will not surprise you to say that I have covered my idea of 'luminosity selections' in great depth within my guide book, so if you really want to dig down into the nitty gritty of this technique and how you can use it for your own work, then you know what to do don't you? But in the meantime I will give you a brief outline of what 'luminosity selections' are and why they are so amazing and easy to use.. Firstly setup your shot in fully manual mode for a 3 shot bracket of plus and minus two stops and use a tripod and remote to make sure nothing changes or wobbles between shots - when I say manual mode, I mean everything including your white balance, which I always set to 'Daylight' for every shot. Then setup your focus point as usual for your point of interest of hyperfocal distance etc and fire off your 3 shots. Then back at the computer, load all three shots into a layer stack and make sure they are aligned correctly. Then drag the underexposed shot to the top of the layer stack and open your channels palette and then holding down your Control key or Command key on a Mac, right button click on the upper RGB channel just once. |
|
This means you will have now selected all the lightest (luminous) pixels from a medium tone up through to white in your underexposed shot, which in this instance was the sun and the brightest parts of the sky. Now with this luminosity selection still active, hold down your Control key (Command on Mac) and tap the letter J (Ctrl+J), then turn off your underexposed layer. You should now see that the sky is no longer blown out, but the shadows are still a little too dark. Next drag your overexposed shot to the top of the layer stack and once again hold down Control (or Command) and click on the RGB layer once again, but this time invert your selection with Ctrl+shift+I and once again hit Ctrl+J and then turn off your overexposed layer. You should now have much lighter shadows and darker regions throughout the shot. You can then adjust each layer's opacity levels to taste, before flattening the image. Now at this point you will probably be looking at the image and thinking it looks rather flat, but that is what we want, because now you can start to add contrast into the image in whatever way you want, until it looks perfect to you. You could also try mixing and matching each of these new 'luminosity selection' layers before flattening, by scrolling through the entire list of blend modes within your layers palette, just to see what the image looks like, as well as using opacities etc. I will stop there now, but I will finish by saying, that what I have just explained above, is only the tip of the iceberg of what you can do with 'luminosity selections' and how using a simple idea such as this, can totally transform your work and the quality of what you produce. So if you do want to find out more (and why wouldn't you?), then all you need to do is read my book, because in the 'Technique' section, I take on a really deep dive into how you can use these ideas to maximise the quality of your work for both luminosity and colour - so what are you waiting for???
|
 |
 |
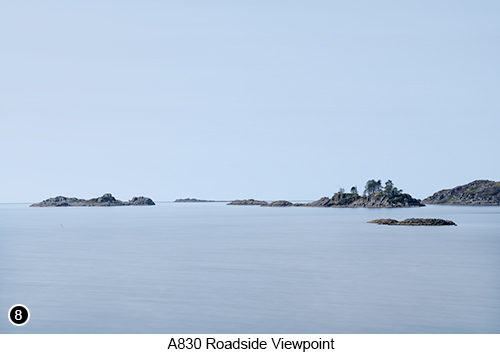
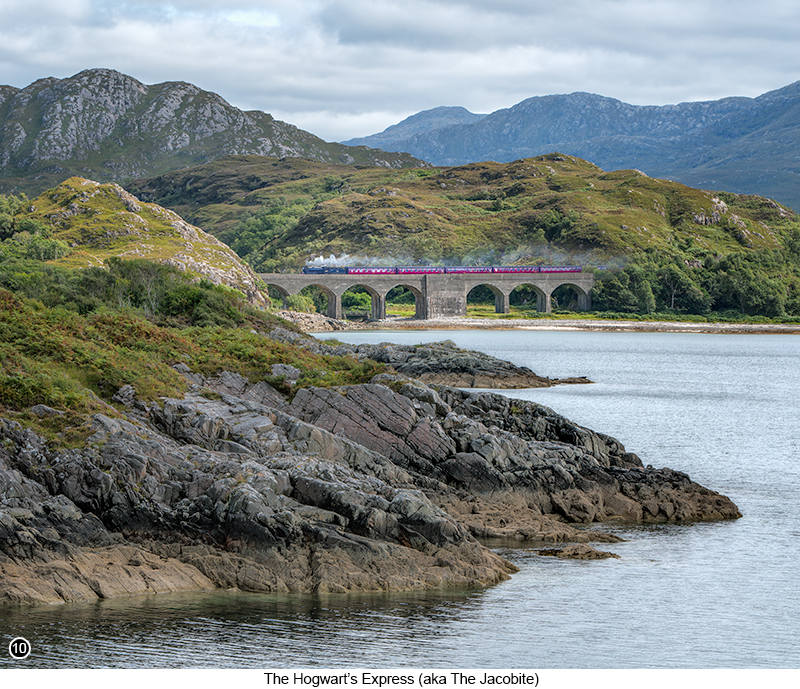
Then when you have finished working this area, get back onto A830 and continue driving inland for another 7 miles or so, until you reach a new section of road that arcs around to your right, with views out to a line of small islands (Skerry) across the other side of bay, as shown in the pictures above and to the left. You will need to drive a couple of hundred yards past the views shown above Map View, Street View and to the left and further down the A830 to large car park on your right Map View, Street View and where you can also setup to photograph the Hogwart's Express,when she passes over the arched bridge at the head of the glen, as shown below in image 10. But first and assuming the train is not due to arrive for a while, having now parked your vehicle, walk back up the road alongside a stone wall on your left, but keeping an eye out for any fast moving traffic coming at you from either direction and towards the line of new Armco barriers you should now see in the distance to your left. Once at the barriers, it is then simply a case of finding the best framing for your shots of the island skerry, over on the opposite side of the bay. I opted for a 30 second exposure for each shot, using my Hoya 10 stop screw in ND filter, because in the shot 8, there were no clouds in the sky yet (although I could see them coming), so I thought I would go for a more 'abstract' rendering of this view. But then a short while later, when the clouds did hove into view, I took a second and much wider shot of the scene, as shown on the left. So having finished at this viewpoint, walk back down to the car park and if you got your timings right, setup next to the gap in the trees nearest to the loch edge and the small sheer cliff that drops down into the sea and wait for the train to appear from your right. |
| How I took the Hogwart's Express Shot - For the Hogwart's Express shot (which is called the Jacobite, as the original locomotive is now housed in the film studio that made all the Harry Potter movies) you will need to use a lens with at range of least 200mm, as well as selecting a reasonably long depth of field, so you can get in close enough to see the detail and steam from the train, but at the same time capture the hills and mountains that surround it. You could go even longer with say a 400mm lens and I am sure that would also work, but for me when I was there, I chose to shoot it in a way that would show the train surrounded within its context. But hey isn't that what photography is all about, you doing what you want to do and me doing what I want to do and where everyone goes home at the end of the day with a big, satisfied grin on their faces? If you want to be here and setup ready to shoot this view of one of the most famous railways lines in the world, then you will have to be organised and prepared before the train arrives, so here is a link to the timetable website that will tell you exactly when the train is due to be travelling along this line. Now when I took this shot shown below, it was before the dreaded pandemic hit us, so the times of when I took it will have probably changed, because since Covid reared its ugly head, everything seems to have changed. So do not rely of the EXIF time stamp I am showing you below for this shot, because if you do you might be disappointed and miss it, but instead go to the link above and use that instead to work out your timings for being here. Tip: getting your shot of the Hogwart's Express - I am now assuming you are at this location and your camera is setup on a tripod and using a lens with a range of around 200mm, next select an f/stop of around f/8 or f/11 and set your focal point, to the bushes in front of the rocky point (which is being side lit here) at the upper middle left of the shot. Then frame the shot so you can catch the train as it travels into to the upper compositional third as shown below. You will also want to select an exposure time of at least 1/250th of a second to freeze the action and if the sky is quite bright, you should also underexpose your shot by at least one stop so you don't blow it out. Now if the light levels on the day you are here don't allow for this type of exposure and DoF mix, then simply bump up your ISO settings until it does. Then using a remote cable release, wait for the train to arrive and which you will know is about to happen, because it will start to blow its whistle before puffing its way onto the bridge, then as it starts to cross, begin firing away about every quarter of a second or so, until it leaves the bridge about 6 seconds later. Then back at the computer, just pick the one with the best compositional placement of the train. |
|
 |
|
--Exif information for each of the numbered shots shown throughout this chapter --1 - Canon EF16-35/2.8L USM, 30 Sec, f/16, ISO 50, Focal Length 35mm (cropped), taken on 21st Mar at 10:16 --3 - Canon EF16-35/2.8L USM, 1/30th Sec (+/- 2 stops), f/16, ISO 50, Focal Length 22mm, taken on 31st Aug at 08:57 --4 - Canon EF16-35/2.8L USM, 13 Sec, f/16, ISO 100, Focal Length 100mm, taken on 30th Aug at 11:05 --5 - Canon EF16-35/2.8L USM, 1/60th Sec (+/- 2 stops), f/11, ISO 100, Focal Length 35mm, taken on 30th Aug at 19:14 --6 - Canon EF16-35/2.8L USM, 1/40th Sec (+/- 2 stops), f/16, ISO 100, Focal Length 32mm, taken on 30th Aug at 19:03 --8 - Canon EF70-200/2.8L IS USM, 30 Sec, f/20, ISO 50, Focal Length 200mm, taken on 31st Aug at 11:54 --9 - Canon EF70-200/2.8L IS USM, 30 Sec (four shot vertical pano), f/20, ISO 50, Focal Length 70mm, taken on 31st Aug at 11:59 --10 - Canon EF70-200/2.8L IS USM, 1/320th Sec, f/9, ISO 100, Focal Length 200mm, taken on 31st Aug at 12:33 |
|
If you have enjoyed reading these 'Extra' chapters to my Guide Book and think you might also enjoy reading 79 more chapters across 270 pages, that also includes more than 340 Fine Art quality images, along with detailed descriptions and large scale maps to guide you to the exact location of where I took each and every one of them and which then goes onto discuss the techniques and tools I used to process them, but where everything is written in plain easy to understand English? Then please consider buying the Book. |
|