The Outer Hebrides (now called the Western Isles) from Top to Bottom - Part 1 of 3 The Isle of Harris |
A Brief Overview of the Outer Hebrides - The string of islands that used to be called the 'Outer Hebrides', or "Innse Gall" in the ancient Gaelic tongue that some long established families on the islands still prefer to speak, are thought to have become permanently inhabited and settled by man (and woman of course) around 8500 BC during the Mesolithic era and as soon after the last ice age as the changing climate would allow. The Outer hebrides are mainly low lying and absolutely covered in hundreds of lochs of varying sizes and shapes, as well as being dotted with castles and fortified ruins and many other much more ancient structures, such as the standing stones at Callanish on the Isle of Lewis, which is now thought could date back to the early Bronze Age some 6,000 years ago. Then there are the amazing pale almost white coloured sandy beaches, which you have to walk upon yourself to realise just how truly stunning they are. With mile after mile of amazing open flat sands, that arc off into the far distance and which always look as if no other human being has ever walked across them before. Remote, peaceful, stunning, ancient and pretty much totally untouched by the hand of man, in every direction you look and that seem to exude an eerie feeling of tranquility and peace and where even the passage of time itself has become an irrelevance. But be warned, because sailing across to the Outer Hebrides can (at least according to ancient Scottish folklore in this area) be a very dangerous thing to do and which has been described throughout the ages by the poetry and legends of the "Blue Men of the Minch" and which I will describe to you now - The stretch of sea between the Isle of Skye and the Outer Hebrides takes around 45 minutes to cross on a modern ferry and is called the "Little Minch", but is where it is said that a mythical tribe of creatures called the "Blue Men of the Minch" inhabit and who continually try to cause chaos and destruction to any passing vessels that they see, with their ability to summon up powerful storms and high seas at a moments notice. When the tide is at the turning and the wind is fast asleep,
|
||
A commemorative Stamp issued in 2009  |
Blue Man: Man of the black cap what do you say as your proud ship cleaves the brine? You: My speedy ship takes the shortest way and I'll follow you line by line. Blue Man: My men are eager, my men are ready to drag you below the waves. You: My ship is speedy, my ship is steady, so If it sank it would wreck your caves.
.. and where you can then get back to your wildlife watching and wondering which parts of the Outer Hebrides you intend to visit and photograph first, safe in the knowledge you are not about to disappear beneath a huge wall of water, that has suddenly risen up out of nowhere and is barrelling towards you at great speed.
| |
How to get there - At the Northern Eastern end of the Isle of Skye at the harbour township of Uig, you will find a large ferry terminal that offers regular sailings from the Inner Hebridean Island of Skye, Street View, Map View, to the Outer Hebridean Islands for both foot passengers and vehicles, with the ferry landing point at the small harbour village of Tarbet on the Isle of Harris, Street View, Map View. Harris is the Island that sort of sits in the middle of the Outer Hebridean archipelago and is a great place to start your photographic adventure around the rest of the Outer Hebridean islands. The 'Little Minch' is the local name given to the stretch of sea between the Isle of Skye and the Outer Hebrides and the 'Minch' is the name given to the adjacent stretch of sea between the mainland and the Outer Hebrides and which are both seamlessly joined together and indistinguishable from each other. Please Note, I would not advise that you just turn up on any of the Outer Hebridean Islands and expect to easily find accommodation, as there just aren't that many places to choose from and most of them, will probably have been pre-booked and already full. So if you do intend to go over to the Outer Hebridean Islands for a week (as I suggest you do, because that is how long you will need to fully explore the whole of the island chain), then you will need to pre-book all of your accommodation beforehand, or you may well end up having to spend several uncomfortable nights sleeping in your vehicle. So I will begin my directions for this chapter from the Skye toll free bridge and the A87, which is the road you will now be driving along when you cross over onto the Isle of Skye. You will then need to continue driving North West for 48 miles through Skye on the A87, to the small township and ferry port terminal of Uig. Then after boarding the ferry for a very pleasant 45 minute sea crossing over the 'Little Minch', you will then disembark onto the Isle of Harris at the tiny harbour village of Tarbet and immediately join the main A859 road as you drive out of the village. You should then turn immediately left, as you begin to head South for around 25 miles towards the beaches at Luskentyre, as shown below in image ONE. When you do reach Luskentyre on the A859, Street View, Map View, you will see a small unnamed road leading off to your right signposted for "Losgaintir" (Luskentyre) 2 miles further on, turn right here and continue along this unnamed road for another mile or so. |
||
 |
||
You should now reach a right hand bend in the road and the view as shown above in image ONE above, Street View, Map View. This is a stitched multi shot pano, with the camera set into vertical orientation, so that I can show you a really wide all encompassing view of the Luskentyre beach area at high tide and how beautifully clear the water is here always seems to be, as well as there being a complete lack of atmospheric haze all the way out to the horizon. |
||
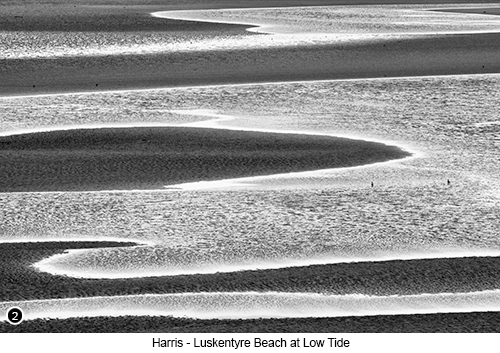
Then having shot the viewpoint shown above, if you carry on driving along this unnamed road for another mile or so, you will eventually come to a small parking area on your left, Street View, Map View and is where I setup to take this very abstract view of the Luskentyre Beach at low tide (but just as the sea was starting to flow back into the bay), as shown here in shot TWO on the right. I converted the image into black and white, simply to emphasise the apparent abstractness of the scene, as the colour of the water and the sand seemed to detract from the graphic elements in the shot. Although I must admit, I didn’t shoot this image with the intention of converting it into black and white, but when working on the file later, I soon realised that I must have composed it to be more of a ‘graphic’ style of image, rather than a ‘scenic’ style of image and so it would probably work better as a nice contrasty mono, that added to the graphical nature of the composition and this is the result. It is also worth driving right on to the end of this unnamed road at Luskentyre, to reach a parking area (with toilet facilities) surrounded by large undulating sand dunes and many hiking paths that lead off into the surrounding hills and where you can walk for miles and never meet another living soul. So having worked this area for a while and taking your shots of the many opportunities you will find here, if you now head back towards the main A859 road and turn right and follow the main road as it hugs alongside the opposite shoreline heading North. You will then arrive at another great view of the Luskentyre Beach area now below you on your right, Street View, Map View, but with a small sandy cove that you can access via a short but steep walk down to the beach, as shown below in shots THREE and FOUR. |
 |
|
|
|
||
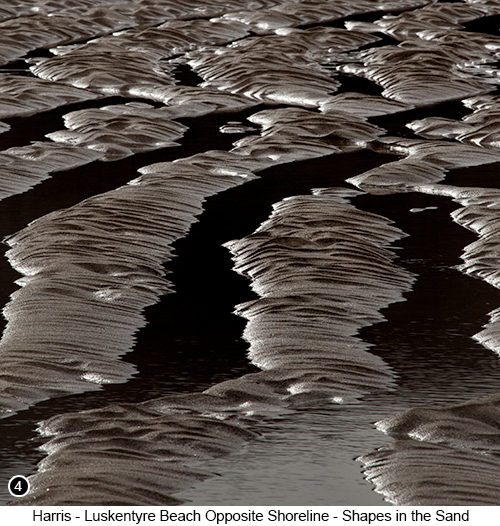 |
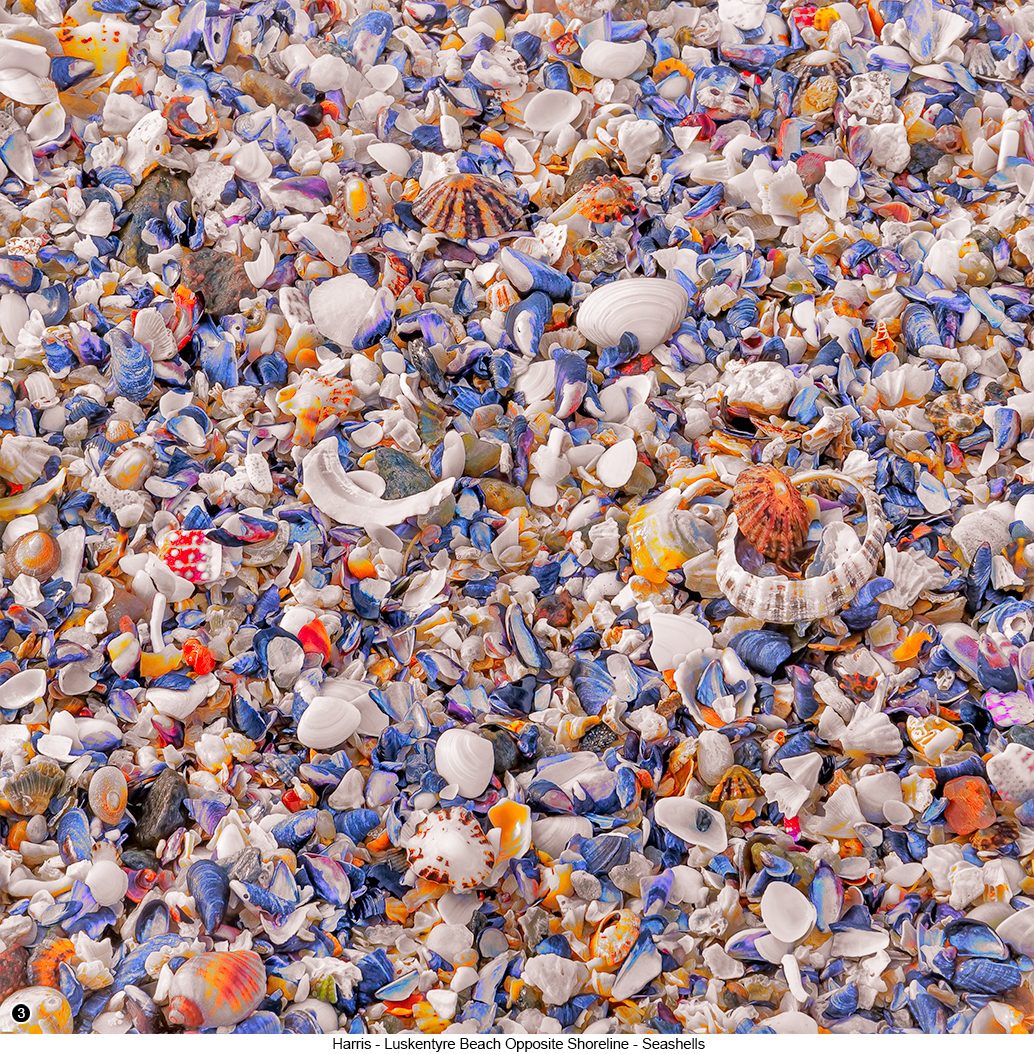
So having parked your vehicle, if you walk over to the low fence near to the back of where you are now parked, you will see the unofficial path down into the bay that has been created by everyone that has walked down here before you. So hop over the low fence (if it is still there, because there wasn't much of it left in tact when we there) and then head off down to the beach just a few yards below you. If you would like to take your versions of shots THREE and FOUR as shown here, then you need to be down on this small beach and photographing at the lowest point of the tide and preferably after there has been a storm out at sea the night before. Because even though this bay is quite small, the sea motion and currents here are obviously quite strong and will often create some very interesting shapes in the sands for you to photograph, as shown on the left. And, it must also be this same strong tidal motion, that can churn up the surrounding seabed and scoop up lots of broken, multicoloured seashells and then dump them into several neat little piles around the base of the rocks for us to photograph. So, if you are lucky enough to be here with your camera after a recent storm, then look around the base of the rocks nearest to the path where you came down into the bay and choose the one with the most shells next to it, so you can frame the shot to exclude any of the surrounding sand. This way you will give the viewer the feeling, that this bed of broken, multicoloured shells, must continue outside of your framing and off into infinity, which it doesn't obviously, but the viewer will probably feel satisfied (at a subconscious level at least) that it does. So if the best pile of shells that you can find is only quite small, then zoom right in until you completely fill the frame with the broken shells, but with as many of them showing in the frame as you can fit in, as you also try to exclude any of the surrounding sand. And if the piles of shells are quite large (the biggest being about two foot across when I was there), then pick the one you like most and zoom out as far as you can, but that still includes as many shells as you can before taking your shot, but again without any of the sand showing around the edges of your frame if possible. Now obviously depending on the size of the pile of broken shells you have chosen to work with, will also dictate whether you have to setup your shot through a series of focus stacked images. But as I say I was lucky and the pile of shells for me, was big enough to allow me to stand far enough back to get it all in one shot - which incidentally, is also how I took the sand abstract shot shown here on the left. | |
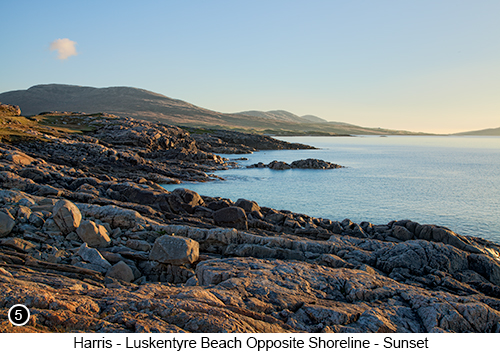
Then having taken your versions of shots THREE and FOUR, if you now go back to your vehicle and continue driving along the A859 for another couple of miles or so, you will soon come to the point where I took shot FIVE as the sun was setting over to my right, and as shown here on the right, Street View, Map View. However, when we were last here (back in 2014), there was no official parking area at this location, so assuming things are still the same, you will have to do as I did and find somewhere else to park safely and courteously nearby and then walk back to this point. But once at the location, walk over the small hill at the side of the road and then down onto the rocky foreshore area to set up your camera there, as you wait for the sun to set. And where the warm glow of the sidelight coming in from your right, will then begin to light up the faces of the scattered rocks and boulders, that seem to sweep off into the distance in front of you in the form of a very nice diminishing 'C' curve. Now if you are a seasoned landscape photographer, you will already know how just how good sidelight can be for your compositions and how it can help to define and pick out the shapes across the landscape in front of you. Now please forgive me, if it sounds like I am trying to teach your grandmother how to suck eggs here, but for those of you who haven't had the chance to build up your photographic experience to this level yet, then perhaps this idea of using sidelight to your advantage is totally new to you. So if you do not know this, then I would advise that you should always be on the look out for sidelight and try to shoot it whenever you see it, no matter what the subject is and especially if it is sunset sidelight, because the quality of light for landscape photography, really doesn't get much better than this. |
 |
|
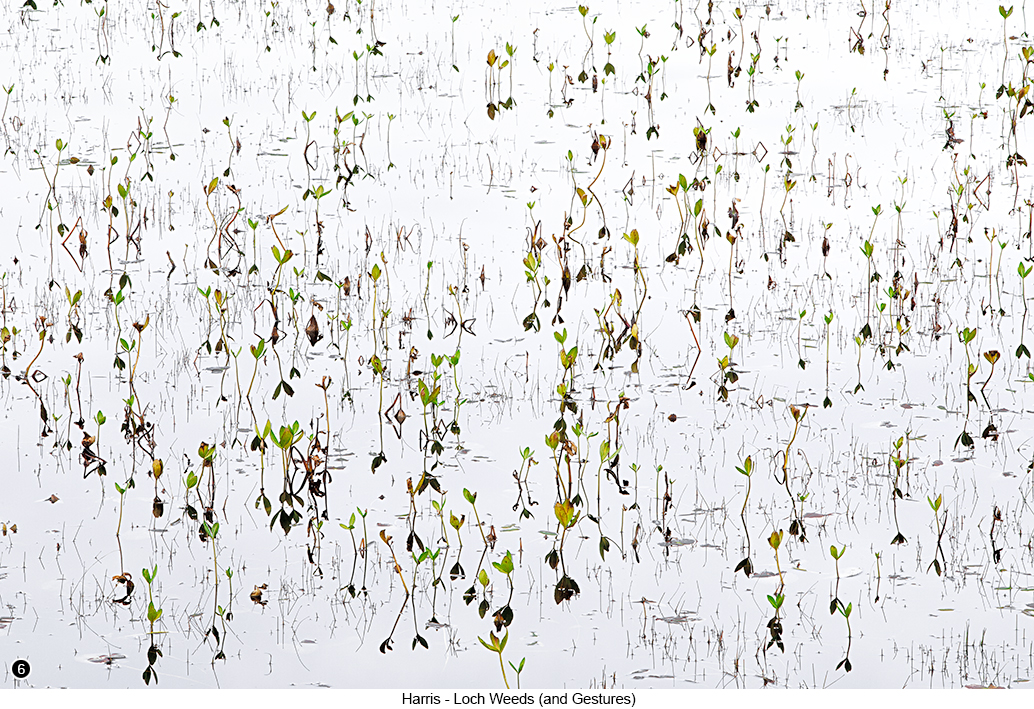
We then drove around the Isle of Harris looking at more of the scenery, the wildlife and of course looking for more photo opportunities, and where I began to notice that most of the smaller lochs (or 'Lochans' to give them their proper title if they are quite small), had these small but interesting weeds growing across them. So at the next lochan we came to that had an available parking area next to it, Street View, Map View, I decided I would to try to take a few shots of these weeds and their interesting reflections. I then started to work the scene from around the side of the lochan from various angles, as I tried to capture how these little weeds were beginning to remind me of what groups of people in a town square, or skating across a frozen loch, or an ice rink etc., might look like, if they were just standing around and chatting, or meeting, or dancing with each other. And how I could then use this idea of what humans would look like and their 'Gestures' and which in turn would make the image seem much more interesting and compelling to the viewer and which resulted in shot SIX shown below. Now if you do not know about using the idea of 'Gesture' in your photography, then l will let Jay Maisel himself describe it to you in this short video clip which I have linked to here, as he is the undisputed master of this idea and quite possibly its originator. TIP: So what can you see in the image below? Because if you agree that these weeds do have the appearance of what a crowd of people, who were standing around and communicating with each other would look like, then that is exactly what I was trying to capture at the time I was there and is what Jay is describing when he uses the term 'Gesture' and how our minds are always looking to identify human like attributes, within non human objects. You know what I mean don't you? Such as perhaps catching a glimpse out of the corner of your eye of a shadow on a wall, that looks a lot like a human face etc. So to wrap up my very short explanation of what 'Gesture' in photography is and how you can use it to enhance your images, let's say you have just come across a scene of a tree standing alone on a hill and to your mind, it could look a little like an old person bending over and trying to tie their shoelaces or something. Then try to emphasise that humanesque quality within your shot as much as possible, because you will then be capturing the 'Gesture' of the object and so whoever looks at your image of the tree/old person, will hopefully see it as well and enjoy recognising that element within it - now they might do this subconsciously without realising it, but they will see it and enjoy the image more, simply due to those subliminal human qualities you have captured within it. |
||
 |
||
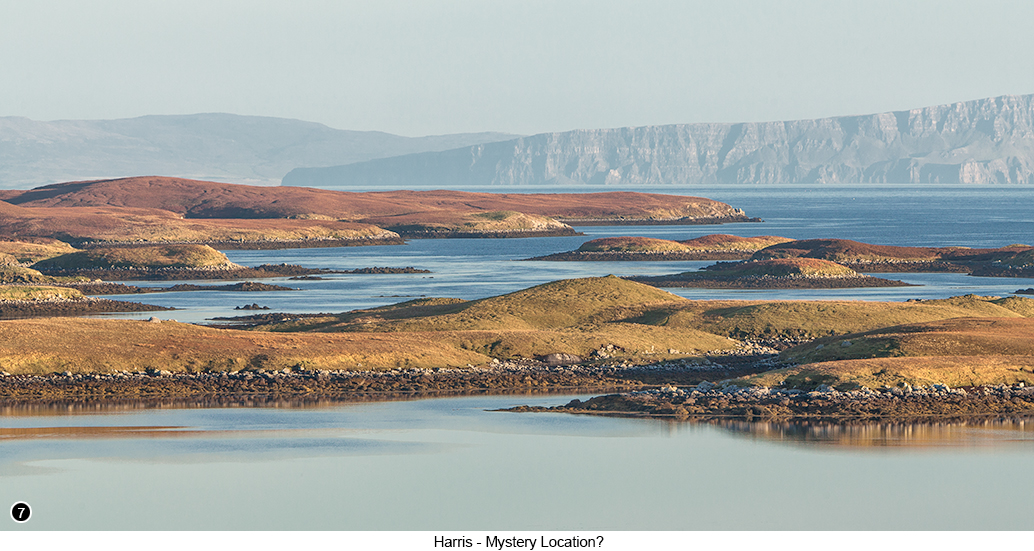
We then continued our explorations around the island and where I then came across this multi shot pano view, as shown below in shot SEVEN, but unfortunately I can't tell you where it is, because I am totally unable to remember where I was when I took it. And yes I have tried searching around the Isle of Harris for hours on Google Street View maps, but still I can't find it, so this location will have to remain a mystery to both of us, at least for now. Although I do suspect that the cliffs that increase in size towards the upper right hand side of the image, are quite probably located on the Northern end of the Isle of Skye. So as Skye is immediately to the East of Harris, then I must have taken this shot on the East coast of Harris looking across the Little Minch towards Skye. But even though I know this, I still can't find it using Google Maps, so I can only imagine this is due to me using a 70/200 zoom with a 1.4x extender to shoot my version of this scene, whereas the people at Google used an extremely wide angle lens to shoot there's. |
||
|
||
--Exif information for each of the numbered shots shown throughout this chapter --1 - Canon EF24-105 f/4.0L IS USM, 1/60th Sec, f/16, ISO 100, Focal Length 50mm (6 shot vertical pano), taken on 19th Oct at 12:36 --3 - Canon EF70-200/2.8L IS USM, 1/100th Sec, f/32, ISO 400, Focal Length 200mm, taken on 16th Oct at 17:35 --4 - Canon EF100-400 f/4.5 - 5.6.0L IS USM, 1/150th Sec, f/32, ISO 100, Focal Length 400mm, taken on 17th Oct at 12:09 --5 - Canon EF24-105 f/4.0L USM, 1/6th Sec, f/16, ISO 100, Focal Length 35mm, taken on 14th Oct at 17:38 --6 - Canon EF70-200/2.8L IS USM, 1/2 Sec, f/32, ISO 100, Focal Length 200mm, taken on 15th Oct at 15:19 --7 - Canon EF70-200/2.8L IS USM + 1.4x extender, 1/120th Sec, f/11, ISO 100, Focal Length 280mm (5 shot vertical pano), taken on 21st Oct at 17:07 |
||
If you have enjoyed reading these 'Extra' chapters to my Guide Book and think you might also enjoy reading 79 more chapters across 270 pages, that also includes more than 340 Fine Art quality images, along with detailed descriptions and large scale maps to guide you to the exact location of where I took each and every one of them and which then goes onto discuss the techniques and tools I used to process them, but where everything is written in plain easy to understand English? Then please consider buying the Book. |
|