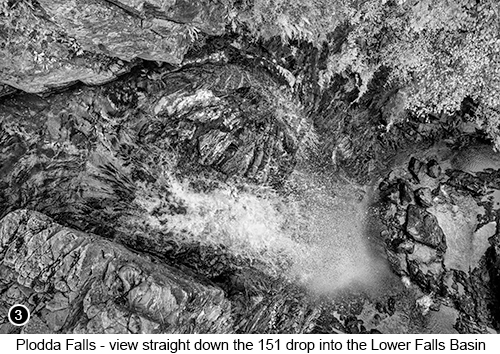
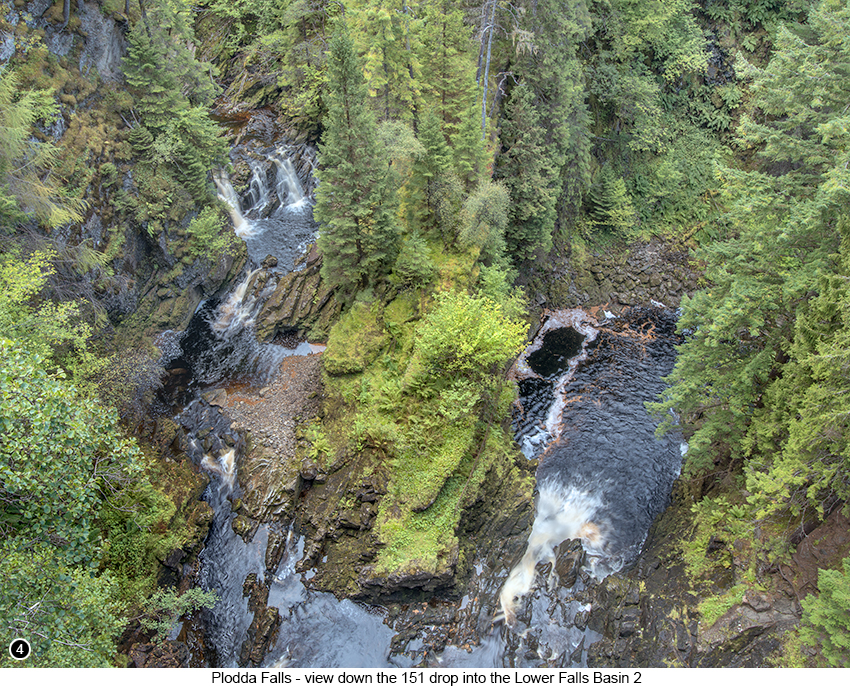
Plodda Falls The upper Plodda Falls cascade area, followed by a breathtaking view out across the Lower Falls basin, 151 foot below |
 |
There is a gruesome story associated with this area of Scotland and the forest around Plodda Falls, but this time unlike previous chapters in these on-line guides I am continuing to write, it isn't a legend, or a scary tale about sea monsters, or ghost dogs, or beautiful female vampires etc., that have been passed down through the ages, no, because this time, it is all completely true and perhaps what is even more terrifying, is to hear about was happening in these woods, only a few short decades ago and it's the story of the "Monster Butler". The Monster Butler (or Killer Butler, as he also later became known in the press) was a man called Archibald Hall, who suddenly in the early 1970's and at the age of 53, took the next step in his criminal career and progressed, from being a small time petty thief and burglar, into a prolific five times serial killer over a two year period, before he was finally caught by the police and given a full life sentence for what he had done. Hall came to a life changing decision, as he was serving yet another jail term for burglary and petty theft, that he really ought to try and do a little bit better for himself and get out of this rut of being sent back repeatedly to jail for minor offences, and the answer he came up with, was to try and totally change his outlook on life and land a job working for a rich, land owning family as a butler. So he began to take elocution lessons in prison, in an attempt to remove as much of his strong Glaswegian accent as possible and to cultivate an air of upper class sophistication, which to the satisfaction of the governor, he was quite successfully able to do before his release. And the reason I am telling you this?? Well it is simply because Hall murdered and then buried several of his helpless, elderly victims and others, in the woods near to Plodda Falls. |
Archibald began his killing spree, by shooting his first victim (a fellow ex con) at point blank range with a double barrel shotgun, for trying to blackmail him and give away his previous criminal history, to the family he was now butler to. He then with the help of the female housekeeper to the estate, who he had sweet talked into helping him. Drugged, gagged and tied up the two elderly people he was working for and then drove them in the boot of their own car, for well over 500 miles from the South of England, all the way up to this remote area of Scotland, before beating them to death with the shovel he then used to bury them with. His female assistant, who it seems was now a willing accomplice in these monstrous acts, then made the fatal mistake of wearing and flaunting, a very expensive fur coat, that she had stolen from the lady of the estate after Archibald killed her and which Archibald knew would give the game away. So he lured her into a meeting, under the pretext that he was now working for another rich family, that would provide ripe pickings for their next act of violence and theft, but with a request for her to come along wearing the fur coat, so he could see just how good she looked in it. He then battered her over the head with an iron poker, that he had expressly brought along for this purpose, before once again stuffing yet another lifeless corpse into the boot of a stolen car, then driving all the way up to this remote area of Scotland to bury it. Archibald's final victim in his short but active killing spree, was dispatched by using a chloroform filled handkerchief, held over his victims mouth until he collapsed, before he then drowned him in a bath full of cold water and who's corpse he was later caught with red handed, as he was once again driving up to Scotland with the body of his lifeless victim stuffed into the boot of the car, in an attempt to get to these remote woods, so he could bury the corpse where he thought no one would find it. |
 |
|
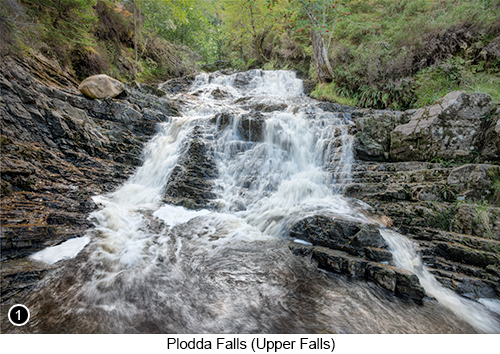
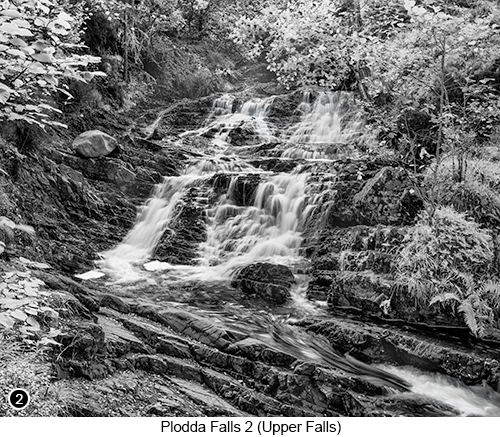
How to get there - From Inverness to the Plodda Falls car park at Cannich near to Beauly, is around 35 mile drive. So if you are starting from the centre of Inverness, head North through the City towards Fort William and then into the countryside as you follow the A82, until you reach the small town of Drumnadrochit. Continue North through Drumnadrochit to the Northern end of the town, until you see a turn off for the A831 to your right at a left hand bend and take the A831. Street view, Map View. Now carry on driving until you reach another junction on your left, signposted for the village of Tomich 1 1/2 miles ahead and take this road Street View, Map View. You will now find yourself driving along an unnamed but well maintained gravel covered track, with the river meandering through the glen to your right, until a few miles further on, you will finally reach a large official car park at the end of the track, Street View, Map View. The track does carry on a little further over the other side of the river, but this is where you want to be, so find a place to park and then set off down the track to your front left, as it follows the river into the woods. Now continue walking down the hill into the woods for a few hundred yards or so, until you come to the view of the upper falls cascade area, as shown in images 1 and 2 above. This viewpoint (and all the others in this chapter) look much better after several days of heavy rain. So if you are able to choose when you visit these falls, then try to do so after a storm, but when it has stopped raining (obviously!). You will find there is a short path down to the side of the falls and is where I setup for shots 1 and 2, shown at the top of this page. |
 |
|
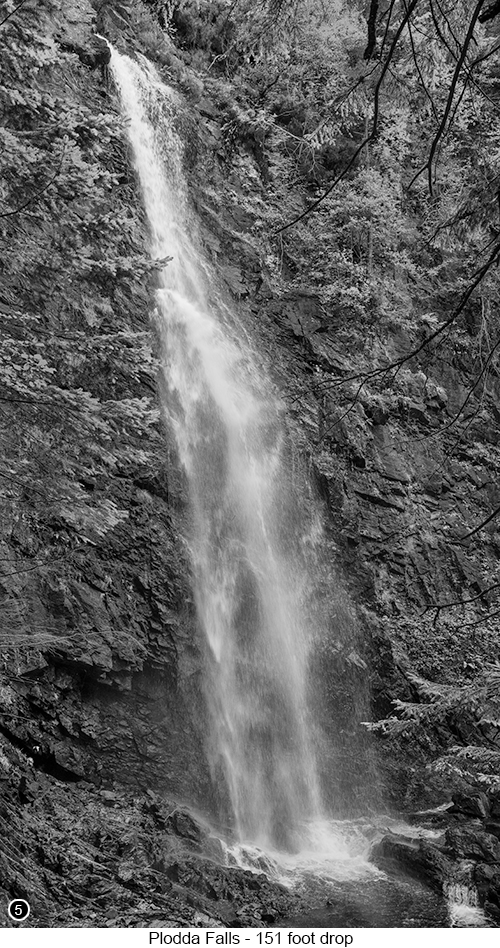
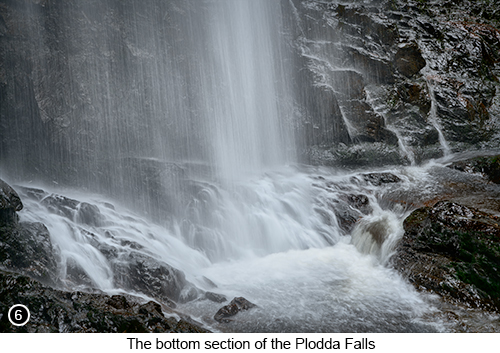
Then after shooting the cascades area, if you get back onto the path behind you and head further along the path to your left (we will be taking the path down the lower falls after shooting this next viewpoint), you will soon come to a long thin wooden viewing platform, that takes you out to a stunning view directly over the falls and the basin below, as shown in images 3 and 4 above. Now if you enjoy a white knuckle ride and want to set your heart racing, then as you walk out onto the viewing platform, for the last 5 yards or so, close your eyes and reach out for the wooden barrier in front of you, then as you reach the barrier, grip tightly onto it, but then lean out slightly over it and open your eyes, as you look straight down at the view of the falls below you. Yes, quite a rush isn't it and one that will make your toes curl, especially if you do not have a very good head for heights, as my dear wife doesn't. To get the shot shown in image 3, I setup my camera into autofocus mode and then focused on a leaf sticking out about a third of the way down the falls. I then turned off autofocus and held out my camera at arms length, but pointing straight down. I then took a series of shots that I hoped would excluded the edge of the wooden platform I was standing on. I then kept reviewing my shots on screen, until I finally got a shot of the falls, that looked as if I could have been suspended in midair when I took it. I then used a similar idea, but using my tripod and a much wider angle of view to show you the whole of the lower basin and took shot 4, as shown above. So moving on, you are now going to take the path down the hill to the bottom of the falls, which is quite steep in places, but does have steps and so is easy to negotiate, but does take quite a bit of heavy breathing to get back up to the car park, especially if you are carrying lots of camera gear with you as I was. I then kept walking down the path, until I reached a viewpoint that sort of branches of slightly to the left of the main path, but that has a good view of the entire drop of the falls, but that is blocked off by a wooden fence, that has been placed there to stop you from getting too close to the edge of the gorge to your front right. Now us landscape photographers, always seem to want to get that little bit further into the scene, than the people who install these types of safety fences want us to and if you lean over the fence, you will see where the earth has been flattened by lots of other photographers, who have walked across it and so it is quite well worn as a result. So as I do not want the liability of suggesting you do the same, or your family trying to sue me after you have fallen over the edge and disappeared to be never seen again, then my advice to you is DO NOT EVEN THINK OF CROSSING OVER THE BARRIER to get closer into the shot, as it is not safe to do so. However, me being one of those photographers, who thinks that signs and barriers are extremely good advice for everyone else to abide by, meant that I did indeed step over the barrier to take my shot of the falls, as shown here in shot 5 on the right. And the reason I felt the need to do this? Is because the only way I could shoot the entire drop of the falls, without there being tree branches sticking into the side of it from the left, was to move myself a little further into the scene, so I could frame out most of the tree and the sky above. I then took the shot in the vertical orientation, but with the intention of cropping it into the even thinner vertical, shown on the right, so as to emphasise the length of the drop. I also converted the image into black and white, as the green of the needles on the trees branches, were still sticking in slightly to either side of the shot, and that I knew by removing the green colour, would camouflage the green needles of the leaves against the similarly toned rock face in the background and make them almost disappear, which it did. I then zoomed in with my 70/200, so I could isolate the bottom of the falls and show you a more intimate, detail shot of the bottom of the falls. Also with the light levels at the bottom of the falls being quite low and in shadow, it allowed me to increase the shutter duration (which is now being referred to as 'Dragging the Shutter', in the photographic community) sufficiently, to enable me to show you the water moving and splashing on the rocks as it fell, as shown in shot 6 directly below. |
 |
 |
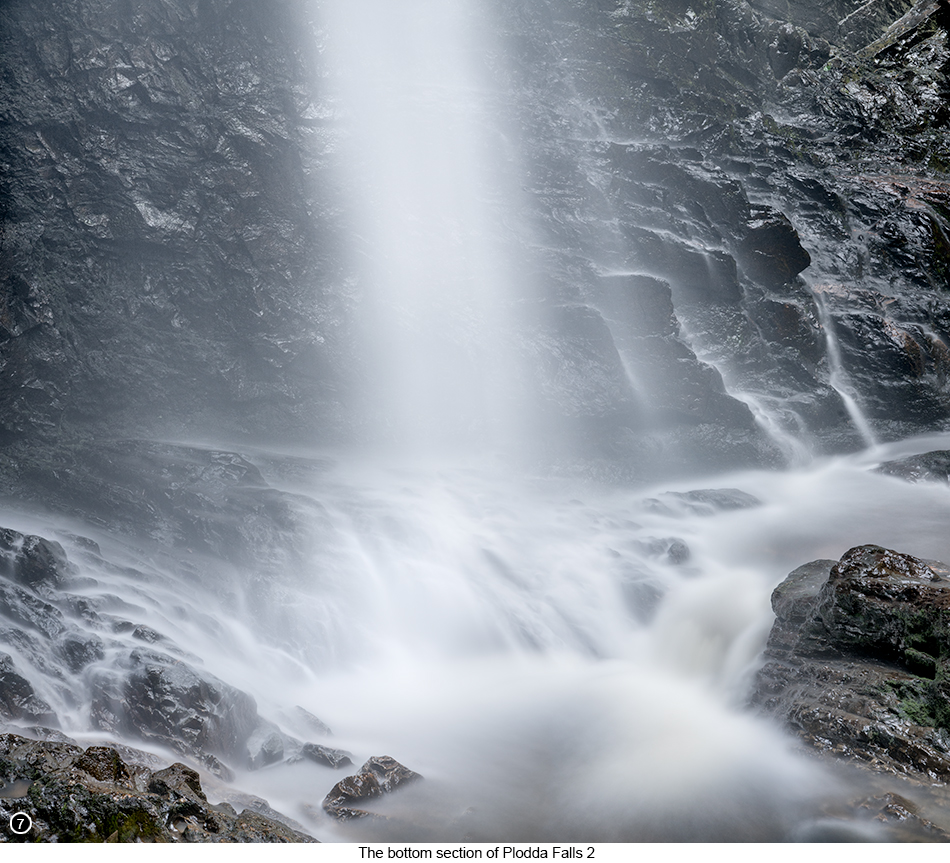
So now having taken the falls in a way that showed you the drop and how the water was moving when it hit the bottom, I decided to get all 'arts fartsy' and throw on my 10 stop screw-in ND filter and go for a much more ethereal look with a really long exposure, as shown in the shot 7 below. Now I am not normally one of those photographers, who likes to shoot moving water using really long shutter speeds, to make the water look like detailess cottonwool. But there are occasions (and especially when trying my damndest to be 'artsy fartsy' it seems), when a very long shutter speed, can be a really good option to go for and I obviously must have felt at the time I was there, that this was indeed one of those occasions. Tip: as a general rule when shooting moving water, such as waterfalls, rivers and crashing waves etc., I will always try to set up my camera for a 1/10th of a second exposure time. As this can really capture the movement and detail very well, but yet with areas in the water (like droplets), that still look tack sharp. Then if I want a much more 'painterly' look, where the water movement looks more like wet brush strokes on a canvas, then I will try to achieve an exposure time of 1/5th of a second. Then if I want to go full-on artsy, I will try for anything up to 30 seconds and even beyond. Now all these figures I have just thrown at you above, are not written in stone, so you might want to tweak them slightly up or down to suit your own tastes. But from my experience, these exact timings do seem to work perfectly for me, each and every time that I use them. So perhaps think of them more as a starting point, from where you can begin to experiment, to find your own preferred long exposure timings. |
|
|
--Exif information for each of the numbered shots shown throughout this chapter --1 - Canon EF16-35/2.8L USM, 1/20th Sec, f/16, ISO 100, Focal Length 16mm, taken on 23rd Sep at 12:40 --3 - Canon EF16-35/2.8L USM, 1/160th Sec, f/16, ISO 320, Focal Length 35mm, taken on 14th Jun at 12:06 --4 - Canon EF16-35/2.8L USM, 1/3 Sec, f/16, ISO 100, Focal Length 27mm, taken on 23rd Sep at 13:11 --5 - Canon EF24-105/4.0L USM, 1/10th Sec (+/- 2 stops), f/11, ISO 100, Focal Length 28mm, taken on 23rd Sep at 13:32 --6 - Canon EF70-200/2.8L IS USM, 1/10th Sec, f/11, ISO 50, Focal Length 150mm, taken on 14th Jun at 12:38 --7 - Canon EF70-200/2.8L IS USM, 30 Sec (three shot vertical pano, with 10 stop screw-in ND filter), f/13, ISO 250, Focal Length 200mm, taken on 14th Jun at 12:46 |
|
If you have enjoyed reading these 'Extra' chapters to my Guide Book and think you might also enjoy reading 79 more chapters across 270 pages, that also includes more than 340 Fine Art quality images, along with detailed descriptions and large scale maps to guide you to the exact location of where I took each and every one of them and which then goes onto discuss the techniques and tools I used to process them, but where everything is written in plain easy to understand English? Then please consider buying the Book. |
|