
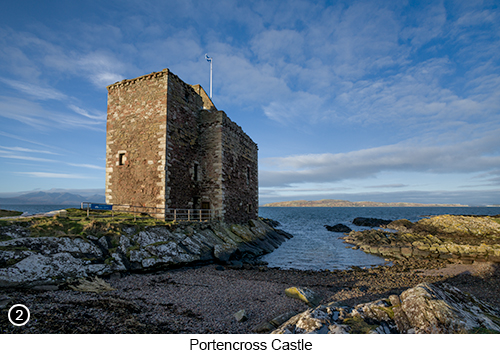
Portencross Castle |
It is said that, whenever an ancient king of Scotland passed away, his body would be brought by boat to Portencross castle, to be laid there in state for several days, to allow people to pay their last respects. Before completing his final voyage, over to the holy island of Iona. Where he would then be laid to rest, alongside the many other kings of Scotland who are buried there. Which is a tradition, that is believed to date back to the 5th century and when Christianity first arrived in Scotland. Portencross Castle, sits next to the sea on the West coast of Scotland, about two miles North West of the town of West Kilbride, in the tiny village of Portencross. But not only is this a fantastic, historical location to take photographs, of a 750 year old Castle next to the sea, it is also a West facing viewpoint, so is really good for sunsets.
|
||
 |
||
Setting the scene: It is known that this site, has had several different types of fortification and defensive "Tower Houses" built upon it. But where this small, but once heavily armed castle you see here today, is believed to have been built in the mid 14th century. Portencross castle was originally known as "Ardneil Castle", due to the fact that it sits on the edge of the Ardneil Bay and was originally under the control of the de Ross Clan, for over 200 years. Who built the castle at this strategic point right next to the sea and then armed it with several large cannons (one of which can still be seen lying next to the castle entrance), so they could extend their control, over anyone trying to sail through the Ardneil Bay waters without their permission. |
||
Then after the Battle of Bannockburn of 1314, the newly declared King of Scotland Robert the Bruce, gifted the entire Ardneil estate, to Sir Robert Boyd of Kilmarnock, as a reward for his support during the successful uprising. The castle then remained in constant use, until a great storm swept through the area in 1739. Which not only removed the roof, but also destroyed parts of the upper rampart section of the castle. The castle was then deemed by the occupants, as being unfit to live in and who then moved out and left it to fall into ruin. The slow, crumbling decay of the old castle, then continued for the next 250 years. Until in 1995, when the remaining structure, was finally declared a significant ancient Scottish monument. Remedial work then began to stop the collapse of the castle and repair it to a point, where it once again became structurally secure. How to get there: Click HERE for Googles suggested route, from the centre of the City of Glasgow to Portencross Castle. The drive to Portencross Castle from Glasgow, will take you around an hour to complete. By first driving North West on the M8 out of the centre of Glasgow, then South West on the A78, heading towards the seaside town of West Kilbride and then finally onto the village of Portencross. So I will assume you have now left Glasgow and are driving West on the A78. |
 |
|
Continue driving on the A78, until you arrive at a junction to the B7048 single track road on your left, signposted for the village of Portencross and take this left hand turn, Street View, Map View. Then continue driving down the single track Portencross Road for a couple of miles, with fantastic views out to several low lying islands, across the other side of Ardneil Bay on your left. Keep going down this very narrow road, until you finally reach the Portencross Castle car park on your left, Street View, Map View. |
||
|
Now drive into the car park and park wherever you can. Then grab your kit (wide angle lens and medium zoom) and walk out of the car park to your left towards the houses and then continue walking along the Portencross road for a couple of hundred yards. The road then dog-legs sharply to the left and then to the right. After which, you will then see a graveled side road heading towards the castle on your left. Walk up the graveled track to the castle, which you will now see directly in front of you. You will then see the castle information notice board (as shown below), at the end of this short track, Street View, Map View. Click on the info board thumbnail below, to load a larger version onto your screen.
|
|
How I shot the Castle: All of the images of Portencross Castle that you see here, were shot using a variety of wide angle views, as there just isn't that much room for you to work with otherwise. So you are definitely going to want to have, your wide angled lens mounted on the camera for this shoot. To allow you to get a wide enough view of the castle, but that will also exclude all of the nearby houses, that are sat in a line directly behind your back. Which basically means, you don't really have any other choice, but to go wide and shoot close in to the castle, to allow you to capture the full width of the scene. But without any of these modern day structures, creeping into the edges of your frame. But as we all know, shooting wide and getting in close, especially when shooting straight edged architectural structures. Is definitely going to introduce some sort of lens distortion effects into your shots. Such as barrel and keystone distortion. But luckily for us, most post processing software tools these days, come with lens distortion correction effects built into them. But none the less, the more lens distortion effects you can avoid creating in the first place, the better. So my advice is this, stand as far back from the castle as you can (given the limited space) and then zoom back in for a close up, yet wide angle perspective. You could also try taking several medium zoom vertical shots of the castle, in a sort of "mini pano" and then stitch them back together. As your stitching program will use the central and therefore less distorted part of each image slice, to blend back into a single image. Thereby significantly reducing the worse parts, of any unwanted distortion effects from your lens. Or, if you are lucky enough to own a rectilinear wide angle lens, then you could use that. But for most of us none architectural photographers, that is a luxury few of us own. |
|
|
SHOT 1 shown above, is a view of the castle from about 20 yards or so, to the right of the information board. SHOT 2 shown above, was taken from about 10 feet to the right of the information board. And SHOT 3 also shown above, was taken with me standing directly in front of the information board - because as I mentioned above, if you want to frame out the houses, then there really isn't that much room to work anywhere else. But for SHOT 4 on the other hand, I got really creative and walked about 20 yards to left of the information board, to setup directly behind the castle. Which is a view I really liked, as it shows the curved, stone paved path, that leads directly up towards the castle entrance. | ||
|
I then walked up to the old Portencross pier and a little further North along the Ayrshire Coastal path, Street View, Map View. Which can be seen just to the lower right of SHOT 4, shown directly above. Where I found an old rotting tree trunk, that had been washed up onto the shore and so doing an "Adam Gibbs". I took close up shot of it, to highlight the patterns in the rotting wood. Which is shown here in SHOT 5 to the left, as an abstract. We then came back later hoping for a sunset, but which didn't turn out, as at the last minute, a huge dark bank of clouds hoved into view and obscured the horizon. Which seems to happen more often than not to me, no matter where I am shooting in the world, but especially here in Scotland. Then the following day, we set off back home to the Isle of Skye and where we stumbled on a random field in the middle of nowhere. Where there just happened to be, several Highland cows laid down chewing their cud. So I jumped out of the car and threw on my 70/200 lens, to grab several handheld shots of them staring back at me, with a curious look on their faces and these are the results. It doesn't get much more archetypal of Scotland, than a shot of a Highland Cow. So is a subject I always enjoy shooting whenever I see them, as shown below in shots 6, 7 and 8. You will see quite a few highland cows travelling around Scotland. But which unfortunately, I can't give you directions to, as I never noted down where we were when I shot them. As well as the fact, they will have moved onto pastures new by now anyway. But don't worry, you will definitely find your own field of Highland cattle to photograph when you are here - trust me, there are lots. |
|
|
Tip: Shooting Highland Cows. These beautiful, gentle, hair hanging in front of their eyes animals. Seem to really conjure up the feeling, of what Scotland is all about to rest of the world. So grabbing your shots of them when you are here, simply is a must. So here are a few ideas to make your shots of them, that little bit more interesting and well above your average tourist shot.
|
|
|
|
 |
|
Exif information for each of the numbered shots shown throughout this chapter --1 - Canon EF16-35/2.8L USM, 30 Sec (with 10 stop ND), f/16, ISO 50, Focal Length 18mm, taken on 6th Mar at 10:28 --3 - Canon EF16-35/2.8L USM, 1/125 Sec, f/14, ISO 200, Focal Length 16mm, taken on 13th Jan at 10:40 --4 - Canon EF16-35/2.8L USM, 1/15 Sec, f/16, ISO 200, Focal Length 16mm, taken on 13th Jan at 10:57 --5 - Canon EF70-200/2.8L IS USM, 1/160 Sec, f/22, ISO 400, Focal Length 115mm, taken on 6th Mar at 11:42 --6 - Canon EF70-200/2.8L IS USM, 1/800 Sec, f/2.8, ISO 100, Focal Length 200mm, taken on 7th Mar at 10:30 --7 - Canon EF70-200/2.8L IS USM, 1/1250 Sec, f/2.8, ISO 100, Focal Length 200mm, taken on 7th Mar at 10:38 |
||
If you have enjoyed reading these 'Extra' chapters to my Guide Book and think you might also enjoy reading 79 more chapters across 270 pages, that also includes more than 340 Fine Art quality images, along with detailed descriptions and large scale maps to guide you to the exact location of where I took each and every one of them and which then goes onto discuss the techniques and tools I used to process them, but where everything is written in plain easy to understand English? Then please consider buying the Book. |
|


