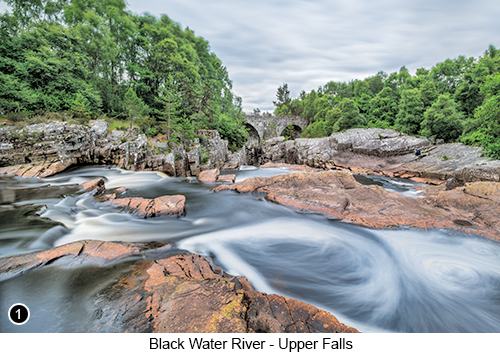
Little Garve (Gairbh Beag) and the Upper Falls Area - (Part 1) A beautiful location, where an old stone bridge crosses over the Black Water River, with cascades, waterfalls and surrounded by forest |
|
|
Setting The Scene - General George Wade was promoted to the Commander in Chief of the Army in Scotland in 1724, due to his skills as an excellent soldier, but also as someone who was a very capable road and bridge builder. So from 1724 through to 1740, Wade began a 16 year campaign to construct over 240 miles of military grade roads and 30 bridges, which could then be used to increase the amount of commercial trade taking place across the Highlands of Scotland, but at the same time also allow the British Army to increase the speed at which it could deploy soldiers around the area, to quickly quell any of the many Jacobite uprisings that kept on springing up across Scotland throughout the 18th Century. The first Bridge over the Black Water River I will be taking you to in this chapter, is now known locally as Wade's Bridge' and was constructed around 1726 and which you should just about be able to see at the back of the image to the left. Whereas the second and more hidden away Bridge that I will then take you to, is called the Garve Bridge (also Known as the 'Silver Bridge') and which also crosses over the Black Water River at Little Garve. This second bridge was built in 1760 by William Caufield, who was the successor to General Wade and was also part of the ongoing and much needed expansion of the road network throughout Scotland. How to get there - see below left for Map and Street View links to the locations covered in this chapter. Also if you want the GPS coordinates for these locations for your Satnav, then look in the address bar at the top of your screen after clicking on either of the links below left, where you will see a line of link text that starts like this: |
https://www.google.com/maps/@57.6368349,-4.6784869, etc, etc..and which also includes the geographical coordinates to these locations embedded within the beginning of the link text for both the Lat(itude) and the Lon(gitude), which are then shown as Lat 57.6368349 and Lon -4.6784869 How to get there (continued) - Driving down from the North West of Scotland on the A832 and around 35 miles further on from the village of Lochcarron, you will eventually come to a 'T' junction with the A835 signposted for Ullapool to your left and Tore and Inverness to your right, turn left here towards Ullapool. Now continue on the A835 for another 4 miles, but first passing a sign pointing down a road on your right for Little Garve, which is where we will eventually come out to rejoin the A835 at the end of the next chapter. So continue on past the LIttle Garve sign, until you see a sign pointing to your left for a Car Park with Picnicking and Public Toilet facilities and turn left here. Then drive up to the second of the two parking areas after passing the old bridge on your right and on up to the one with the toilet block in the top left hand corner. But as soon as you enter this second car park, try to park immediately in the first space next to the trees on your right if you can, but don't worry if you can't, just park wherever you can. However if you have been able to park in this corner parking space, then you should just about be able to see where there is a tiny gap through the trees in front of you that leads to a small grass covered unofficial path and is where we will be going in a short while, but after we first scout out the area a little further up the river from the official viewpoint path at the top of the car park and directly opposite to the toilet block. So having parked your vehicle, walk up to the official path at the top of the car park and then turn right and walk down onto the small viewing platform, where you will then find the upper falls viewing point in front of you. I have tried shooting the river and its falls from this small platform several times, but which has never turned out to be very successful for me, but hopefully you may be able to find the shot that I have so far been unable to see. However if you wish to get down closer to the falls as I did and where I did find several interesting shots, then turn around and start to walk back up the path to the car park, but then turn immediately left from the platform and go through the trees. You will then see a very short unofficial path that leads down to the rocks next to the falls and is where I took the shots ONE, TWO and THREE. |
 |
WARNING All the rock surfaces around the Black Water River Falls area, are very slippery indeed, even on the driest of days, but after rainfall they become ridiculously slippery even though they may not look it. And yes I know this from my own personal experiences, because even though I have photographed all around these two locations many times, I still managed to find myself bouncing around painfully on my backside on two separate occasions, because in both instances my enthusiasm to get to the shot as quickly as I could, made me forget this simple fact (you'd think I would have learnt after the first time I fell onto my butt wouldn't you, Doh??). But luckily for me and my equipment, only my pride got hurt. So please take care, as I really cannot emphasise enough just how slippery these rocks always seem to be in this area come rain or shine, so you really do need to be extremely cautious at all times when visiting either of these two locations. |
|
 |
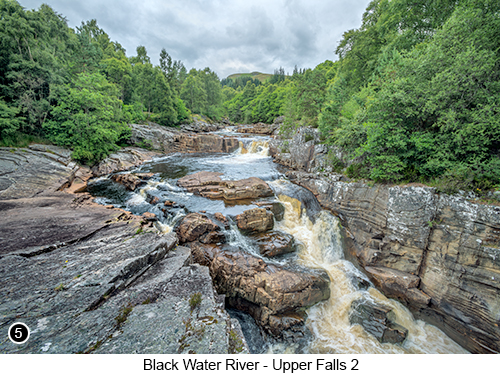
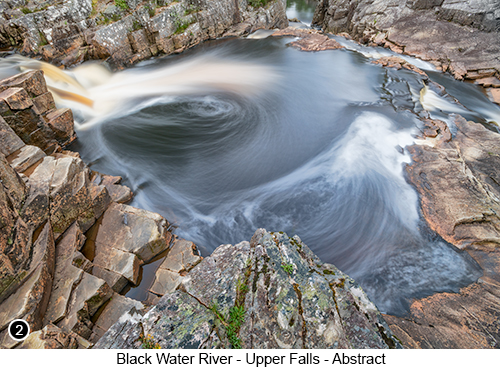
For shots ONE and TWO, I used a 10 stop Hoya screw-in filter to allow me to shoot a 30 second exposure in broad daylight, but here is a Tip if you are going to buy such a filter and you wish to use it on a very wide angle lens as I did for these shots, then I would advice that you buy a thin variant of this type of filter if you can, so that the edges of it do not show up in your shot at 16mm. Also buy a size bigger than you need, such as if your lens's filter mount is 77mm as my old 16-35 is, then buy an 82mm filter along with a cheap 77mm to 82mm step-up ring. This way you can still use your lens at its widest viewing angle, but without too much noticeable vignetting due to the edges of the filter still being visible in the edges of the shot. Shot THREE shown here on the left is a 'Focus Stacked Bracket Set' shot taken in autumn, where the light on the scene was coming from a very contrasty clear blue sky, but its direction was low and coming from over my shoulder, which meant that the trees on the opposite bank of the river were fully and evenly illuminated (albeit harshly), yet the rocks in the foreground were totally in shade. So by using a series of 2 stop -/+ long exposure bracket sets, which I then took as I focused onto five different areas throughout the scene from bottom to top, meant that I could then pull all of these shots back together into the single sharp image that you see here. I have described all these types of 'Advanced Techniques' in my Guide Book, so for those of you who would like to know how to create this type of shot, but who are also finding this brief description a little less detailed than you would prefer , then why not treat yourself to my book which is choc full of this type of information. So having now scouted, photographed and generally worked your way all around this part of the falls area and if you are ready to move onto where I took the next couple of shots, then retrace your steps back up to the viewing platform path and walk back into the car park. Then once in the car park, turn immediately left and walk down to the bottom left hand corner of the car park and look for the small unofficial path through the trees now on your left. Once you find the path, go through the trees to find there is a short, but steep, muddy path, that leads you all the way down to the edge of the Upper Black Water River Falls below. |
Once you are down at the edge of the river you should see an area to your front left, where there is a small and fairly insignificant looking part of the falls close to the edge of the rocks nearest to you, as shown here to the right in image FOUR. Now please forgive me for sounding a little anally retentive here, but this is what I would call a 'Critical Timing' type of shot, whereby during most of the year and during most of the day, this shot does not exist at all, but on certain days of the year and then for only a few seconds on each of those days, then it does - so if this type of shot appeals to you, then let me explain how I shot it and what you will need to do if you want to get your version of it. So first things first, to get this shot you will need to be at this location in early autumn, you will also need a clear blue sky day (or at least a bright sunny day), a 200mm zoom with a rotation collar, a tripod and a cable release. So assuming you have done that and you have also arrived here early enough, so that the whole of the scene in front of you is still fully lit by direct sunlight, then all you have to do now is wait for the perfect moment to arrive to take this shot. Now standing there with your cable release in hand, the camera set for a -/+2 stop bracket set, a very deep depth of field (I used f/29) and your lowest ISO setting (I used ISO 50) and focused onto the very edge of the rocks that make up this tiny part of the falls. Then look over your shoulder and watch the sun as it begins to descend towards the horizon behind you and just before it starts to disappear behind the trees that are also behind you, if you look down at your feet and the rock surface you are standing on, you should now see the front edge of a moving shadow as it crosses over these rocks and quickly begins to creep towards this part of the falls. Keep an eye on this moving shadow and wait until it starts to cover the front part of this little waterfall, but with the river area just behind it, still being fully lit and reflecting the autumn colours from trees on the opposite bank. Now start taking your shots, but begin doing so just before this critical moment has arrived and then continue shooting both during and after it has passed, just to make sure you have captured all the best detail at the optimum moment. Then back at your computer you should be able to seamlessly blend the underexposed shot of the upper autumn coloured reflected area of the river, with the correctly exposed lower part of the falls in shade, for an image that looks something similar to image FOUR shown here on the right. |
 |
|
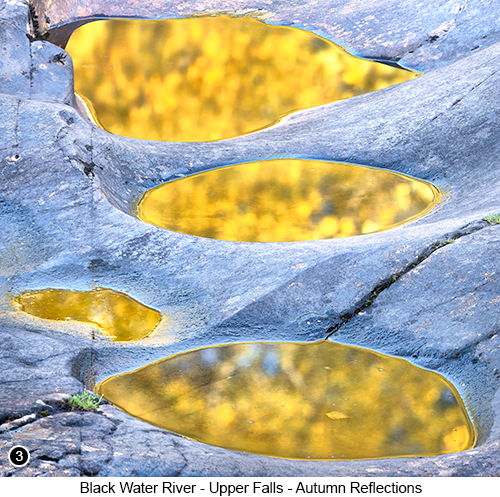
Moving on from the last shot shown above, if you now make your way up the rocks towards the old bridge behind you (and also after taking heed of my previous warning of just how slippery the rock surfaces can be here), you will soon arrive at a flat area that sits at the top of this natural dish shaped rock structure, as it arcs around the edge of river to the left at this point. You should now also be able to set up your tripod on this flat area as close to the edge of the rocks as you can, for a view of the Black Water River as it flows towards you and then quickly drops away into a deep sheer walled gully to your right, as shown in image FIVE to the left, before it finally and noisily disappears beneath the central arch of the old bridge built by General Wade in 1726. This is a viewpoint I have shot many times over the years, because I know whenever I come here that no matter what the weather is doing, or what time of year it is, I am always going to find something worth photographing and also have the opportunity to shoot many different formats, such as horizontals (landscapes), verticals (portraits), multi shot stitched panos, or even zoomed in close up detail shots. In fact I always find that this whole area is just such an all round beautiful place to be with my camera, where I can happily spend the best part of a day just wandering around looking at the scenery and listening to the gurgling and gushing noises, as the peat coloured water flows by me. This is also a good place for bird watching, as there are a couple of Grey Wagtails that live in this area and who seem to enjoy spending their day, flitting around from one side of the falls to the other chirping loudly at each other. You will know what they are when you see them, because they have distinctive yellow markings down their sides, that always make them easy to spot. |
|
-- Exif information for each of the numbered shots shown throughout part 1 of this chapter -- 1 - Canon EF16-35/2.8L USM, 30 Sec with a 10 stop ND, f/16, ISO 200, Focal Length 16mm, taken on 14th July at 14:11 |
|
If you have enjoyed reading these 'Extra' chapters to my Guide Book and think you might also enjoy reading 79 more chapters across 270 pages, that also includes more than 340 Fine Art quality images, along with detailed descriptions and large scale maps to guide you to the exact location of where I took each and every one of them and which then goes onto discuss the techniques and tools I used to process them, but where everything is written in plain easy to understand English? Then please consider buying the Book. |
|