Little Garve (Gairbh Beag) and the Lower Falls Area - (Part 2) Another nearby location, where a second stone bridge crosses over the Black Water River, with yet more cascades and waterfalls |
|
Setting The Scene - There are several old stone bridges that cross over the Black Water River near Garve and Garbat, with the Silver Bridge and its two stone arches supported by a large outcrop of rock in the river bed, being the lower of the two bridges nearest to the village of Little Garve. But long before any of these bridges and roads were built, this whole area had remained a wild and dangerous area of Scotland and hence the name Garve, which translates directly from Gaelic as the "Rough Place" and is also believed to be where the Battle of Bealach nam Broig (meaning the "Pass of the Brogue" in English) took place in 1347, in which there was a large uprising against the much hated Lord of the Isles and his Clan Mackenzie followers. The uprising then quickly gathered pace, when the word went out to all the local highlander Clans of MacIver, MacAulay and MacLeay, who came streaming down from surrounding mountains and began to mass together in large numbers, in readiness for their coming fight against the Lord of the Isles and his tiny army of Mackenzie men. But just as both sides were preparing for battle and what everyone thought would be the inevitable outcome, a Bodach (which translates from Gaelic as “Old Man”, but who also had the gift of many mystical powers) came to the Mackenzies with a promise to help them. He told them if they did exactly what he told them to do, he would use his powers to protect them all and at the same time help them to annihilate their enemies. But his powers would only work he told them as they began to look at him in dismay, if they all wore their left brogues (shoes) on their right feet and their right brogues on the left feet and which they all reluctantly did. A battle of such a ferocity and bloodshed then quickly ensued and which resulted in all the local men of the Clans MacIver, MacAulay and MacLeay being completely wiped out, but without a single scratch on the victorious Mackenzies. How to get there - Lower Black Water Falls area - Street View - Map View. I will begin by assuming you are driving down the short distance from the Little Garve Upper Falls area, as covered in Part 1 of this chapter, which if you haven't visited already, then I advice that you make time to go there next, because both of these falls are really good for photography and as they are situated so close to each other, you really don't want to miss either of them. You can also walk down from the Upper Falls area to the Lower Falls if you wish, by just walking over Wade's Bridge (as discussed in Part 1) |
and then following the path at the other end of the bridges, as it goes right and then follows the left bank of the Black Water River all the way down to the Silver Bridge area. So as I say, assuming you are driving down from the Upper Falls area after you have finished shooting there, if you now return to your vehicle and drive back out of the car park and then turn immediately right onto the A832, where after a mile or so you will then come to a small left hand turning to the Lower Falls area as shown on this map, so turn left here. Then follow the single track (and not very well maintained) road for another three quarters of a mile, until you see another single track road leading off to your left through the forest and turn left here. You will then come to a large parking area on your right that is big enough for a dozen or so vehicles and park here. You should now be able to both see and hear the Black Water River, as it runs all the way across the scene in front of you from left to right. If you now begin to scout around the area, you will quickly see that there are plenty of opportunities to shoot both up and down this stretch of the river, as well as zooming in for the rocks and details etc., within it. But I will also often find that when I am presented with a scene that is so full of opportunity like this one is and with so many ways that I could choose to shoot it, that having this much opportunity can often become a little confusing and can sometimes get in the way of my creativity. So the best I way I find to bypass this confusion and that will allow me to single mindedly concentrate on what I am doing, is to leave the rest of my equipment locked in the car (except my tripod and remote shutter release cable) and shoot with only one lens for at least the first hour. So first I will begin with my 16-35, as I slowly |
|
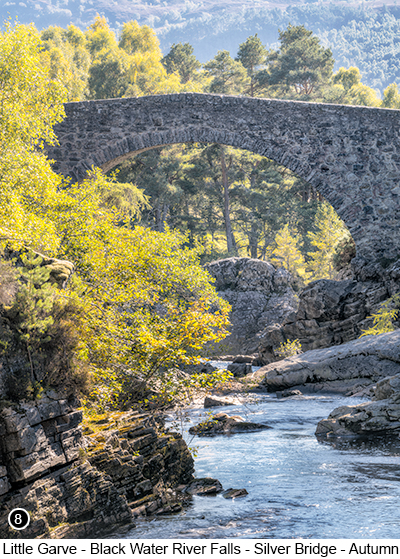 |
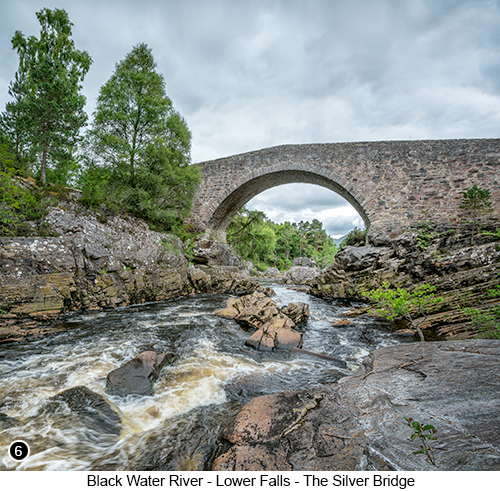
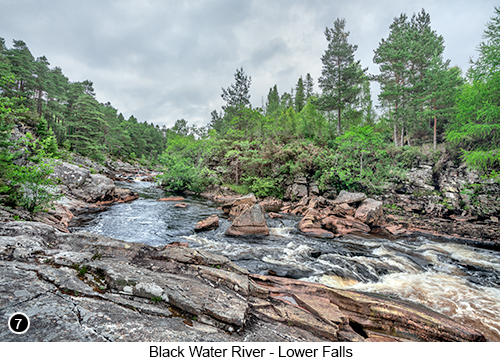
work around every part of the scene for an hour or two just shooting wide. I will then go back to my vehicle and throw on my 70-200 to see what else I can extract from the full length of the scene for another hour or two and so on for any other lenses I happen to have brought with me and that I think might also work. Now you may work differently of course and each to their own as they say, but for me it just seems to work better this way, because I have found if I begin scouting around the scene with lots of different lenses in my bag, I will soon start to question myself and wonder whether I have the best lens mounted onto the camera for each individual shot. So rather than adding in any more confusion into the process than I have to, I have found that by sticking to this 'only one lens for a period of time' method, that it allows my mind's eye to become accustomed to that one lens and more easily apply an imaginary frame around the shot. So, back to the scene - if you walk from your vehicle towards the river and then through the shrubbery and trees to your right, you will come to a great close up view of the old Silver Bridge, but unfortunately I have never had any success from here, as there is a little too much foliage sticking into the edges of the frame at this point. So I have found that if I walk back up the river a little way and then scramble down to the edge of the river, I can get a much cleaner view of the old bridge, as shown above left in image SIX. And if I also shoot it from a slightly lower angle from this viewpoint, I can fit the bridge around a loosely defined compositional upper right third using a square crop. Now having got your shots of the lower falls bridge area, if you scramble back up the bank and then continue to walk up river for another hundred yards or so, you will come to a bend in the river surrounded by rocks. But once again you will need to scramble down the rocks to the edge of the river and where you should then be able to compose a shot of the Black Water River flowing past you, as shown above in image SEVEN. Shot EIGHT shown here on the left, can be found by climbing back up to the main path from the area where you just took the previous shot and then walking a little further up by the side of the river away from the bridge, until you reach a sort of hump in the path with steps over it. You should then see just past these steps where there is a flattish heather covered area to your right surrounded by trees and where using a longer lens to shoot through the trees, you can just about frame the river as it flows beneath the bridge. However, if you are here on a bright sunny day as I was when I took this shot, then you will probably have to frame (or crop) out the sky above the hills in the distance as I did, or they will look far too bright and distracting in the final image if you don't. |
To get to the next shooting location, as shown here to the right in image NINE, get back onto the main path and then carry on walking further upstream for a couple of hundred yards or so and until you come to a second set of falls and cascades. |
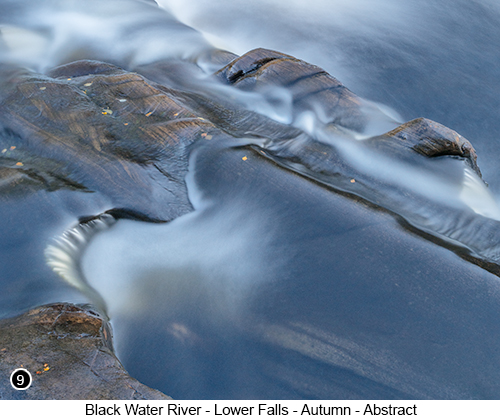 |
I know I have already said how slippery the rocks always seem to be at the edge of this river in Part 1 of this chapter, so I suggest that if you want to get in really close to the edge of the river as I did for the shot shown on the right, then only move around on these rocks after your camera has been packed away safely into your camera bag and not still hanging around your neck, or mounted onto the tripod. So that way if you are unlucky enough to slip and fall, then at least your camera and lens should still be protected by the padding in your camera bag - because the only thing worse then a sore backside, is a sore backside along with a broken camera and lens. |
Now this area of the river is really good for abstracts using very long exposures, and I particularly enjoy the reaction I get when people look at shot NINE shown here on the right, because of its ambiguous size and scale and which can really start to mess with their minds. Because at first when you look at it, you will probably think "Ah I see", it's a really close in detail shot of water flowing over rocks taken with a long lens. But as you begin to look at it more closely and notice the autumn leaves on the rocks in the background and how small they look compared to how big they are in real life, you then start to think "Oh actually", the shot must cover quite a large area due to the small scale of those leaves, so it must have been shot using a wide angle lens. But then when you look back at the water and how it seems to be only trickling over those rocks and how that makes everything look tiny again, you will once again think, "Hang on minute", it must have been shot with a zoom lens, but what about the size of those leaves? See image 9 EXIF data below for the answer. |
|
|
--Exif information for each of the numbered shots shown throughout part 2 of this chapter --6 - Canon EF16-35/2.8L USM, 1/30 Sec with -/+2 stop bracket, f/16, ISO 100, Focal Length 16mm, taken on 14th July at 12:27 |
|
If you have enjoyed reading these 'Extra' chapters to my Guide Book and think you might also enjoy reading 79 more chapters across 270 pages, that also includes more than 340 Fine Art quality images, along with detailed descriptions and large scale maps to guide you to the exact location of where I took each and every one of them and which then goes onto discuss the techniques and tools I used to process them, but where everything is written in plain easy to understand English? Then please consider buying the Book. |
|