A Landscape Photographer's Road Trip Through The Cairngorms (Part 2 of 2) The Linn of Dee, The Muir of Dee and Burn O' Vat and the Tomnaverie Stone Circle |
|
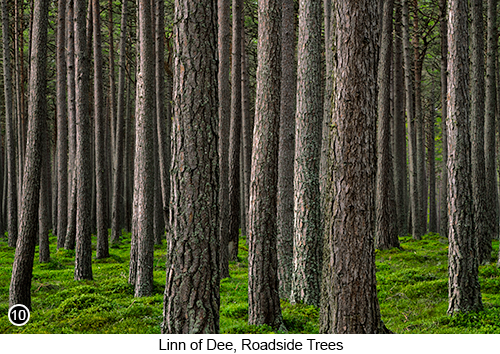
How to get there, The Linn of Dee - From the centre of the Braemar village, if you turn left along the main street, passing by a few shops and a hotel on your right, then keep following the Marr Road, until you reach a small roundabout, with the Linn of Dee straight on towards your front right and then onto what has now become known as the Linn of Dee Road. Continue driving along the Linn of Dee Road for another 10 miles or so, with the River Dee meandering down the centre of the glen to your right. Until you enter the Marr Lodge area, with a couple of old buildings and a croft house appearing over to your right in the woodland. Then a little further on (about 200 yards), I saw this forest of trees over to my right, that looked sort of randomly distributed, yet at the same time, had a very organised feel to it, with a thick green mat of grass, neatly covering the entire floor of the forest, Street View, Map View. "Mmm I thought, that looks really odd yet beautiful, in a sort of 'organised chaos' kind of way, so I had better stop the car and take a shot of it, if for no other reason than it just looked so surreal, as shown here in IMAGE 10 shown on the left. The weather and light when I took this shot (as with all the other shots I took in the Linn of Dee area), was bright but overcast and fairly even and flat, yet with enough 'oomph' still in it, to add a soft but three dimensional sculptured look to the trees and without any deep shadows to worry about. This meant I could to take the shot handheld, at the camera's suggested meter reading and which in turn allowed me, to walk around and frame up the shot more quickly and easily.
|
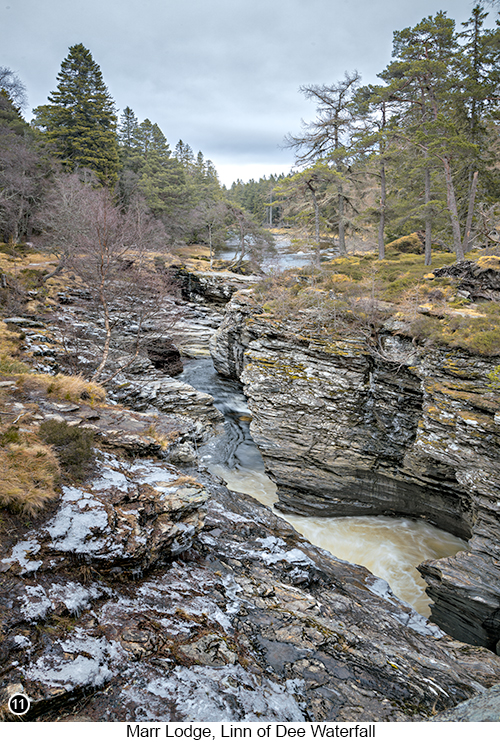
So having now taken your shot of this 'enchanted' looking forest as shown above, go back to your vehicle and continue driving down the road for another few hundred yards or so, until you cross the Marr Lodge bridge, as shown in IMAGE 13 shown below. Then continue driving on around a right hand bend and up a short hill, before turning into the large official car park you will now see on your left, Street View, Map View. Having parked your vehicle, if you now walk out of the car park and back towards the edge of the forest on the other side of the road, you will find there is a path that leads you all the way back down to the edge of the River Dee, so follow this path. Then, having reached the edge of the river, you will see there are lots of photographic opportunities that have now become available to you, both to your left and to your right and all the way up towards the old bridge and beyond. When we were there, it was overcast and kept sleeting, then snowing, then raining, then sleeting again etc. So if the conditions are like this when you are here, then you must take great care when approaching the river, as the moss covered rocks all along its edge, are very, very slippery indeed. So do not go charging into this scene like a bull in a china shop, because you will definitely come a cropper. And as you can see from IMAGE 11 shown here on the right, this is an area of the River Dee, that you definitely do not want to fall into, because once you are in there, no one will be able to pull you out, until the turbulent undercurrents in this part of the river, chooses to spit you out, at the other end of this long series of large, razor edged potholes, after ripping both you and your equipment into shreds - so do not let that happen to you, OK? Alright, grumpy old dad lecture over, so let's get back to what you can see here and the many photographic opportunities, that this amazing place is going to offer you.. So I am assuming you have now walked down the path from the main car park in the forest and that you are now standing near to the river about half way down this series of potholes. I am also assuming you have timed your visit to be here, when the river is in full spate during spring run-off as I did. You will then see to your left as you look down the river, the same view as I am showing here in IMAGE 11 and which to my mind, seemed to work better as a vertical, or portrait orientation shot. I did consider shooting this scene as a short 3 shot stitched vertical pano, but the wind was a little too active for me to do this when I was there. So in order to stop the leaves and branches on the trees from blurring my shot, I could only shoot it as mother nature was allowing me to, which was to go for a single exposure with a relatively fast shutter speed. Also, to be sure that I wasn't going to blow out the sky, so I chose to underexpose the sky by one stop and deal with the shadows later in post. This meant that the shadows were probably going to be around 3, or maybe even 4 stops underexposed, but that was OK, because I also knew that I could still get away with doing something like this at a push, due to modern sensors being so utterly amazing at capturing shadow detail and showing little to no discernable loss in pixel quality, even at a whopping 4 stops under, which I think is completely crazy and has turned quite a lot of what I thought I knew about photography on its head. But hey, we are where we are, so embrace it I say! |
 |
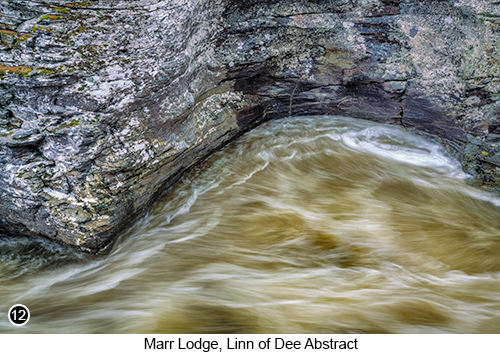 |
In fact I would even go as far as to say, that the old adage that we have all heard by now and tried to adopt in our own work, whereby we should always try to "expose to the right", is no longer the be all and end all photographic tip that it was once thought to be and is now only any good for some high dynamic range scenes. Yet if you are working under conditions such as I found here, where I could only shoot using single shot mode and with a relatively fast shutter speed, then why not try "exposing to the left" instead? Then back on the computer, I loaded the file into PS as normal, ticked the "Remove Chromatic Aberration" checkbox, before dragging the shadow slider all the way up to the top and the highlight slider down a little and which I hope you agree, seemed to work out perfectly fine for SHOTS 11, 12 and 13. Having now shot the scene as shown in SHOT 11 above , if you move down river slightly to your left, you will see where I took the next abstract detail shot, of one of the larger potholes, as shown here in SHOT 12 on the left. This seems to be yet another one of those shots, where I was going for the "Ying and Yang" style of composition and which I obviously still had bouncing around in my head during this shoot, as well as in the previous chapter for the old croft house - see image 6. Then walking back to the main path that follows alongside the river, if you now walk a little way back up towards the bridge and standing next to a couple of small straggly trees, you will see the scene shown here in SHOT 13 below. |
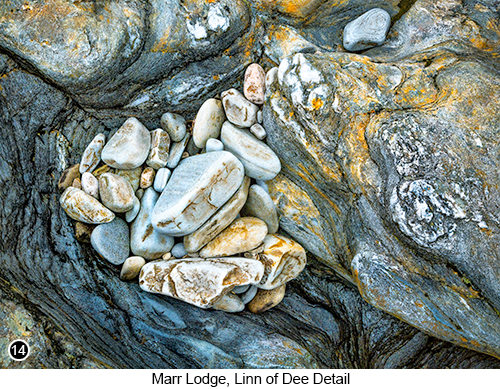
I then continued along the path towards the bridge and then down to the other side of it, to a much wider view of the River Dee flowing directly towards me, across a relatively flat plane, before rushing over a series of rocks and cascades, to then plunge out of sight under the old bridge to my left. I tried shooting this wide open scene, which I am sure would look spectacular on a day with something other than a flat, slate grey sky, but for me when I was there, flat, slate grey skies was all it was giving me, so I abandoned that Idea and instead concentrated on the detail at my feet and which resulted in SHOT 14 shown below. Shooting abstracts like the one shown below, is something that all us landscape photographers, have to have a go at one time or another in our careers and I am sure you have tried shots like this too. But these types of close-in-abstract style of shot, can be very, very difficult to capture successfully, because this type of shot is only about composition, with little to do with context, or subject - let me explain. In SHOT 13 for instance, I composed the shot for the river flowing under the bridge, so it was on, or at least near to the upper right compositional third. I was also composing it so that the river then continued to flow through the scene, in a way that allows the viewers eye to move along, down and through the scene repeatedly, to notice things not seen at first glance and to discover a few other interesting but secondary details. Whereas in SHOT 14, the entire subject is muted in tone and made up of only one thing, rocks. So if I want the viewers eye to linger on this shot for more than the briefest of moments and gain some sort of satisfaction from looking at it, then I have to give them more than just rocks and muted tones, I have to give them a 'flow' and a 'rhythm' to the composition, that guides their eye around the scene and makes it worth studying. How you achieve this is up to you and is very much based on your own experiences and abilities. But for me, the easiest way I find to shoot abstract scenes like this, is to try to completely detach my thought process from what I am doing. I do this by hand holding my camera, using a medium zoom (24-105 in this case) with autofocus turned on and I just start to experiment, by zooming in and out of the scene, as well as rotating the camera and moving around, in and out and generally just shooting the hell out of it. Because I have found, that initially as I begin to shoot the scene, I will be looking for form and composition, details, colours, shadows etc, but after I have been working on it for only a short while, and taking perhaps a dozen or more shots, my mind will begin to detach itself from the process and wander off, to think about all the other things that are happening or have happened in my life, as my muscle memory then takes over and I start to shoot it in a sort of absentminded, daydream sort of way and that is when the magic can sometimes begin to happen. So if you are willing to try this, but you are finding it difficult to drop into this absent minded, daydream mode straight away, then just keep on shooting the scene until you do, or at least until you realise that you had already dropped into this 'daydream' mode a couple of shots ago, but without noticing it until now. |
|
|
OK, I know I am making this all sound very easy and it isn't, but for the shot shown to the left, I must have rattled off maybe thirty or forty images, before my mind started to wander off and think about something other than what I was doing, like that stale cheese and ham sandwich that I munched my way through back in 1984, or something else as equally inane. Yes you are probably laughing right now, but this is the only way I can think to describe what was happening to me when I took this shot. So why not give it a go? I mean what have you got to lose, maybe 20 or 30 seconds of your life, deleting a few dozen files that you don't like, but with the chance of stumbling upon something hidden within them that do? So do I think the shot shown to the left in IMAGE 14 is some great work of art? Of course not, in fact I wouldn't even class it as a portfolio grade image. But what I would say about it, is that it is an image that I really enjoyed finding and then taking and that as a mental exercise and just all round 'feel good' experience, it certainly ticked all the boxes for me. Because with every success that any of us achieve with our photography, no matter how minor that success is, will help us to push ourselves and our abilities forward. Yes I know we can all learn from our mistakes as well, but I believe we can learn a whole lot more from our successes, even if they are only minor ones. And that is how I would class this image, marginally successful, interesting to look at and well composed, but nothing more than a mental workout to help hone my skills. Yet with the hope that the next time I find myself in a similar situation, I might indeed stumble upon that portfolio grade image using this technique, that was hiding away in front of me, but where my fully engaged brain would never have thought to look. |
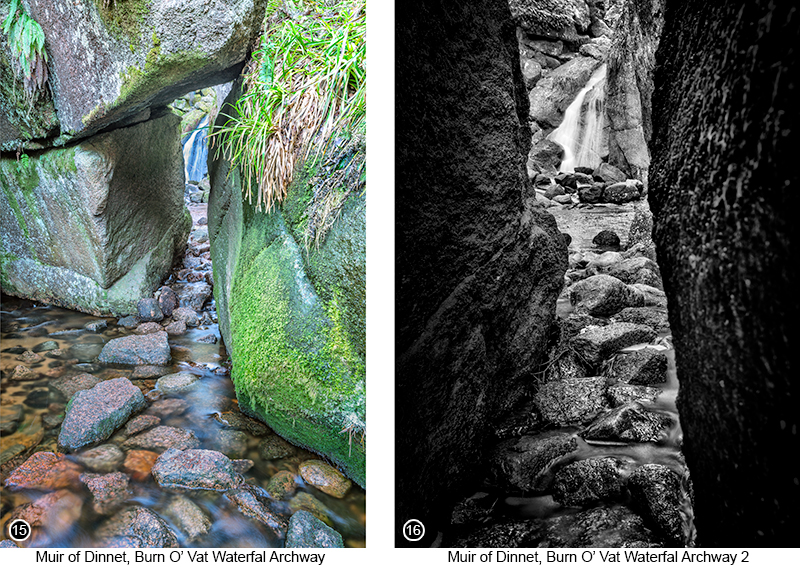
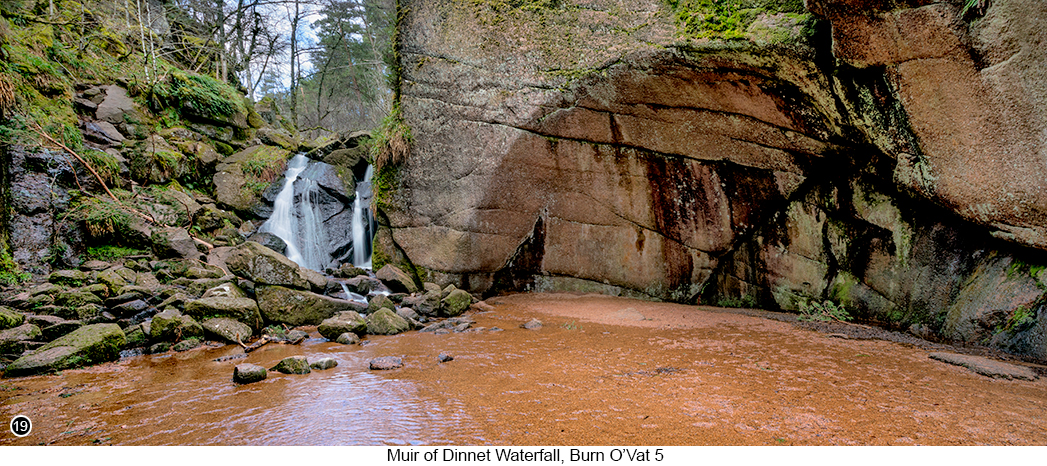
| The Muir of Dee and Burn O' Vat - Having now shot your way around the Linn of Dee waterfall area, go back to your vehicle and head back towards the village of Braemar. Then once in the village, get back onto the A93 heading left out of the village (East) for 5 miles, then on past the Balmoral Estate (but don't forget to wave at the queen as you drive past) and then on through the village of Ballater, further along the A93. Then after another 5 miles or so, turn left onto the B9119 signposted Muir of Dinnet Nature Reserve. Then continue on up through the nature reserve, until you reach the main Nature Reserve Car Park and cafe building on your left and park here, Street View, Map View. I am now going to take you on a short walk down to the Burn O' Vat waterfall and for which I would suggest you put on your widest angle lens, although a medium zoom such as a 24/70 or 24/105, would also be a handy lens to take with you, but then you will probably be stitching lots of vertical pano slices together, if you want to capture the entire scene from left to right. The Burn O' Vat waterfall, is probably the nearest thing to a naturally formed fairy grotto, that you will ever find yourself standing in with your camera. It is open all year round without any limits or restrictions, has no barriers or restricted areas where you can't go within it, or climb up to photograph it from. It is reached by walking (and crouching a little, but not too much) through a natural archway of stones, as shown here in IMAGE 15 and IMAGE 16 below. This archway looks tiny in both the shots I am showing you below, but it isn't really that tiny and is only the effect of me using a 16mm lens to shoot these shots. So, from the car park, walk towards the cafe building area to your front left and then follow the path as it goes around the left of the building and then down into the woods, as it meets up with and then follows alongside, the Burn O' Vat flowing through the woodland to your right. Then just a couple of hundred yards further along this path, you will arrive at this natural stone archway (as shown below) and a roughly laid set of stepping stones, that lead you through the arch into the grotto area - so duck your head down and walk through the natural archway. Depending on the water flow of the Burn when you are here, you might wish to consider wearing your rubber boots (Wellington's) for this shoot, because the entire floor of this grotto, is covered in soft fine sand and the water from the falls flows through all the width of it - see IMAGE 19 below . So if you want to be able to move around freely within this area as you shoot it, which you will, but without the worry of sinking into the sand down to your ankles and getting your feet wet, then wearing waterproof footwear is definitely the way to go. |
|
|
|
Then having walked through the natural stone archway, you will come out into a wide, sandy covered base, with the waterfall flowing into it from the opposite side of the grotto, over a steep pile of rocks and boulders, as shown in IMAGE 17 below. The way I chose to photograph this scene, was to walk straight over to the waterfall and work that area from a few different angles, then start to back away from the falls as I continued to shoot the scene wider and wider, as shown in IMAGE 18 directly below. Until I found that I had worked the scene all the way back towards the area in which I first came into the grotto, where I then shot as an all encompassing pano, to show you what the entire scene looks like, as shown below in IMAGE 19. |
|
 |
|
Here are a few general tips for shooting in the Muir of Dinnet grotto area:
|
|
 |
|
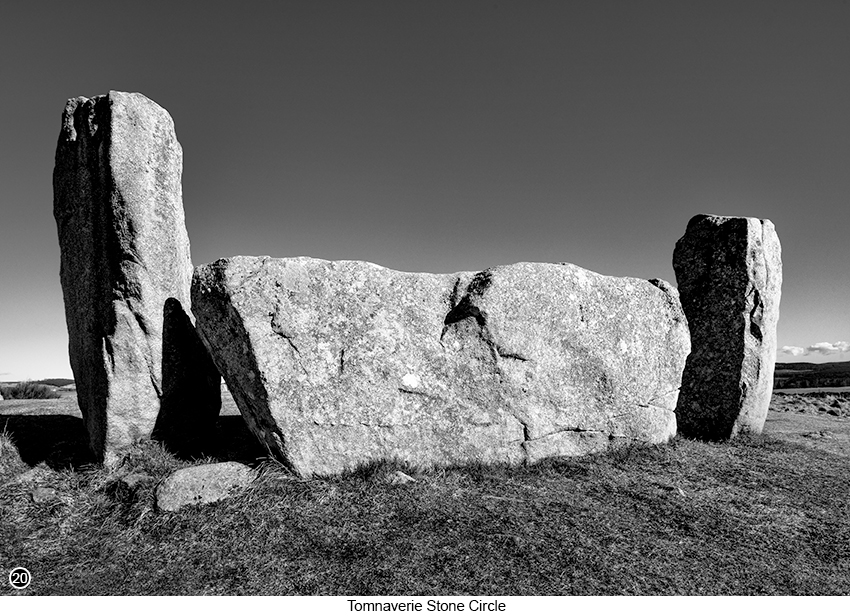
Tomnaverie Stone Circle - Having now shot the Burn O' Vat waterfall and grotto area, I am next going to take you to the Tomnaverie stone circle, so continue on driving through the Muir of Dinnet Nature reserve, along the B9119 for another 5 miles or so, until you eventually come to the car park for the Tommerverie Stone Circle, Street View, Map View. So park your vehicle in the designated parking area and then take the short five minute walk up to the top of the hill, for magnificent 360 degree views of the surrounding area. But when I say magnificent views, I mean wide and open in every direction, so fantastic to look at and to take in the unobstructed atmosphere of the place, but not so much for photography I am afraid, as everything surrounding the monument, is just featureless rolling hills and farmland, as far as the eye can see and in every direction. Tomnaverie is what is referred to by historians, as a "Recumbent Stone Circle", which is a specific type of monument, that can only be found in the more North Easterly regions of Scotland. A Recumbent Stone Circle, will always have a large human sized stone slab laid on its side as its central feature, that is then immediately flanked by two slightly smaller upright stones, that indicate South. Archeologists who have studied this site and all the area that surrounds it, have discovered that it is actually littered with many more stone circle remnants, whose construction date they have concluded to be over 4,500 years old. But unfortunately, until the 1930's, this site was not seen as having any significant historical value to the locals and farmers, who dug up most of the stones to use them in other building work, or simply dragged them out of the way, so they could more easily farm the land. This means that there is little left of the many other stone circles that once occupied the entire top of this hill. So even though, the few remnants of the main stone circle I am showing you here in IMAGE 20 below, still look very impressive, the current landowner has decided to fence off the far edge of the circle, right up to the edge of the stones, so shooting these standing stones, turned out to be more of a challenge to me than I initially thought it would be. First of all it was a blue clear sky day, so before I even got the camera out the bag, I knew I would shooting it as a black and white using the 'Red Filter' in Photoshop, to significantly darken down the sky (a. k. a. the Ansel effect), to try to put some interest into an area of the shot where there wasn't any. Secondly as impressive as these stones still are, I knew I would have to elevate them in the shot to give them more gravitas, so I would need to get down low to the ground, so I could shoot them form a much lower perspective to give them more height. Thirdly there was the modern (ugly) wire fence to contend with immediately on the left of the monument, that was giving me very little wiggle room to work with. So I got my old bones down on the floor and began to lean on the fence as much as I could without damaging it (this fence is private property, so we must still give it the respect it deserves, even if it is really annoying and gets in the way - so do not damage the fence), then using the flip screen on the back of my camera to compose the shot and using autofocus, I began to shoot the scene to arrive at the shot you see below. Now I am in no way an historical person and I have never study archeology in any way what so ever, but when I was standing next to these stones and looking at the main recumbent stone, the fact that it was human sized in length and seemed to have a shape that would follow the contours of a person laid on their back, as well as a trough or drainage area running down the centre of it, did make it look to me more like the type of thing a coroner would use in a modern day autopsy. Which then led me to start thinking, how this monument perhaps could have been used for human sacrifices and which did actually take place in the far distant past within some areas of Scotland. So even though I have not been able to find any reference to these types of activities taking place here, I will let you make your own mind up. However you may wish to keep this in mind when you are standing here, to see if you agree with me, that this whole setup looks suspiciously like it was designed, to be used as a human sacrificial alter? |
|
 |
|
--Exif information for each of the numbered shots shown throughout this chapter --10 - Canon EF24-105mm f/4L IS USM, 1/25th Sec, f/16, ISO 320, Focal Length 105mm, taken on 28th Feb at 14:00 --12 - Canon EF24-105mm f/4L IS USM, 1/3 Sec, f/16, ISO 100, Focal Length 47mm, taken on 28th Feb at 14:23 --13 - Canon EF24-105mm f/4L IS USM, 1/8th Sec, f/16, ISO 100, Focal Length 35mm, taken on 28th Feb at 14:28 --14 - Canon EF24-105mm f/4L IS USM, 1/100th Sec, f/16, ISO 500, Focal Length 55mm, taken on 2nd Mar at 14:57 --16 - Canon EF16-35mm f/2.8L USM, 1/3 Sec (+/- 2 stops), f/16, ISO 100, Focal Length 31mm, taken on 2nd Mar at 11:46 --17 - Canon EF16-35mm f/2.8L USM, 1/13th Sec, f/16, ISO 100, Focal Length 16mm, taken on 2nd Mar at 11:24 --18 - Canon EF16-35mm f/2.8L USM, 1.3 Sec (+/- 2 stops), f/16, ISO 100, Focal Length 34mm, taken on 1st Mar at 12:24 --19 - Canon EF16-35mm f/2.8L USM, 1/15th Sec (3 shot horizontal pano), f/16, ISO 100, Focal Length 16mm, taken on 2nd Mar at 11:38 --20 - Canon EF16-35mm f/2.8L USM, 1/160th Sec, f/16, ISO 100, Focal Length 16mm, taken on 1st Mar at 13:43 |
|
Return to Part 1 of 2, A Landscape Photographer's Road trip Through The Cairngorms |
|
If you have enjoyed reading these 'Extra' chapters to my Guide Book and think you might also enjoy reading 79 more chapters across 270 pages, that also includes more than 340 Fine Art quality images, along with detailed descriptions and large scale maps to guide you to the exact location of where I took each and every one of them and which then goes onto discuss the techniques and tools I used to process them, but where everything is written in plain easy to understand English? Then please consider buying the Book. |
|