
Loch Maree and the Peak of Slioch - Part 1 |
Loch Maree is a large inland loch and within it there is a small but enchanted island and ancient Clan burial ground, that sits in the lee of the mountain of Slioch (which translates into English as "The Spear") as shown below. And where it is said that in the centre of this island there is yet another small loch surrounded by 'Wishing Trees' ( † ), with yet another island that sits within the middle of that smaller loch and is the place where the legendary Queen of the Fairies is said to live and hold her annual court of the Fairy Clans. It is also said that the waters around the island of the Fairy Queen have now become so enchanted over time by her continued presence there, that these waters are able to cure many debilitating ailments up to and including lunacy and where it is said that if anyone who is suffering from such an affliction is taken out to the island and sailed around it once, they will be quickly cured of their illness. But only on the strictest understanding that if they or anyone else were to land on the island and take anything away from it down to even the smallest of pebbles, that all of that stored up insanity along with every other ailment that had been previously cured there, would all be instantly released upon the world! ( † ) Wishing Trees or Money Trees, are the physical and historical evidence of a very old tradition that has been practiced throughout Scotland for many generations, and where people in the past would offer up their small donations of money to the fairies in exchange for a wish, by pushing or hammering a coin into the trunk of a Wishing Tree, in the hope that the fairies would then grant them their wish to cure an illness, or cure the illness of someone they had chosen to designate their wish to. Which is even something that Queen Victoria is known to have done in 1877, when she asked to be taken out to the enchanted island on Loch Maree, just so she could hammer an old penny into the bark of a Wishing Tree and then make a wish. |
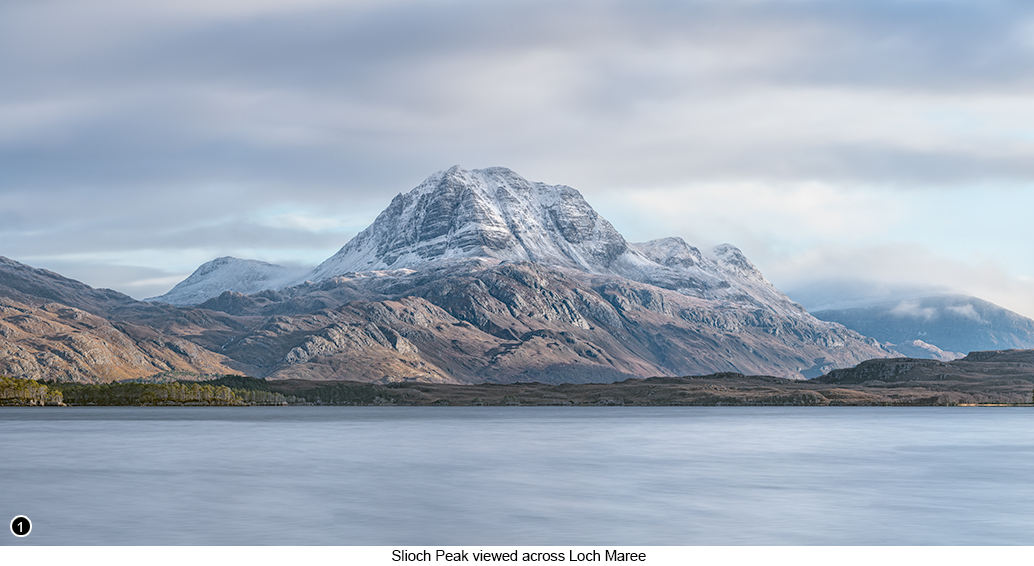 |
How to get there - Continuing East on from Loch Carron on the A896 (as shown on the large road map in my Photographer's Guide Book on page 188) and which then turns into the A890 after passing the Strathcarron junction, continue East for another 30 miles or so until you reach the roundabout at Achnasheen Street View - Map View and turn left here onto the A832. Now drive on further North for another 15 miles or so until you pass Loch a' Chroisg on your left (which can also be a good place for photography), until you reach a junction with the A896 at Kinlochewe Street View - Map View (which if you were to take this road back towards the Isle of Skye on your return trip, would lead you to yet another beautiful and very photographic location around the Loch Torridon area and which I have also discussed in great detail in my Book starting on page 209). Then continue along the A832 for several more miles until you reach the head of Loch Maree, but then continue on towards the Northern end of the loch. Now even though Loch Maree is a large inland Loch, there are only a few places where you can actually park safely and still get a good clear view of it and the Slioch Mountain range that sits on its opposite shore, the best of which is a large official car park and picnic area as shown in these two links Street View - Map View. This official car park can be located by turning down a small and almost hidden away right hand turn from the Northern end of the main A832 road, as it runs all the way alongside Loch Maree for its entire length as shown here Street View - Map View and where you will then drive down a small single track road that soon passes by a couple of abandoned buildings on your left and then a residential building on your right and which if you then carry on driving the last hundred yards or so through dense woodland, until you finally emerge into a large picnic and parking area, that has great views over Loch Maree to the peak of Slioch on the opposite shore, as shown above in SHOT 1 and below in SHOT 4. |
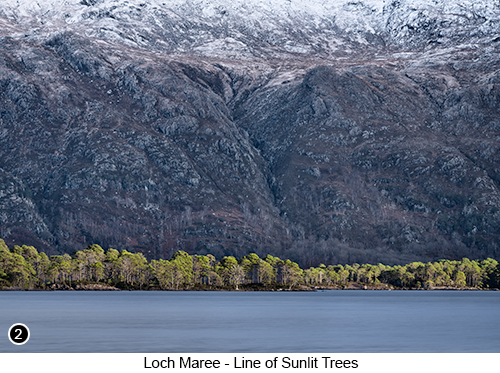 ------- -------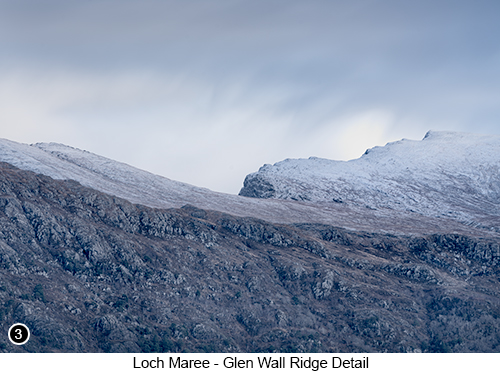 |
I have visited and photographed the scenery from this particular car park viewpoint of Slioch, about half a dozen times over the last few years and even though the views from here are always going to be spectacular, it isn't an easy location to just turn up, jump out of your car, shoot it and then expect to walk away with something you would be happy to hang on your wall. So when I visited this viewpoint again so I could add it to this guide and show you guys just how beautiful this area of Scotland really is, I knew if I was going to show you some images that would make you think this location is definitely somewhere worth coming to with your camera, as well as me being able to get enough worthwhile images to be able to write a full chapter about this location, that I would need to show you a lot more than just a single image of the Slioch Peak rising up from the opposite end of the loch. So (and this is a good tip for wherever you go to shoot in the world by the way) after taking the obvious shot of Slioch, as shown in SHOT 1 above and getting it out of the way as quickly as I could, I then began to concentrate on any other parts of the scenery that were catching my eye, as I started to scan around the horizon looking through the viewfinder of my camera with my 70/200 mounted, to see what else I could 'extract' from the scene that wasn't as obvious as my first shot, but where the light was still making whatever it was that I was looking at worth shooting. Now this scanning around looking for what the light is doing rather than what your subject should be, is an idea that can often work out quite well and help you to take shots that you would probably never have thought about taking otherwise, because it will force you to look at the entire scene in front of you differently, as you begin to concentrate solely on what the light is doing instead of what the subject is going to be and is how I came to take SHOTS 2 and 3 shown above. OK, I am now making all this sound a bit too easy aren't I? and yes it does help if you have built up enough experience over the years to be able react quickly to what you are seeing, but that is just practice and which is something that I know you will already be doing as much of as you possibly can. So if you are looking at SHOTS 2 and 3 above and thinking to yourself something like "My goodness, I am sure I would never be able to see shots like that", well neither did I until the light landed on it and pointed it out for me, because all I was really doing was pointing my camera at whatever the light was illuminating and then taking a shot of it in the best way that I could. So if you are prepared to give this idea a try, then I see no reason why you can't also take shots like this and get something that no one else has ever thought about shooting in that way before - oh yes you can!!!!! |
 |
|
I then went back to this exact same viewpoint for a second go at it several weeks later, so I could shoot a vertical shot of Slioch to add to this chapter (because you should always try to shoot at least one vertical, no matter what it is that your are photographing), as well as to try and get a few more shots of the loch and the Slioch Peak under different lighting conditions and which resulted in the SHOT 4 above, as well as photographing from a couple of other interesting locations I had previously driven past around the loch and which I have gone on to discuss throughout the second part of this Loch Maree chapter and can be accessed via the link at the bottom of this page. Tip: How to dust spot your images quickly and effectively using Photoshop and your peripheral vision - Now I am sure you already have your own method of dust spotting your images using whatever image processing software you prefer to use, but I use Photoshop and have found it to be by far the best application for this otherwise tedious hit and miss process. So as I do this photography thing full time and produce a lot of images and therefore have a lot of dust spotting to do, because you can never stop it happening no matter how clean you try to keep your kit (assuming you own an interchangeable lens camera of course). So over the years I have developed my own 'easy' method of increasing both the speed and accuracy of how I do this part of my image processing work, to save both the last vestiges of my sanity, as well stopping my eyeballs feeling as if they are about to roll out of their sockets, due to the mind numbing tedium associated with this part of my workflow. But anyway I digress, so if you want to know how I dust spot my images quickly and effectively using my peripheral vision, because I have found it to be much more effective, then do please read on... First of all, I do not dust spot my images until the very last stage of the process. Now the reason I leave it to the very end, is that if I start working on an image and about halfway through the process I decide that the image isn't really worth all the ongoing effort I am putting into it, then I can abandon it more easily if I have already limited my time and commitment to it. Because the more time you commit to processing an image, as doing something like your dust spotting can take if you do it first, means that even if you slowly begin to realise that the image really isn't worth all that effort, then you are more likely to keep going at it just because you don't want feel as though you have wasted all the time you have already put into it. Which means you can then end up with an image that deep down you know isn't as good as you would like it to be, but that has now been fully and perfectly processed and that you also know will just end up sat in some dark corner of your hard drive and that you will probably never look at it again. So as dust spotting can be both intensive and time consuming depending on where the dust spots happen to fall within your image, then why not leave it until last, because if the image has been worth all the effort you have already put into processing it, then by the time you get to the tedious part of where you only have the dust spotting left to do, it will then seem worth all that extra effort. So assuming you have done all you want to do the image and you are sat back looking at your masterpiece on screen and everything is perfect except for those annoying dust spots, save this version of it as a backup, then flatten the image into a single Background layer and then duplicate it by creating a second layer above the flattened background layer by using Ctrl+J (or whatever the equivalent to Ctrl is on a Mac). Now go into the 100% view of the image with Ctrl+1 and then go one step further to 200% with Ctrl++ (that's control plus the + sign). You should now have your image displaying on screen at 200%. Now use Ctrl+ the Home key which will make your image all but disappear into the bottom right hand corner of your screen. Then using the scroll bars, move what you can see of the image until it fills around half of the screen except for a large gap to the left and a smaller gap at the top of the screen, so that the top left hand corner of your image is now sat near to the top centre of your screen. Now load up your Spot Healing Brush (set to 95% hardness and 25% spacing) and which looks like an Elastoplast that you would normally use to cover a small wound and make sure that it is the tool that looks like an Elastoplast and not one of its other subcategories. Now using the horizontal scroll bar via your mouse pointer, start to move your image from right to left in an even and continuous motion at whatever speed you feel comfortable with, as you continue to stare at your picture, but with a sort of fixed distance unmoving gaze that remains fixed on the centre of the screen, as though you are trying to focus two or three inches in front of the screen, so that you go ever so slightly crossed eyed. This means you are then using the peripheral part of your vision, because you will then be able to easily identify any dust spots as they scroll horizontally into your peripheral viewpoint, which is better at picking up shapes and anomalies than your central vision is, which is usually better at identifying edge contrast and detail - so how does this work? Well have you ever looked at something on the horizon that looks small because it is a great distance away from you such a communication tower, but that when you look straight at it and try to focus on it it seems to almost disappear in the centre of your vision, yet if you look for it again by moving your eyes slightly off to one side of it, that it seems to reappear once again albeit slightly out of focus? And if you haven't tried this, then try it the next time you are out and you are able to find something small on the horizon that you can try to focus on with your eyes alone, because you may be surprised at just how effective this peripheral vision trick can be and how your eyes actually work. Anyway, getting back to the subject - so you are now moving the image so that it scrolls continuously and evenly across the screen in front of your fixed but slightly out of focus gaze, as you look for any anomalies such as dust spots and which will then become instantly obvious to you as they move into view, as big dark regular shaped but slightly out of focus blobs in your peripheral vision and that just shouldn't be there. Then when you do locate a dust spot and which will now become obvious to you no matter how faded or indistinguishable they would normally be using any other method, you can then focus your central vision back onto it, as you now begin to move the scroll bar left and right in smaller and smaller increments, until you can really home into where the spot is using the central part of your vision, before clicking on it with your Spot Healing Brush. Then when you get all the way over to the right end of that part of your 200% magnified image, scroll down to the next part of the image by using the scroll wheel on your mouse (or the on-screen vertical scroll bar if your mouse doesn't have one), to scroll down about two thirds of what you can already see on your screen (three rolls of my mouse's scroll wheel seems to work fine on my system) and then start the process again, but this time from left to right and keep doing it until the whole image has been scanned for dust spots. I would say that this whole process takes me no more than 10 minutes, for an image that is around 8,000 pixels along its longest side and that when I have completed this task, I can be pretty confident that I have caught and repaired all the dust spots that can been seen with the naked eye. Now as we all know there are some dust spots that need a little bit more attention than can be gained from using just the Spot Healing Brush Tool alone, such as a dust spot that crosses the edge of some significant detail etc. So for more complicated dust spots I will either resort to using the clone tool, or make a small selection around the dust spot with the Lasso Tool and then use the Content Aware Fill option (which is setup on my computer with a short cut key combination using Shift+Backspace), or I will use the Patch Tool if nothing else seems to be working for me and which you can find as a subset tool of the Spot Healing Brush's fly out submenu, or even a combination of all of the above if the dust spot is a particularly stubborn one. |
--Exif information for each of the numbered shots shown throughout this chapter --1 - Canon EF70-200/2.8L IS USM, 30 Sec with 10 stop ND, f/11 (4 shot pano), ISO 50, Focal Length 165mm, taken on 3rd Dec at 11:57 --3 - Canon EF70-200/2.8L IS USM, 30 Sec with 10 stop ND, f/11, ISO 50, Focal Length 200mm, taken on 3rd Dec at 12:07 --4 - Canon EF70-200/2.8L IS USM, 1/60th Sec, f/11, ISO 100, Focal Length 135mm (cropped), taken on 4th Jan at 13:37 |
If you have enjoyed reading these 'Extra' chapters to my Guide Book and think you might also enjoy reading 79 more chapters across 270 pages, that also includes more than 340 Fine Art quality images, along with detailed descriptions and large scale maps to guide you to the exact location of where I took each and every one of them and which then goes onto discuss the techniques and tools I used to process them, but where everything is written in plain easy to understand English? Then please consider buying the Book. |
|