
Sutherland and the North, North Western regions of Scotland - Part 1 of 4 Wild, remote, rugged and windswept, but most importantly of all, breathtakingly beautiful and quite rarely photographed |
 |
My heart's in the Highlands, my heart is not here,
Farewell to the Highlands, farewell to the North, Robert Burns - 1794 |
How to get there - Driving further North, North West on the A837, heading towards the medium sized ferry port and fishing town of Ullapool, you will then arrive at the outskirts of the town, with the wide expanse of Loch Broom over to your left. But then, just before you drive into the town proper, you will see a sign pointing you to Lochinver (A837) and the NC500 Route on your right at the next 'T' junction, take this route Street View, Map View - please note, if you need to top up on food supplies or petrol etc., then go into the town of Ullapool first and get whatever it is that you need, because even though there are a few shops and petrol stations, scattered all along the route you are going to be driving along, they are few and far between, so stock up here first. |
|
 |
|
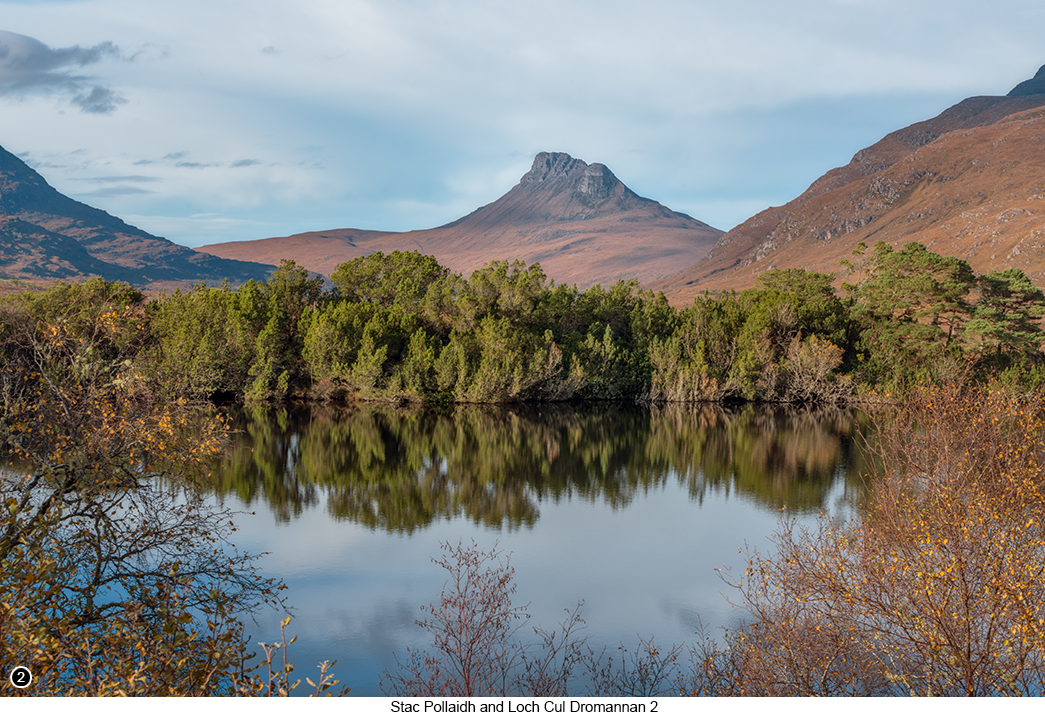
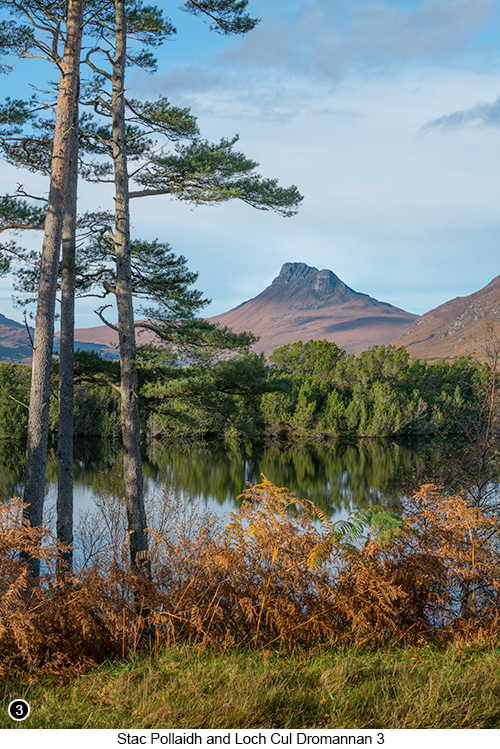
Then continue driving on NNW for another 9 miles or so, until you arrive at the main roadside car park viewpoint of Stac Pollaidh, as covered in this previous chapter. Then once you are finished shooting this wide panoramic scene from the car park, continue driving further up and along the A837, as the road crests the hill, before it starts to head down the other side and heading towards, a small loch that you will soon see coming up towards you on your left. This small Loch is called Cul Dromannan and is a great place to shoot reflections of the Stac Pollaidh peak and surrounding hills. But to be able to see and photograph these reflections, you will need to be here, when all the leaves from the roadside trees have mostly fallen off, which means towards the end of autumn through to early spring. Because when the trees are in full leaf, then it becomes very difficult indeed, to find a gap in the foliage that is large enough, to shoot through for a clean shot of the reflection. And is why I believe, this scene has rarely been photographed, as most people driving down this road in summer, probably wouldn't even notice that this little loch exists. You will then see there is a small track running off to your right Street View, Map View, where you should be able to park your vehicle safely off the road for this shoot. But if this track is already occupied, then there is a much larger official lay by parking area, just a couple of hundred yards further down the road on your left, so park there and walk back up to this viewpoint, to take your shots of this pretty little scene, as shown in SHOTS 1 and 2 above, as well as SHOT 3 shown here to the right. To get these three shots, I jumped out of the car and using my camera handheld and with the lens I just happened to have on, which was the 70/200mm. I started to work my way up from where I had parked on the track, trying to shoot through any of the gaps I could find that were wide enough, as I knew I would not have the reflection for long, as there was quite a gusty wind starting to build up as I was shooting. So I went into what I jokingly refer to as my "Photo Frenzy" mode (which I am sure you must have also experienced), whereby I just run and gun as quickly as I can, as I tried to grab as many shots of the reflection as possible, because I knew the conditions were about to change and how it would all be over in a blink of an eye - which it was. I suppose if I'd had little more to time to prepare, I would have probably preferred to be using my 24-105mm instead of the 70/200mm. Because the reach of the 70/200mm was proving to be just a bit too long and so I found I was having to stand on the opposite side of the road from the loch, just to be able to get something like the framing that I wanted at 70mm. Whereas if I'd had the 24-105mm on the camera, then I know I could have move closer into the scene and tighter into the trees, so I could open up those gaps a little by changing my perspective. But then that would mean I would have lost some of the long lens compression effects, that I was getting with my 70/200mm and that was making Stac Pol, look considerably larger and closer to me than it was. Oh well, ya wins some and ya loses some, as the old saying goes. But for this scene and on that day, I think that not having the time to choose the lens I would have preferred to be using, but instead having to go with whatever lens I just happened to have on, turned out to be the correct choice for all of these three shots. |
 |
 |
|
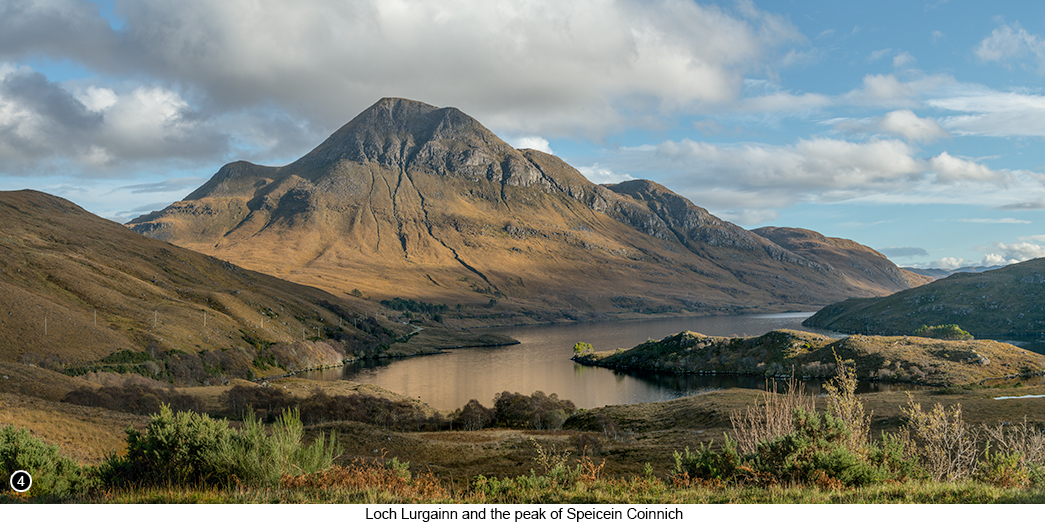
Then, having finished shooting the Stac Pollaidh peak at Loch Cul Dromannan, continue driving North for another 3/4 of a mile, until you see a left turn leading onto an unnamed road and a signpost, directing you to the village of Achiltibuie 15 miles further on to your left, take this left turn Street View, Map View. Continue driving on this road heading North for another 9 miles or so, until you start to drive past the shores of Loch Lurgainn on your left and then further on up the hill past the official Stac Pollaidh car park (park here if you wish to climb up to the top of the Stac Pollaidh peak, to take some photographs of the stunning 360 degree views that can be seen from up there), until you reach a viewpoint (without any official parking area) looking over Loch Lurgainn, with the very photogenic peak of Speicein Coinnich on the opposite side of it, as shown in the multi stitched pano SHOT 4 above, Street View, Map View. If you are going to park here to take your version of this shot (and why wouldn't you if the weather is good?), then look over towards the left hand side of the road, near to the apex of this bend, where you will see there is just enough room to safely squeeze your vehicle, fully off the road and park here. This is another shot that I would not have taken with the 70/200mm if I'd had a choice and would again have preferred to use my 24-105mm if I'd had the time to swap out that lens. So yet again this turned into another 'run and gun' type of image, using what I thought to be the wrong lens at the time, but which then turned out to be the correct lens when I look at this image now. You see when we arrived here and I saw this scene opening up to my left, I liked how the light was hitting the main peak in the background and the placement of the clouds behind it. But what really caught my eye and what I really loved about the scene, was how the light was picking out that single tree sticking out into the middle of the loch and which was also adding a sort of rim lighting effect to the series of small hills behind it. But when I got out of the car and looked to my right, I could see where a line of dense heavy clouds, were quickly coming towards me and how they would soon start to block out the sun and put this single tree and the hills to the right of it, into a deep and much less interesting shadow. So working quickly (again) and not having time to swap out my lens and to compensate for the limitations of what I knew I would be able to fit into the frame using the 70/200mm, I simply turned my camera into the vertical/portrait orientation and then machine gunned the whole scene from left to right as quickly as I could and which again turned out to be the correct thing to do and the correct lens to be doing it with. Also just before I began machine gunning the scene and having my second photo frenzy in under an hour, as well as using a lens I would not have chosen to use if I'd had the time to change it, I set my focus point to about a third of the way into the scene using auto focus, which I still had turned on from my previous photo frenzy at Loch Cul Dromannan. I then turned auto focus off again (but left the stabilisation on) and started to fire off a series of 9 overlapping vertical handheld shots, from left to right. The clouds then moved in quickly as I knew they would and snuffed out the light on the tree and the hills behind it and the shot was gone. Although I did wait around for another 20 minutes or so, as my wife broke out the flask and we drank a cup of tea, just to see if the small tree and the hills behind it would light up again, but they didn't. So we decided to move on, without me knowing whether I had captured the scene to my liking or not, but which turned out that I had. Do you ever get the question from your other half after you have been running around shooting something, who asks if you have "got it?" Only for you to reply in an uncertain voice, that you are not sure and how you will have to wait and see what it looks like on the computer when you get home, because you genuinely do not feel confident that you have? Well this was definitely one of those shots. And isn't it quite exhilarating, when you do get time to look at your image on screen later and realise, that even though you were shooting it in a frenzied 'auto-pilot' mode using only muscle memory, that everything turned out to be exactly as you wanted it to be in the end? Ah, the joys of landscape photography..! So I suppose my advice to you based on my experience with SHOT 4 above, is that when you see an obvious shot such as this, then also look around within the scene and the secondary elements within it, to see how the light is playing on them and if they are complimenting the scene in anyway, no matter how small. Because I believe it is these tiny but significant secondary elements, that can lift a good shot into something a lot more special, because as we all know, light is absolutely everything in photography. So whenever you are shooting any scene and notice that the light is momentarily giving you that little bit of something extra (the 'X Factor' you could say), then do all you can to capture it, before it goes away. |
|
 |
|
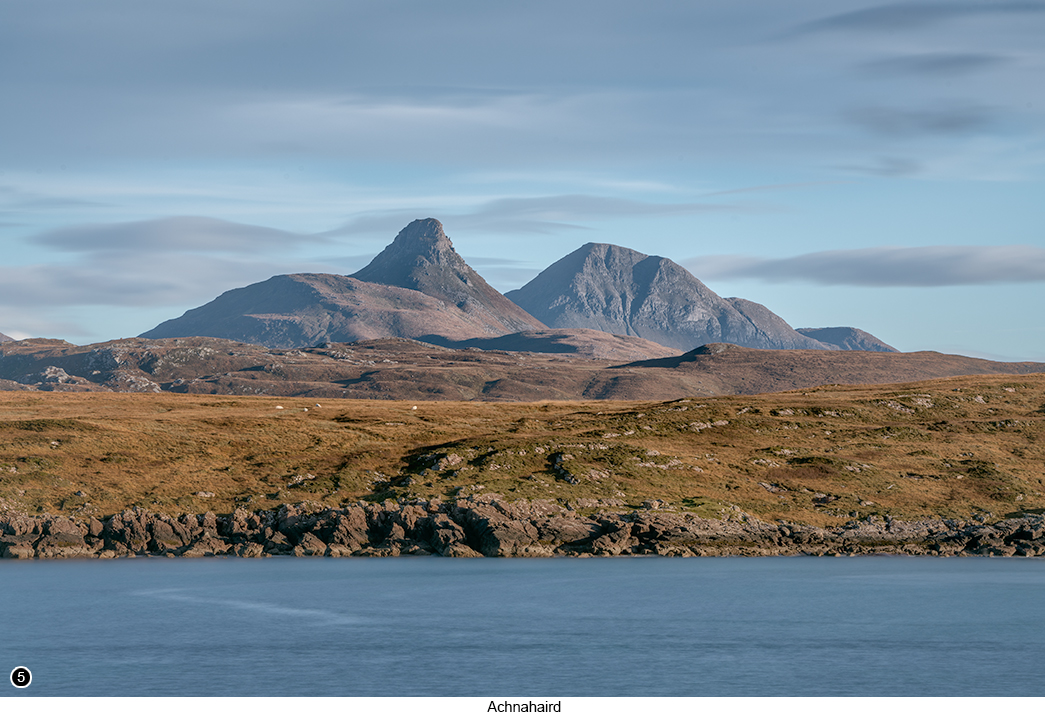
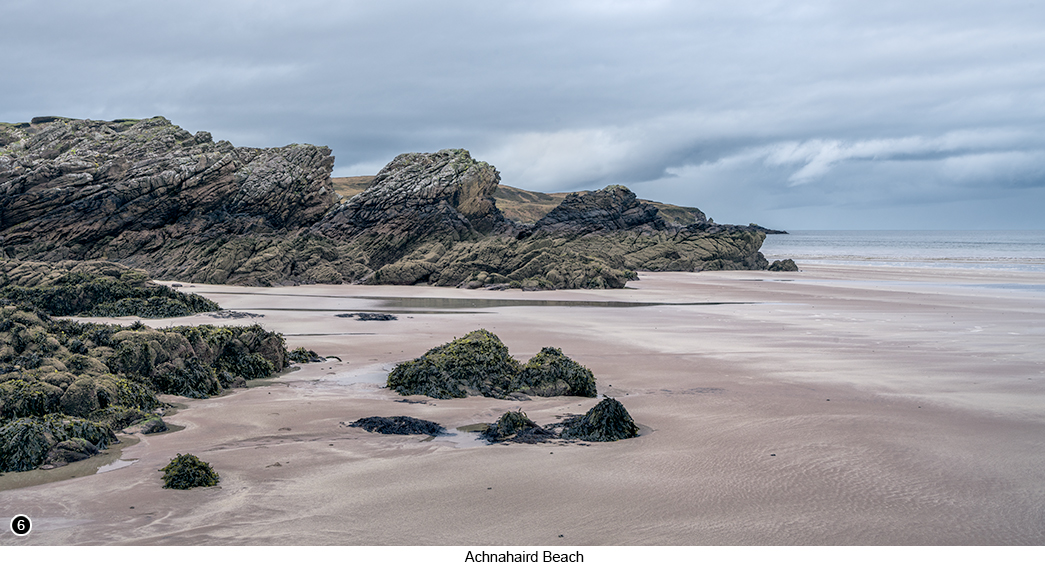
Now continue driving for another 3 miles or so, until you reach a junction, with a signpost telling you that Inverkirkaig is 7 miles to your right and Achiltibuie is 6 miles further straight on Street View, Map View and continue straight on towards Achiltibuie - although be mindful, that we will be returning to this junction after discussing the next location and then heading towards Inverkirkaig, . You will then come to a 'T' junction, with Achnahaird signposted as being half a mile on your right, so turn right here, Street View, Map View. Now continue driving North North West for another mile or so, until after passing several houses scattered along the roadside to your right and with amazing views to your left and behind you, you will eventually come to a signpost directing you to the Beach to your right. Take this turn and drive down the last few yards to the large official parking area at Achnahaird Beach, Street View, Map View, with a magnificent view across to the mountain range we have already been photographing, but from other closer in viewpoints, as shown in SHOT 5 above . The car park here is quite large and, as you are now in quite a remote location that is well off the beaten track for tourists, that not many people other than the local dog walkers know about, you should pretty much have the whole place to yourself. You probably need to allow yourself at least three hours at this location, to fully take in what it has to offer you photographically, so don't rush this one, but take your time and get into the feel of the place. Once out of your vehicle and after taking, a few shots of the very picturesque car park view of the mountain range shown in SHOT 5 above, with your medium to long zoom, you will then see at the opposite side of the car park, there is a walkers gate in front of a path that leads over to the beach. So go through the walkers gate and head out along the path. The path then meanders over the top of a couple of small rolling hills, where you will see that all the grass on top of them, is being continually mown down flat by the local flock of sheep, to appear as tightly fitting as the green felt baize on top of a snooker table. You will then reach the end of this short path, as you then walk down the side of a series of small sand dunes and then across a few rocks surrounding the edge of the beach area and then out onto the sand of this small, but very beautiful beach at Achnahaird Bay. You will also find, there is a fast flowing burn (stream) over at the opposite end of the beach, which depending on the recent rainfall and how high and fast the flow is, can create some very interesting abstract patters in the sand for you to photograph. My choice of lens for the beach at Achnahaird, was to swap out my 70/200mm (finally) and throw on my 16-35mm wide angle lens, as well as to take along my 24-105mm (which I never used) and my 10 stop ND, as I knew I would want to capture a very wide view of the beach in some of my shots, as well as to flatten out the sea in others. Tip: the best time to be here in my opinion, is during a 3/4 ebbing tide. This way you should be able to photograph anywhere on the beach, without having to worry about trying to frame out any dog walkers, dogs, boot prints, or paw marks. Also as this is such a small bay at only a few hundred yards wide, an ebb tide will you give a much wider area to work with, as well as access to the many interesting rock structures along its left edge, as shown below in Shots 6 and 7. |
|
 |
|
 |
|
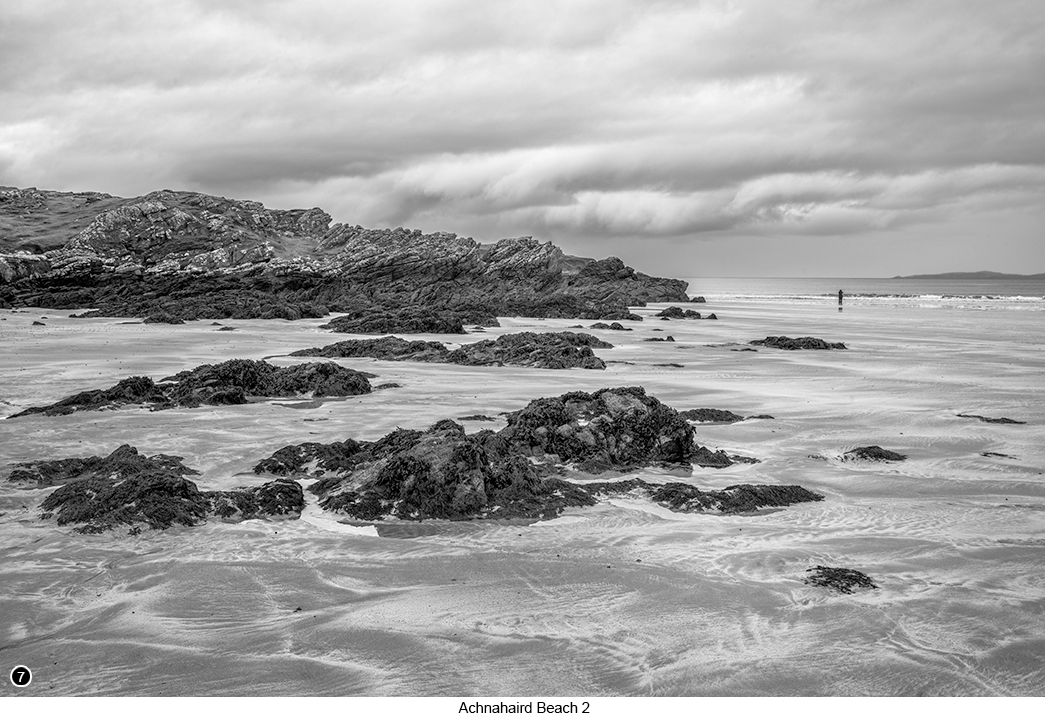
In SHOT 7 above, that is my dear wife Ann with her trusty old Zeiss binoculars, tracking a couple of Sea Eagles circling high above us in the distance. She is a very, very keen bird and wildlife watcher, so asking her not to walk through my scene as I am photographing it, when there are a couple of eight foot wingspan predators circling overhead, was always going to be a pointless exercise on my part. But for this shot, I think she actually does give the image a sense of scale, as well as a focus point and as I have come to realise over the many decades we have been married, that whenever it comes to any type of disagreement between the two of us, I know I will always get in the last word or two, which is usually something along the lines of "Yes Dear, whatever you say Dear..." |
|
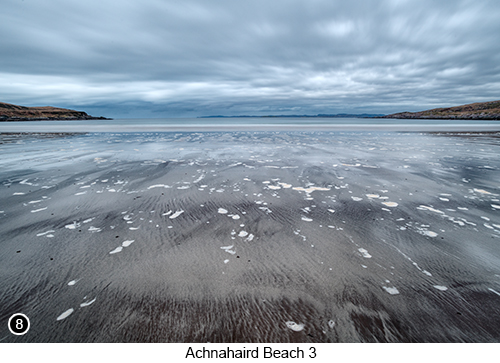 |
I then continued to walk across the beach to the right, when I notice the large amount of spume blowing about across the sand, as well as the interesting contrast that the prehistoric volcanic sand particles (created around 600,000,000 years ago), were giving to the scene as a whole. So I lined up a shot as wide as I could at 16mm and threw on my 10 stop ND, to get my final long exposure shot of the Achnahaird Beach, as shown here in SHOT 8 to the left. However, when I was processing this image to the left on my computer, I wanted to show you the viewer the contrast between the two different types of sand, as well as the empty feeling of remoteness that this location was giving me. So when I first looked at the file on screen and it didn't look as contrasty as my memory was telling me it should, I bumped up the contrast slider in Photoshop as far as I could, to replicate how my memory saw it. Yet to do so in a way that neither blew out the highlights, or blocked up the shadows. So I suppose what I am trying to say to you, is that when you are here and especially if it's a bright sunny day, then you might look at that this part of the beach and think that it doesn't look anything like as contrasty in reality and which in all honesty it probably doesn't. But in this instance, I was never trying to just replicate the exact look of the scene when I was there, but instead go for a much more 'Artistic' look based on my emotional memories of it. So my advice to you would be, is to always try to recreate what your memories are telling you the scene looked like and felt like when you were there and not just what the camera was able to capture. |
Having now photographed this tiny but very pretty beach area at Achnahaird, you will then need to retrace your steps back to the Inverkirkaig junction, Street View, Map View, but this time turn left and then continue on up the hill towards Inverkirkaig. Now this stretch of road, is very photogenic all along its route, with lots of tiny lochs and bays on either side of the road, as well as lots of lichen covered ancient woodland, so keep your eyes peeled for the many photo ops you will find along this route. But unfortunately on the day that we were there, it was raining cats and dogs, so the shot I am now showing you on the right in SHOT 9, is the only one I got from this route on that day that I am happy with, so if you like it (which I sincerely hope that you do), then here is the exact location where I took it, Street View, Map View. As I say, the weather when I was setting up to take this last long exposure shot, really was quite atrocious and the rain was coming down hard and horizontal. In fact there was so much moisture in the atmosphere, that when it was being slammed into these peaks by the high winds, it was creating this sort of localised cloud inversion. Now we all love a good cloud inversion don't we? So even though I knew I would be getting myself and my gear totally drenched, I also knew I had to photograph it. So I broke out my old golfing umbrella and opened it up as I pointed it into to the wind. I then set up my camera with my 10 stop ND on the tripod and locked everything down tightly. Then using the brolly to create as much shelter as I could for the camera, I took a couple of long exposure shots and this is one of them. |
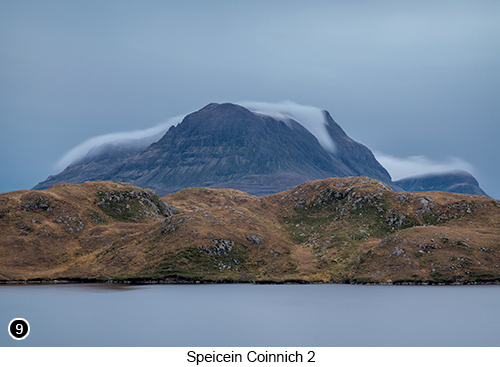 |
| Tip: I had a good idea Shot 9 would work out, even in those very blustery conditions, because as odd as this might sound, sometimes when there is far too much wind buffeting around you and your tripod, yet you want as much sharp detail as you possibly can, going for a really long exposure can often work out, much better than a short exposure. But don't ask me why this can work when all else fails, it just does and perhaps has something to do with the majority of the 30 second exposure time (or longer), where even though the camera is vibrating continually on the tripod throughout the shot, it is none the less spending most of that 30 seconds returning to, or passing through its central position. | |
--Exif information for each of the numbered shots shown throughout this chapter --1 - Canon EF70-200/2.8L IS USM, 1/160th Sec, f/13, ISO 100, Focal Length 95mm, taken on 6th Nov at 12:59 --3 - Canon EF70-200/2.8L IS USM, 1/80th Sec, f/16, ISO 100, Focal Length 70mm, taken on 6th Nov at 13:06 --4 - Canon EF70-200/2.8L IS USM, 1/80th Sec (9 shot vertical pano), f/16, ISO 100, Focal Length 70mm, taken on 6th Nov at 13:30 --5 - Canon EF70-200/2.8L IS USM, 25 Sec (with 10 stop screw-in ND), f/16, ISO 50, Focal Length 150mm, taken on 6th Nov at 14:16 --6 - Canon EF16-35/2.8L USM, 1/8th Sec, f/16, ISO 100, Focal Length 35mm, taken on 12th Nov at 14:10 --7 - Canon EF16-35/2.8L USM, 1/13th Sec, f/16, ISO 100, Focal Length 35mm, taken on 12th Nov at 14:12 --8 - Canon EF16-35/2.8L USM, 30 Sec (with 10 stop screw-in ND), f/16, ISO 250, Focal Length 16mm, taken on 12th Nov at 14:28 --9 - Canon EF70-200/2.8L IS USM, 30 Sec (with 10 stop screw-in ND), f/8, ISO 64, Focal Length 100mm, taken on 12th Nov at 15:47 |
|
| Continue on to part 2 of 4 - Sutherland and the North, North Western regions of Scotland |
|
If you have enjoyed reading these 'Extra' chapters to my Guide Book and think you might also enjoy reading 79 more chapters across 270 pages, that also includes more than 340 Fine Art quality images, along with detailed descriptions and large scale maps to guide you to the exact location of where I took each and every one of them and which then goes onto discuss the techniques and tools I used to process them, but where everything is written in plain easy to understand English? Then please consider buying the Book. |
|