
Sutherland and the North, North Western regions of Scotland - Part 4 of 4 Wild, remote, rugged and windswept, but most importantly of all, breathtakingly beautiful and quite rarely photographed |
Having now photographed your way around the inside of Smoo Cave and its waterfall, as well as the steep, cliff sided bay that it sits in, you are now going to travel another 30 miles along the A838 and then out onto some of the most Northerly and most beautiful, coastal areas of Scotland. So to do this, drive out of the Smoo Cave car park and immediately turn left back onto the A838. Continue driving along the A838, as you head towards Caithness and then up onto the Flow country, until you reach the final destination of this mini 4 part guide and the old abandoned ruins of Moine House. The name of the sea loch you will driving alongside to your left for most of this journey, is called Loch Eriboll and the names of the scattered, thinly populated roadside settlements you will be passing through are - Sangobeg - Rispond - Portnancon - Laid - Polla - Eribol - Hope, until you finally arrive at the amazingly photographic ruins of Moine House. |
|
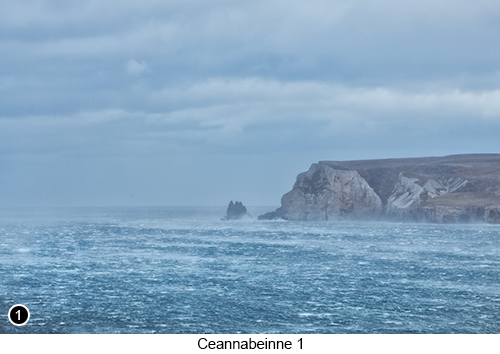 |
But first let me tell you about the weather we experienced, as we traveled around in this area. It was bad, really bad, in fact it got so bad at one point, it became amazingly good - let me explain... The weather when we arrived on the first day of our tour around Sutherland (we stayed for a week) was brilliant. Sunny, flat calm and great for a sightseeing holiday. A bit bright and contrasty for photography, but really good for sightseeing, so musn't grumble. Then on the second day, even though the weather forecast was still telling us we would be having wall-to-wall sunshine and calm weather for the entire week, never the less a storm system began to move in and it turned out to be a big one and which lasted for 4 full days out of the 7 we were there. It started quietly at first, with heavy rain and flat grey skies. Then it was heavy rain, flat grey skies and windy. Then it was heavy rain and flat grey skies, but with winds that were now starting to build up into a gale. Then by day 3, the wind was really getting its act together and was now buffeting us from all directions, as it continued to ratchet up to a whole new level and then all the way up into hurricane force speeds, at well over 100mph. However, even though the weather become quite extreme, the clouds did have a silver lining to them you could say. Because as the wind speeds hit their peak, they began to tear open large blue gaps in the clouds. So one minute it would be drenching, torrential rain, as the car was being bounced around on its axles by the wind, the next minute the sun would break out just long enough, to allow me to grab a few shots out of the car's passenger window. As shown here in SHOT 1 to the left and SHOT 2 below. |
In fact the weather got so bad, that by the end of the week (when it had calmed down a little), the lady who owned the cottage we were staying at, came around to apologise for how bad the weather had been and how it must have totally ruined our holiday and even though she was born here, she had never seen anything like it. "Don't worry" I said, "we have really enjoyed ourselves and it was great for photography, as well as very exciting to see. So can we book the cottage for the same week next year please?" How to get there - follow the A838 to the left out of the Smoo Cave car park, before ascending up to the top of a slowly inclining hill, before you then drop back down to the coastline and start to drive past, by mile after mile of golden sandy beaches to your left, that all look as if no one has ever walked on them. The road then starts to climb up and down, as it heads further around the coast to your right. You will then come to a small area where you can pull into the side of the road and photograph the sea view, Street View, Map View, as shown in SHOT 1 above and SHOT 2 to the right. I am sure there are lots of paths and routes, down to the many pristine beaches you will find to your left, all along this stretch of road. But due to intensity of the weather (as described above), we didn't dare venture too far away from the car. So even though I am showing you several sea view shots in this next section, I took all of them from the safety of our vehicle, and assuming the weather is no where near as bad for you on your visit, then you should also be able to get down onto these beaches at various places, to work any of the scenes from there. So look out for any tracks that you find, that will allow you to do that. |
 |
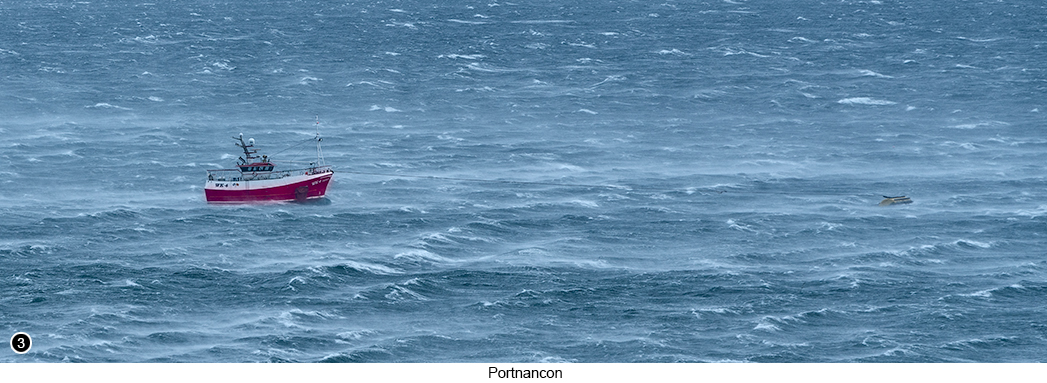
| Then as you continue to drive up the glen, you will see a range of low lying mountains to your front, as you near the head of the loch and also where the width of the sea loch to your left, slowly begins to narrow. Again I was forced to take SHOT 3 as shown below, through the passenger window and also parked in what is not an official parking area, but someone's drive Street View, Map View. By this time, I knew there was no way I was getting out of the vehicle anymore, as the wind speeds had become ridiculous and scary and so I knew I wouldn't be able to stand up in the wind, never mind holding the camera steady enough to take this shot, even though I knew I had to take it, just to show you how bad the weather had become. Where even a boat that had been moored securely, onto what I am sure its owner must have thought was a really safe anchorage point, looked as though it was about to snap its moorings and break free at any moment. | |
 |
|
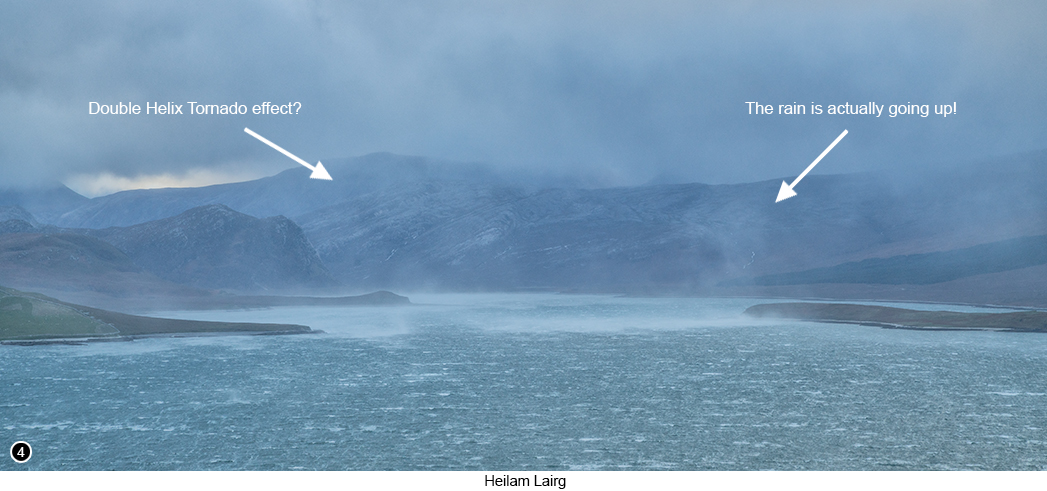
So on we drove further into the maelstrom, with my wife now starting to request that we turn around and go home, "no way" I said, "I am loving this", just as we crawled round a bend in the road at the head of the loch and where a particularly strong gust of wind hit us and lifted the front of our vehicle off the road, spinning us several feet to the left, before dropping us back down onto the tarmac. And as I said in the previous chapter, we were driving in a large, heavy, SUV crossover sized vehicle. But by the time we had both registered what had just happened, I had instinctively jerked the steering wheel back to the right and pulled the vehicle back onto the road and managed to force it round the bend, where the wind seemed to be a little less ridiculous. Just then, a large slab sided camper van drove past us coming in the opposite direction and disappeared around the bend we had just struggled to get around. "Oh dear" I said to my wife, "I think he is going to have some fun getting that thing around the head of the loch in one piece." But when we drove back this way a few hours later, there were no piles of white fibreglass kindling blowing across the road, so well done to him for making it through safely. Now I bet as you are reading this, you are starting to think to yourself "Oh come on Dave, you must be exaggerating, because surely the weather can't have been that bad and so you must be making it up?" So to prove I am not exaggerating or making this up, look at SHOT 4 shown below and how the water from the loch, is being ripped up into the sky by the ferocity of the wind and the 'Double Helix' tornado effect it is creating. So as we sat there mouths agape looking this scene, with the car still bouncing around on its springs, I turned to my wife and said "Wow, this has got to be the first and only time, we will ever see weather so bad, that the rain is actually going up!" Street View, Map View. But anyway, I am sure when you are here the weather will be much nicer (I mean surely it couldn't be any worse, could it?). But boy was it fun being here, at a time when the weather got so bad, it turned into being amazing. |
|
 |
|
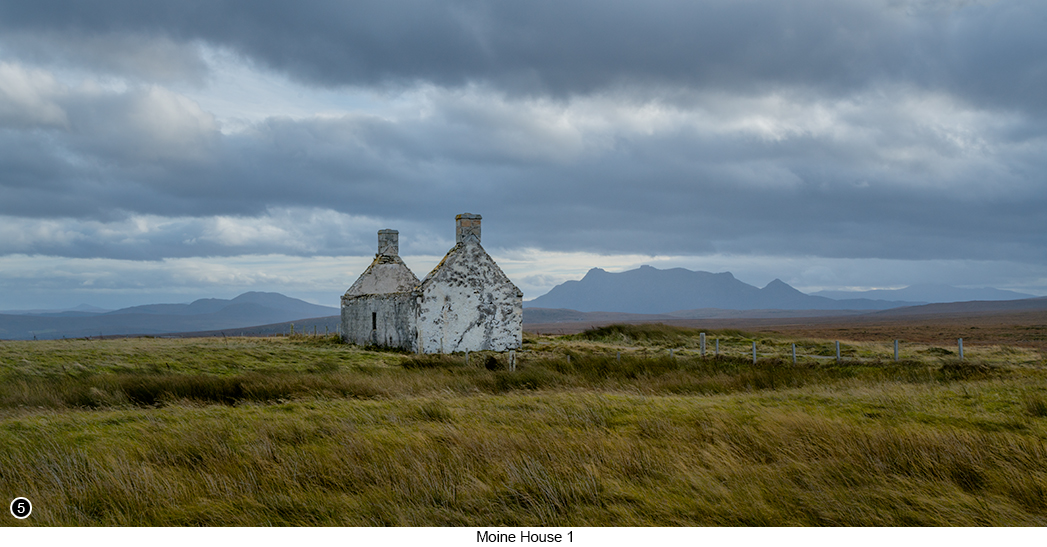
So continue driving along the A838, as it winds its way further up and along the coastline, with lots more to see and photograph over to your left. Until having driven through a small village with a holiday camp, the road then begins to make its way up a gradual incline, with a few wooded areas scattered on both sides of the road, to then finally emerge out into the open expanse of the 'Flow Country', or as it used to be called in times gone by, 'The Moine'. The 'Moine ' (in ancient Scottish Gaelic - A' Mhoine) translates into English as either 'The Moan' or 'The Great Morass' and is a 4,000 square kilometre area of deep, untouched blanket peat bog, which until the early 1700's was said to be completely impassable by man nor beast. And where anyone who tried to cross it prior to that point, got sucked down into the peat bog and never seen again. Then in the mid 1700's, a long and tortuous route was found through the bog, that was said to be tiring, heavy going, slow and dangerous. Because one minute you could find yourself walking over springy dry moss and the next minute wading through deep black sludge, hoping that it didn't get too deep and suck you under. A safe(ish) route was then opened up by an enterprising local, who it is said knew the area like the back of his hand and who for a fee, would endeavour to get you across the Moine, riding upon one of his tiny 'Bog Ponies'. The road that you are now driving over that crosses the Moine, was built in 1830 by the Duke of Sutherland, so he could more easily move his troops around this area, in case there were any new uprisings. The clever construction method he used, to overcome the fact that most of this peat bog is floating over the top of deep water, was to first lay down thousands up upon thousands of coppiced wooden stick bundles, from one end of the Moine to the other. He then had a fresh layer of turf laid over the top of these bundles and then a thick layer of gravel laid over the top of the turf. The Duke also had a small lodging house built about half way along this new road, as a place of refuge for the weary traveler, the remains of which can still be seen and photographed, as it stands stark, abandoned and alone on the skyline, as shown in SHOT 5 below. |
|
 |
|
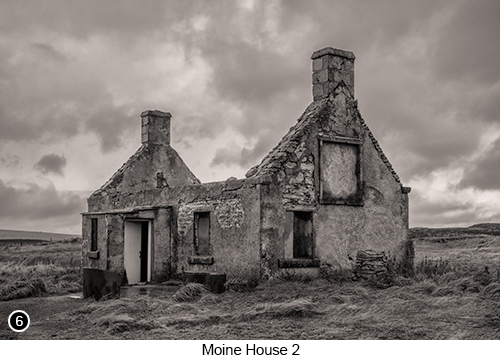
If when you are wandering around this old ruined building looking for shots, of which there are many, if you walk past the front of the house and onto the other end of it, to then look up at its gable end as shown in SHOT 6 below, you will see there is the weather worn remnants of a large stone plaque and the barely legible inscription that was originally chiseled into it, which reads as follows: This house erected for the refuge of the traveller was to commemorate the construction of the Road across the deep and dangerous morass of the Moin, inpractible to all but the hardy and active native; to him even it was a day of toil and of labour. This road was made in the year 1830 at the sole expense of the Marquess of Stafford. Thise who feel not the delay nor experience the fatigue, nor suffer from the risks and interruptions incident to the former state of the country, can but slightly estimate the advantage of its present improved conditions or what it cost to procure them. To mark this change, to note these facts, to record this date, this inscription is put up and dedicated by James Loch Esq. M.P., Auditor and Commisioner upon his Lordship's Estates and John Horseburgh Esq., factor for the Reay Country, Strathnaver, Strath Halladale and Assynt, under whose direction this work was executed and who alone know the difficulties that occurred in its execution and the liberality and perseverance by which they were overcome. Peter Lawson, Surveyor. |
|
 |
As you drive over the top of the Moine, you will see Moine House far off in the distance to your front right, standing stark and alone on the skyline, but set against the backdrop of the flow country and a range of low lying mountains in the distance. Keep going for another couple of miles, until you see a sign for the small official car park on your right Street View, Map View, so pull in here and park wherever you can. Once in the car park, you will see there is a small steep grass covered bank to the left of it. Climb up this bank and standing right next to the fence, you will then see the scene as shown in SHOT 5 above. I shot this wide so I could then crop it down later into a pano - I was also still fighting against the ferocity of the wind by the way, so I had no other choice, than to take all the shots shown throughout the final part of this chapter, handheld. Also in SHOT 5 above, I framed up the shot, so that the house sat as evenly in the centre of the dip in the mountains behind it as I could, as well as slightly to the left of centre in the frame, so that the shot as a whole, would then have a more complete feeling of compositional balance. Now I know that one of the BIGGEST rules in photography, is the rule of compositional thirds, but I would like to offer you a bit of a 'Secret Tip' here, that might just help to dramatically improve your work. And that is to suggest, that the the next time you have a subject that you would normally fit straight onto the compositional thirds without thinking, is to instead try placing it onto the 2/5th of the frame (40% in from two adjacent edges), as I have done here as shown SHOT 5 above. |
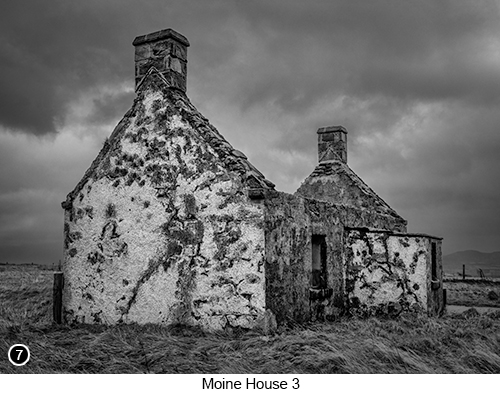
You can still take your 1/3rds rule shot for your next frame of course, but then later on when reviewing your work back on the computer, try comparing the two frames side by side, to see which one feels that little bit more balanced and composed. Because you may well be surprised to find that the 40% shot, just feels right. I often see vloggers on youtube, constantly using the rule of thirds for every single shot that they take, like it was some sort of enforced 'cookie cutter technique' and for most of the time it works OK(ish). Yet by nudging the compositional weight of the shot, just that little bit further into the centre of the frame, can often change the dynamic relationships within the image and give it a much more satisfying compositional feel. So moving on from the view of Moine House as shown in SHOT 5 above, if you now walk further towards the ruins, you will then have the opportunity to shoot it from all different angles and using different lenses, as shown in SHOT 6 above and SHOT 7 to the right. But where oddly enough, I found that it was better to shoot Moine House from a distance using my wide angle lens (16-35) and then to get in closer using a medium zoom (24-105). Because getting in close with a wide angle lens on a scene such as this, means you are probably going to start introducing lots of lens distortion, which doesn't happen so much with the 24-105, as it seems to create a more rectilinear image. This wide angle lens distortion effect, will then become glaringly obvious to the viewer, due to things like the chimneys bowing out to the sides. Especially when getting in close and shooting from a slightly upward angle. So does this mean that the Canon 24-105L is a true rectilinear lens? Who knows, but I can tell you and as I hope you can see for yourself in SHOTS 6 and 7, it does seem to produce a much more rectilinear result, than my old 16-35L f/2.8 ever could, if used from the same focal distance. |
 |
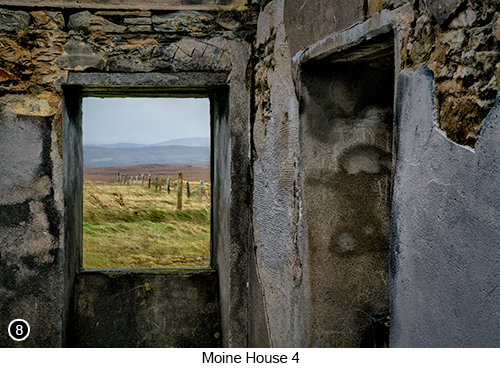 |
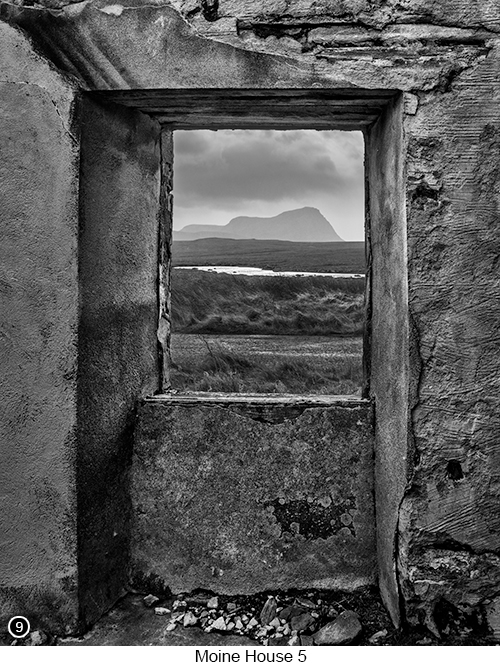
Having now shot Moine House and its moody surroundings from every angle from the outside, if you now venture inside the building, you will see there are several more opportunities to shoot from in there. By shooting out through at least two of the old, crumbling window frames, as shown in SHOTS 8 and 9 to the left and below. Now I know that using an old window frame as a frame within your composition, is a bit of a cliche in photography and has been done many, many times before. But you must also remember, that the reason why photographic cliches become cliches in the first place, is simply because they work so well. Tip: I am now going to waffle on about a subject in photography that is close to my heart and that you will probably not agree with, because everyone will tell you I am wrong. But what the heck, just bear with me for a moment or two and then think about what I am trying to say after you have read it. Every seasoned landscape photographer will tell you, that you should always try to take your shots using the optimum sharpness f/stop, that you can get away with. Which is usually somewhere in the middle of the f/stop range of your lens, around f/8. But with f/8, your depth of field (Dof) will then start to become limited and therefore not always sufficiently deep enough for most landscape scenes. Yes f/8 is probably the absolute best f/stop to use when shooting reflections, that have nothing but the reflection in the foreground. Yet for most other scenes that do have foreground detail, but where you also want everything else in the scene to be in focus, all the way out to the mountains in the background. Then unless you are willing to constantly focus stack all of your work, f/8 or even f/11, just will not cut it for most of the time. |
So that wide, expansive, tack sharp landscape image you have just been shown on youtube at 300%, that the photographer told you they took in a singe frame at f/8. Yet the blades of grass that were only inches away from the front of their camera, look just as tack sharp as the mountain tops 10 miles away and all of the shadows and highlights are bursting with detail. Then please take that with a pinch of salt, because I have been doing this landscape photography thing for long enough to know, that this just doesn't happen in the real world in a single shot, no matter how expensive their lens was, or how new and groundbreaking their camera is. In fact even more so, if they are using a medium format camera, as quite a lot of them do these days. Because if you think your Dof is limited with a 35mm sensored camera, then medium format is considerably more limited, simply due to the size and width of the sensor and its relationship with the size and width of the lens. In other words, the bigger the sensor, the smaller the Dof and the smaller the sensor, the bigger the Dof. This is why the camera on your phone with its tiny sensor, will have almost infinite Dof at around f/8 or f/5.6 and why large format cameras, have quite a limited Dof, even when using a lens that will shoot at f/128. So here is my controversial take on this subject and what I suggest you do if you are using a 35mm sensored camera and a reasonably good quality lens - set your lens to f/16 and forget about it (for most of the time at least). Yes there I said it - f/16. You know I can almost hear every landscape photographer all around the world, gasping in unison as I typed that, as they all start to wail and clutch at their pearls. But please hear me out for just a few moments longer... I have had my 16-35 and 24-105 Canon L lenses for at least 20 years and I have shot with them many hundreds of thousands of times, as well as used them with various bodies, both Canon and Sony. And I can tell you now, that using a modern Hi-res sensor, even when paired with an old lens such as the 16-35 set at f/16, produces images that are about 10 times sharper, than they ever used to be with my older sensored cameras at f/11, such as the 5D and 5D MkII. Even though back then I thought they were amazing and way better than my old film camera. Now this might be due to Back Side Illuminated Sensors (BSI), that are now being used in most modern sensor designs. Where the light gathering part of the sensor sits in front of the wiring, making the photosite wells much shallower and more able to catch uninterrupted light. Or it could be that the density of pixels on the sensor, is now so tightly packed, that any in-camera anti-aliasing effects, become much, much less of an issue (anti-aliasing can be thought of, as the slight blurring of each pixel around the edges, to fill in the gaps between the round photosites). Or even a combination of the two, who knows? But what I do know, is that I can now shoot quite confidently at f/16, for pretty much most of the time and still be blown away by the sharpness of the detail. And if I am at a scene that does not need f/16 such as a reflection, or if I want to blur out the background, or I am shooting a subject without a foreground, then yes of course I will open up the f/stop to f/8 or whatever I think I can get away with. |
 |
| So if you want an all purpose walk around f/stop, which leaves your mind clear of worry and that allows you to get on with creating your art and capturing your vision, unencumbered by the drudge of having to work out your f/stop for every single shot, then stick it on f/16 and forget about it and instead put all of your mental effort into your composition, framing and studying the quality of the light. | |
Exif information for each of the numbered shots shown throughout this chapter --1 - Canon EF70-200/2.8L IS USM, 1/100th Sec, f/11, ISO 250, Focal Length 200mm, taken on 11th Nov at 11:40 --3 - Canon EF70-200/2.8L IS USM, 1/200th Sec, f/6.3, ISO 160, Focal Length 200mm, taken on 11th Nov at 11:52 --4 - Canon EF24-105mm f/4L IS USM, 1/125th Sec, f/11, ISO 200, Focal Length 96mm (cropped), taken on 11th Nov at 12:03 --5 - Canon EF16-35/2.8L USM, 1/125th Sec, f/14, ISO 200, Focal Length 35mm (cropped), taken on 11th Nov at 13:18 --6 - Canon EF24-105mm f/4L IS USM, 1/125th Sec, f/16, ISO 200, Focal Length 47mm, taken on 11th Nov at 13:49 --7 - Canon EF24-105mm f/4L IS USM, 1/125th Sec, f/16, ISO 200, Focal Length 35mm (cropped), taken on 11th Nov at 13:52 --8 - Canon EF16-35/2.8L USM, 1/125th Sec, f/16, ISO 200, Focal Length 23mm, taken on 11th Nov at 14:07 --9 - Canon EF24-105mm f/4L IS USM, 1/125th Sec, f/16, ISO 400, Focal Length 60mm, taken on 11th Nov at 14:25 |
|
If you have enjoyed reading these 'Extra' chapters to my Guide Book and think you might also enjoy reading 79 more chapters across 270 pages, that also includes more than 340 Fine Art quality images, along with detailed descriptions and large scale maps to guide you to the exact location of where I took each and every one of them and which then goes onto discuss the techniques and tools I used to process them, but where everything is written in plain easy to understand English? Then please consider buying the Book. |
|