
Sutherland and the North, North Western regions of Scotland - Part 3 of 4 Wild, remote, rugged and windswept, but most importantly of all, breathtakingly beautiful and quite rarely photographed |
OK, it is not the usual thing for me to begin any of these online free chapters with a Tip, especially when that tip has nothing to do with how to use a camera, or how to find the best landscape photography locations anywhere in Scotland. But none the less, I think this is a tip that you will still want read and fully digest, if you do ever intend to photograph in Scotland and especially in any of the more remote areas. And believe me, if ever you do visit Scotland with your camera, then you really do need to be making your way out into the more remote areas of it if you can, because this is where most of the least visited, least photographed, yet most stunning locations can be found. Tip: I will warn you now, that some of the roads you are going to be driving along, for this next section of my 'Mini' Photographer's Guide across Sutherland and the North, North West of Scotland, are going to be very, very narrow indeed and in some places not much wider than the width of your tyre tracks. So be warned, because if you are not a confident driver and for whom the thought of driving for several hundred yards in reverse gear along tiny narrow roads, with deep muddy ditches on either side of it, that once you slide into you cannot drive out of, without the help of a tractor and a towing chain etc. Then it might be better for you, to miss out on both locations I have discussed in the first part of this chapter, namely Sheigra Bay and Oldshoremore Beach. However in the latter part of this chapter, I will be taking you to a much easier location to drive to at Smoo Cave, which is located right next to the main road and is a location well worth visiting with your camera. Some of the roads that you will be driving along, as I now take you to a couple of these tiny, remote, but very beautiful coves and bays at Sheigra and Oldshoremore Beach, are all pretty well maintained and serviced, but at the same time are all extremely small and narrow. Yet I was still able to drive down to these locations in an SUV Crossover type of vehicle and found it wasn't a problem for me. But then again I do live up here and have become used to driving along roads for mile after mile, that are no wider than the width of my tyre tracks, as well as being comfortable at reversing for long distances on these types of road. So if you are someone who is only used to driving on wide roads and motorways etc., and are only able to reverse for short distances, as you park your sensor controlled vehicle in your local Supermarket car park, then you may well find that getting to a couple of these next locations, is going to be a totally new type of driving experience for you. But having said all that and probably scared the pants off you already, driving in these areas isn't as bad as you may now think, or as bad as I am making it sound. Because all you need to do, is to fully concentrate on what you are doing at all times, as you take your time and drive slowly, as well as being considerate to all other road users that you meet along your way. Be they people, children, herds of sheep, or groups of wild stags and deer etc. Or even herds of semi wild free roaming highland cattle and bulls, who don't think they should ever have to give way to you or your vehicle, or get off the road. So if you do find as you are driving along a single track road and another vehicle is coming towards you in the opposite direction, then you will both need to get your vehicles aligned next to a two vehicle width passing place, in order to pass by. Which means one of you is going to have to reverse and which should always be the vehicle that is furthest away from the nearest passing place and which half of the time is going to be you. Also most of the passing places in these more remote areas, are still going to be quite narrow and several hundred yards apart, as not that many vehicles use these roads, so you will find yourself having to do quite a lot of reversing. Oh and NEVER try to squeeze past any other vehicles that you meet coming towards you, by driving onto what appears to be a nice solid grass verge to get past. Because even though it may look like it will take the weight of your vehicle, it probably will not and instead turn out to be a thin layer of grass, covering a deep boggy area and so your vehicle will quickly sink down to its axles and which you will then need to have towed out. Which as I hope you can now imagine, tow trucks are not a common sight up here, so getting your vehicle towed out of the bog at the side of the road that you have just sunk it into, will mean a local farmer has to pull it out for you with his tractor and a chain. Which is a sight I have witnessed many times over the years and you would be amazed how efficient a tractor can be at pulling any sized vehicle out of a deep muddy ditch. Especially when the farmer is not a happy puppy, because your vehicle has blocked off access to his land and he has no other choice than to pull it out for you as quickly as he can - ah yes, the sound of rending metal and tyres being ripped off their rims is quite a thing to behold..! Oops, there I go again, frightening you to death - sozzer... So here is my advice on how to safely drive in reverse for several hundred yards, on a narrow single track road if you need to (and you will). Firstly, do not try to drive in reverse by looking over your shoulder and through the rear view window, as you will instantly lose control of the direction of your vehicle and end up driving off the road and into a ditch. Secondly, do not rely on your dashboard reversing camera screen if your vehicle has one, as it will only give you a short view of the road behind you and once again you will quickly lose control and end up in said ditch. But instead first look through your rear view mirror, to make sure there is nothing else coming up behind you, then look at your drivers side passing mirror and where you should be able to see the road behind you and the line that is formed by the edge of it, disappearing off into the distance. Then slowly start to reverse as you keep the edge of the road, tightly parallel to the direction of you vehicle, as you continue to look into the drivers side passing mirror - it feels weird doing this for the first time, but you will soon get used to it. If you have a passenger with you, then ask them to look back through the rear window to make sure nothing is coming up behind you, but while you stay fully focused on the edge of the road through your passing mirror and your parallel reverse driving to it. Then when you do reach the nearest passing place behind you, either pull into it if it is on your side of the road to the left, or pull alongside it if is on their side of the road to the right and that's it. They should now be able to pass by your vehicle safely, as you both wave courteously at each other. So congratulations, you have now learnt how to drive in reverse safely for long distances, on any of the narrow single track roads found all across Scotland and so I hereby award you, a Tufty Club Road Awareness Merit Badge for doing so.. Yes I suppose you have to be over a certain age to know what a Tufty Club Road Awareness Merit Badge might be, but what the heck, I am sure you get my drift... |
|
 |
|
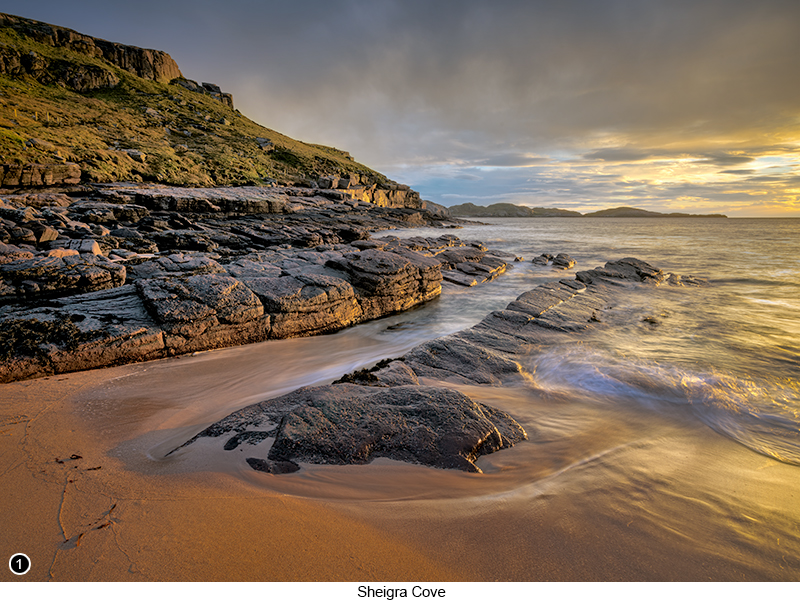
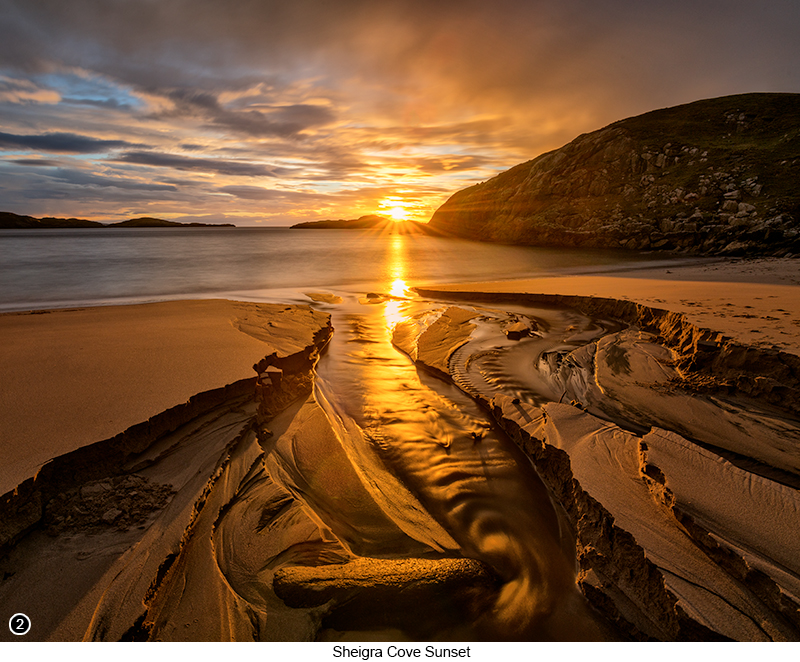
How to get there - Continuing on from the previous chapter, get back onto the A894 and continue driving North for another 13 miles or so, until you reach the small village of Riconich and a 'T' junction with the B801 and a left turn signposted for Kinlochbervie, Street View, Map View, now take this left turn and drive down the hill. Then keep going until you reach the outskirts of Kinlochbervie and where you will then see, a 'Y' shaped junction and a signpost pointing up the hill to Sheigra 4 miles away Street View, Map View. Take the right hand fork at the 'Y' junction and continue up the hill heading towards Sheigra. Next you will come to the tiny village of Oldshormore and another junction posted for the Oldshoremore Beach to your left, but keep heading straight on to the right, Street View, Map View - although the bay down at Oldshoremore is definitely worth investigating with your camera as well, but the reason we didn't when were there, is because the beach was already fully occupied, but more on that later... You will then pass through several more tiny villages, which are no more than a few scattered houses set next to the road, such as Blaimore and Balchrik, until you finally reach a left turn Street View, Map View, that leads down to the Sheigra Cemetery on your left. So turn left here and park anywhere you can in the large official car park next to the information board and access gate. You should now be able to see part of the bay to the front of you, past a few low lying sand dunes and a metal farm gate that you can walk through to get down to it - but make sure you secure the gate shut again after you pass through it, as there are lots of sheep in this area and if you leave the gate open, they will definitely make it their priority to escape and run amok throughout the nearby village. So having now parked in the cemetery car park, head off down towards the beach in front of you, as you walk along a rough sandy path that follows alongside a small burn to your left and then on past past several picnic tables also on your left. Until you come to the top back edge of the beach and where you will then see, where the burn is cutting a very interesting and very photogenic path, through the sand at the top of the cove as it flows out to the sea. Needless to say as you look at SHOT 2 shown below, it should now be fairly obvious to you that this tiny little bay, points almost directly to the West and so is an absolutely fantastic location for a sunset shoot. Especially from mid to late autumn and then all the way through to early spring, which is definitely the time you want to be here with your camera. But before you immediately jump in and start shooting your socks off and launch yourself straight into the burn shot, as shown in SHOT 2 below, instead take a few minutes to walk along the top of the sand dunes to your left and then over towards some very interesting rocks on the other side of the cove. Where you will then find there is a really nice alternative view of this tiny cove and the headland that juts out into the sea further over to your left, as shown in SHOT 1 above. What I did when I first arrived at this cove, was because the sunset was only just starting to happen and I knew I had about 20 minutes before it would be hitting its prime (see the Tip at the bottom of this chapter, for how I was able to quickly calculate this), I knew I had time to work my way across this tiny cove before the main event, so decided to start shooting over to the left of it. This meant walking along the top of the dunes at the back of the cove, so that I wasn't destroying any other shots I might wish to take next, by messing up the clean, undisturbed beauty of the sand, with my own size 10 boot prints - always try to avoid destroying your next compositions before you have even had the chance to look at them, by getting to a scene and then blundering straight out into the middle of it. But instead try to control your eagerness, as you progress slowly around the edges of the scene from left to right, before you finally start making your way into it and to the point where you think it will be at its most photogenic. |
|
 |
|
Having now shot the left side of the cove, get back up onto the top of the low dune area and walk back to where the burn is cutting through the sand, before you consider making your way down over the rocks (slippery alert) and out onto the larger boulders running through the bed of the burn, to set up your camera their. WARNING!!! Goodness me, I like my warnings don't I? But before you go down into the burn and as you now stand on top of the low sand dunes at the back of it, if you look out across the pristine sandy beach at either side of the burn, you will be thinking to yourself that it all looks nice and solid and good enough to walk over BUT IT ISN'T!!! You see the width of the burn that you can see cutting through the sand in front of you, is only about a half of what the water from the burn has actually cut through and undermined. Because as soon as the tide started to go out, the flow of water from the burn, began to look for its easiest and quickest way down to the sea. Which until it found it, meant it also began to undermine and cut through the sand at either side of where it is now flowing. So what you might think looks like flat solid sand running down along both edges of this burn, is actually only a thin layer of sand hiding a series of large empty pot holes and meandering tunnels. Also as I used a wide angle lens for this shot, as shown above, it has made the sand banks at the edges of the burn look quite shallow, but they are not and are in fact about 3 feet high at the side of where I am standing. So if you do decide to walk over to the edge of the burn from the middle of the beach, one of your legs is pretty much guaranteed to disappear down a hole, to at least knee height. So how do I know this? Because that is exactly what I did. Although luckily for me, I was still high enough up the beach, so that this newly opened pot hole that I had just made, did not to ruin my shot. But what I can tell you, is that this experience was really quite disconcerting, to be one minute striding out purposefully with my camera and tripod in hand, with my mind fully focused on how I was going to shoot this incredible scene at sunset. Only to come to a shuddering halt, as my left foot disappeared straight down into a hidden 3 foot deep hole, as I then fell over (to the immediate amusement of my wife) and almost launched all my kit into the burn. |
|
 |
|
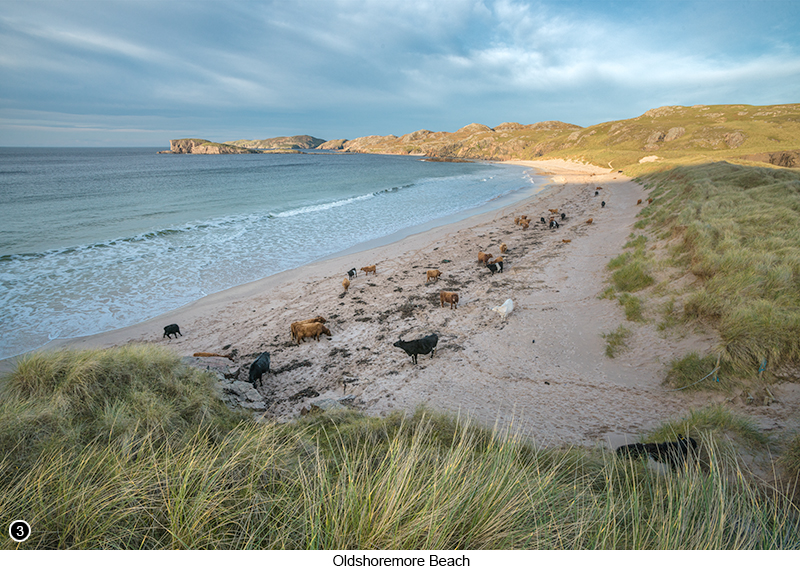
Having taken your shots of Sheigra Cove, if you now retrace your steps back the way you came in and all the way back towards Oldmoreshore beach Street View, Map View. But then take what is now a right hand turn and head on down the hill, as you follow the signs down to Oldshoremore Beach, where you will find a large official car parking area and public toilet facilities. If you then head up towards the left side of the toilet facilities, you will find there is a sandy path that leads you up to a viewpoint looking over the beach and a path that leads you down to the beach. But unfortunately on the day that we were there, the beach was already fully occupied by a herd of cows, as can be seen in SHOT 3 shown above, who are allowed to have free range in this area and so have become semi wild as a result. So not wanting to risk an encounter with these semi wild animals, as well as the fact that they had already completely churned up the beach and probably ruined any of the shots I might wish to take, we decided that this was about as far as we would go. As an aside, the reason you can quite often see cows wandering across some of the beaches around Scotland, is that the cows have learnt over time, that there will probably be lots of old 1 inch thick pieces of trawler rope, that have been washed up onto the beach at low tide. Which at some point in the past, must have been lost by fishing trawlers, as they snagged their nets on the sea bottom, or that perhaps got washed overboard during a storm. These old bits of trawler fishing rope, then become frayed and broken into pieces over time, by the constant motion of the tides across the rocks on the seabed. Which then allows them to soak up lots of salt out of the seawater, which in turn quickly becomes crystallised, as they dry out on the beach or under the sand. The cows then look for these bits of old fishing rope and chew on them for hours, to suck out all of the sea salt. Hence why this beach shown above is so churned up, because it seems that the cows absolutely love this sea salt and are willing to dig as many deep holes into the beach as it takes to find one. So if when you are here, you do see several cows with bits of old fishing rope, hanging out of their mouths as they slowly chew on them, with what I can only describe as a gormless trance like look on their faces, now you know why. |
|
 |
|
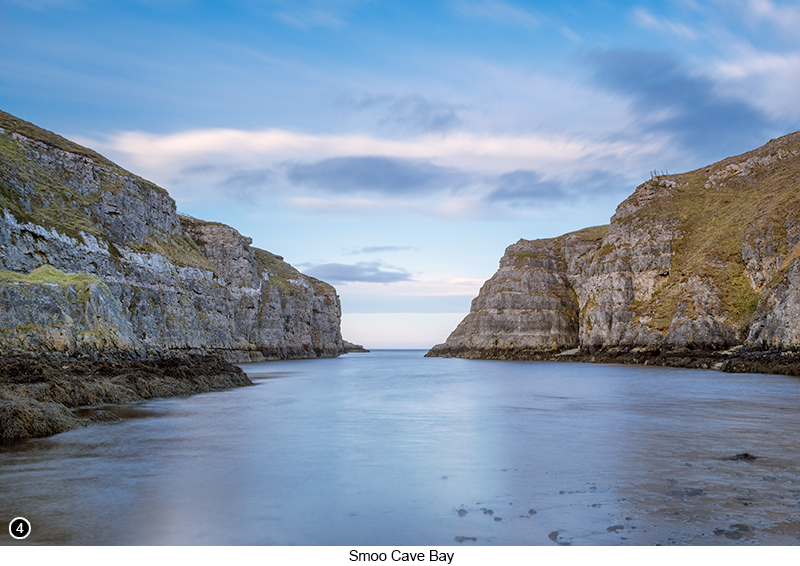
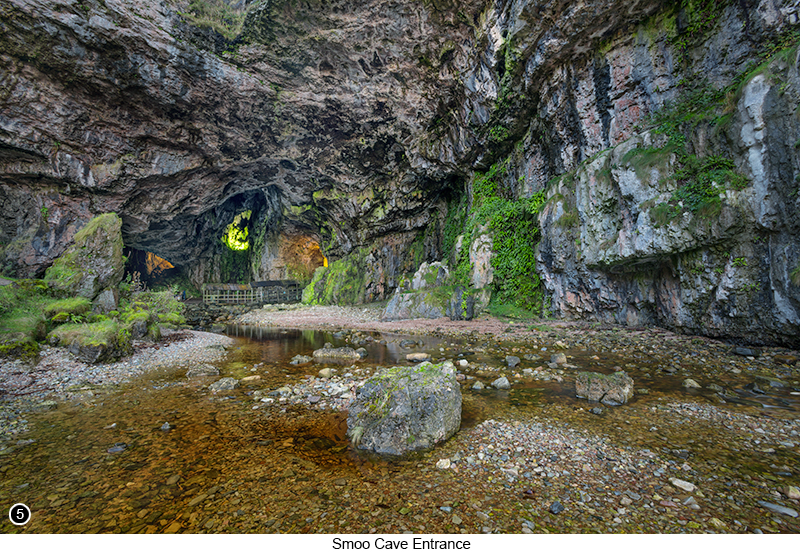
Having now shot your way around Sheigra Cove and Oldshoremore Beach, retrace your steps all the way back to the village of Kinlochbervie and then back to the B801 and then even further back to the main A838 and turn left, Street View, Map View, then continue heading North for another 14 miles towards Durness. You will then reach the village of Durness at the side of the main A838 road, Street View, Map View, so continue driving through the village as you continue to follow the A838 further North - although the local Spar shop that you will pass on your left in Durness, is well worth a visit and is somewhere where you can stock up on supplies and lots of other types of goodies, should you need them. Then once you drive out of the other side of the village and a couple of miles further on, you will see where the A838 road bends to the left in a slow arc, as it starts to rise gently up a hill, with great coastal views over to your left, as the A838 continues to wind its way along this coastal road towards Smoo Cave. You will then come to another area with a few houses scattered along either side of the road and the Smoo Cave parking area and toilet facilities on your left, Street View, Map View, so pull in here and park wherever you can. Once out of your vehicle, if you now walk across the car park heading towards your front left and to the left of the toilet block, where you will find an information board describing the area and the history of Smoo Cave etc., and a set of wooden stairs that lead all the down to the bay and a small bridge. You will now have lots of photo opportunities to shoot all around this tiny bay and of course, inside Smoo Cave itself. I would advise that you allow yourself at least a couple of hours of shooting time at this location, so that you can fully work this area to its full potential. Also a good time to be here I have found, is around mid tide, because then you can walk out onto the pebbly beach heading towards the gap in the Smoo Bay cliffs, for a nice long exposure shot of the bay, that will lead the viewers eye out into the sea and then onto the far horizon. Which even though I never got the chance to return to this West facing bay for a sunset shoot, I imagine could look amazing, especially if you time it so that the sun is setting directly down into the middle of the bay, as shown above in SHOT 4, but without a sunset happening unfortunately... |
|
 |
|
So once you are down in cave area and having walked over the small wooden bridge that you will find there, you will now be able to see into the cave proper and also how it is being internally lit by sodium lights, as shown in SHOT 5 above. I did try taking this shot from the bridge itself, but I soon realised that I wanted the foreground to have a lot more water flowing through it, so instead I followed the path up the left side of the burn that emerges out of the cave and stepped out onto a small ridge of pebbles in the middle of it, to take my shot from there. You can also see the old covered walkway towards the centre left of SHOT 5 above, which will take you into the inner waterfall area of the cave and which I show you in SHOT 8 below. . |
|
 |
|
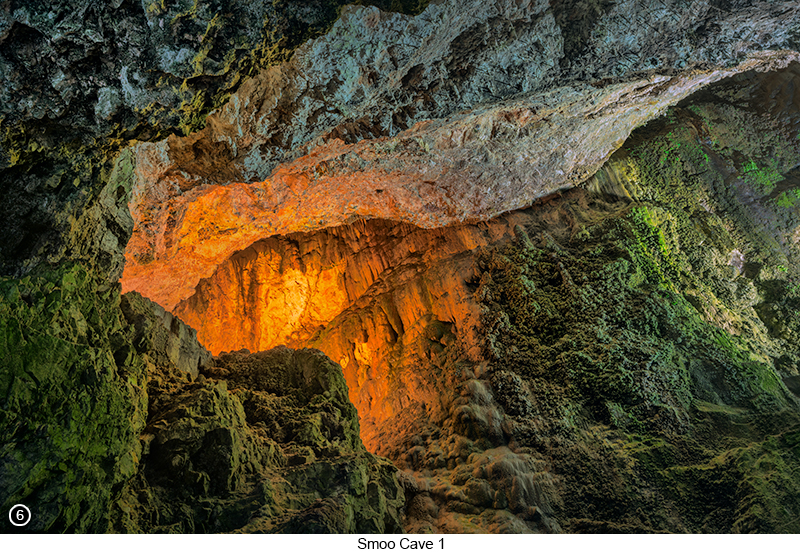
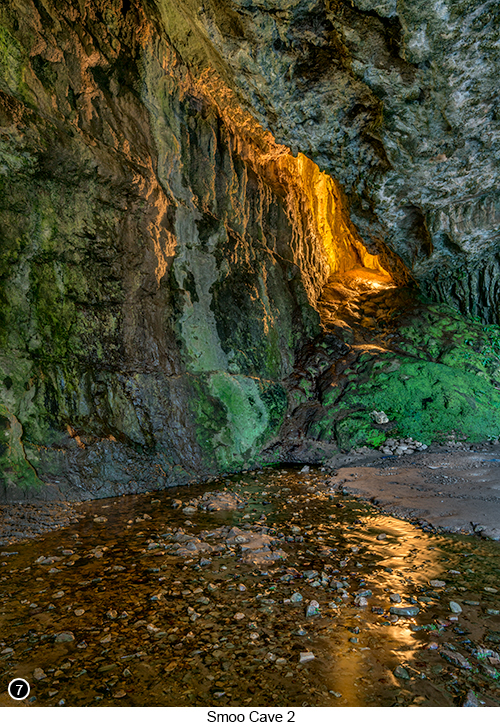
| I then entered into the cave and started shooting my way around the inside of it in a clockwise direction, from the first lit alcove that I found on the left, as shown in SHOT 6 above, then onto the next lit alcove at the back of the cave, as shown in SHOT 7 below. | |
 |
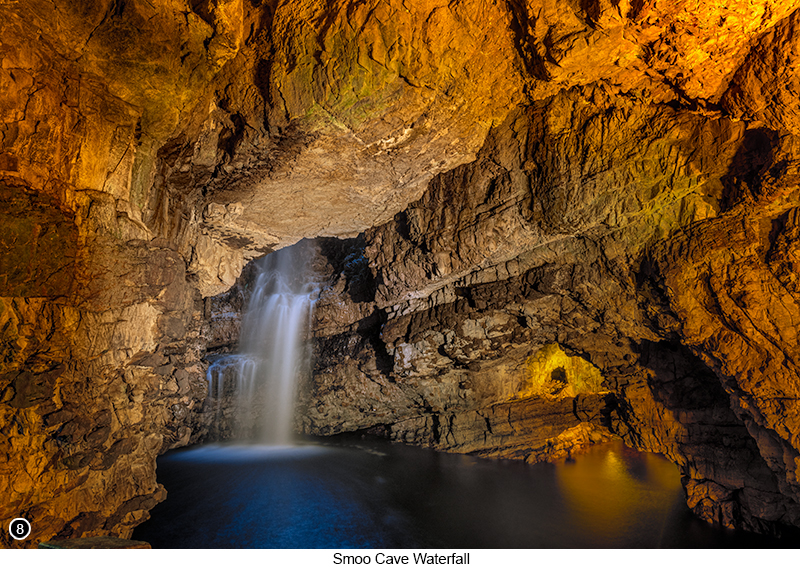
Then finally, I walked around to the other side of the cave and to the old covered wooden walkway and then into the inside waterfall area of Smoo cave, where I setup to take my final shot of the cave area, as shown in SHOT 8 below. Having visited this cave a couple of times before, I knew how it was lit and how the sodium lights that were being used then and that are still being used to this day (as of 2023), are casting what I think is a really quite ugly yellowish coloured light, over the walls of the cave. Sodium lights are slightly cheaper to run and don't use as much power and also seem to be longer lasting, so I understand why they are commonly used to light up monuments and other places that sightseers like to visit. But for photography they are not so good, unless you are prepared to endlessly fiddle around with your in-camera light meter settings, to work out the best balance of daylight and sodium light for each shot. So what I did for this chapter, was to shoot 2 of the shots (SHOT 6 and 7) using my normal daylight white balance settings and let the yellowish glow become part of the composition. But then in the cave waterfall area itself, I thought I would try to be a bit more creative and so here is what I did... I took a speed light with me on this occasion, which is not a piece of kit I normally take with me anywhere for my landscape work, but having visited this cave before, I knew that if I wanted to get anything useable from within the main waterfall area of the cave, I was going to have bring along my own sun, because it is very, very dark in there. So even though they have tried to light up the inside of the main waterfall area, with several horrible yellow sodium lights, there still doesn't seem to be enough light bouncing around for photographic purposes. But when you are in here, your eyes will adjust and you will think it looks quite well lit, but believe me it isn't. So I thought that what the heck, if I am going to bring along my own sun, then why not try to change the colour of the light it is putting out and so I threw on a really strong blue filter gel onto the front of the flash, in an attempt to counteract the yellowness of the sodium lights and this is the result as shown in SHOT 8 below. I set my speed light into its maximum zoom mode of 105mm, so that it was pushing all of its light into a relatively thin beam, that I could direct onto the water and the waterfall area. I then set my exposure for 30 seconds using my 10 stop ND and manually fired off about 5 flashes during the single 30 second exposure. This then had the effect of painting the waterfall with a deep blue directional light, whilst at the same time leaving the rest of the cave still bathed in the sodium yellow light coming from the lamps. This created a subtle yet weird effect, that I actually rather like and that is probably quite unique for this scene. Where my deep blue gel has actually balanced out the sodium filter and neutralised the colour of the rocks in the deepest part of the cave, yet at the same time left the rocks in the foreground still bathed in a sodium yellow glow. You can also see where the deep blue light from my gel, is being reflected off the bubbles in the frothier parts of the waterfall, yet at the same time, has helped to all but neutralise the main part of the water flow, into a more natural looking shade of white. Of course you could just adjust your white balance in-camera and if you are shooting in Raw mode, as I assume that you are, then you can tweak the light balance later in post. But I wanted to get the shot all in one take if I could and as I say, this is the result as shown below in SHOT 8. |
How I went about taking SHOT 8 - first I setup my camera on the tripod, as far as I could place it to the right of the wooden viewing platform. I then had to wait until no one else was in there but me, as I could feel that the wooden viewing platform I was standing on, was vibrating too much when anyone else was walking on it and knew this would ruin my shots. Also you will find there is a lot of water spray constantly being generated by this waterfall, which has no where else to go, other than to carry on through the cave towards you and your camera. So to counteract this, I set up my kit with the camera lens facing towards me and away from the waterfall. Second, I then threw on my 10 stop ND and set up my camera for a 30 second exposure and then turned the camera around to frame up my shot. I then made sure the ND filter was water droplet free by wiping it with my lens cloth, as I then draped the lens cloth over the front of the lens to protect it from the spray. Third, I then pulled out my deep blue gel and waited for the area to empty, of the next group of sightseers who had just wandered in. Then fourth, as soon as it was only me standing there, I pulled off the lens cloth, held my gel in front of the flash and standing as still as I could and holding my breath, I hit the shutter release button on my remote, as I started to fire off as many flashes as my speed light would give me in the 30 second exposure time. Which was something like four or five, or maybe even six. I then wiped the ND filter again, just to make sure it was clear of any spray and repeated the process for another couple of times, before the next group of sightseers entered into this part of the cave and the viewing platform once again began to vibrate under their footfall - which must have been a coach tour or something, as there were lots of them. I then lifted up all of my kit in one go and collapsed my tripod legs, as I walked out of the waterfall area of the cave smiling as I went, at the long line of tourists that had now formed. I then stripped down my kit outside of the waterfall area of the cave and wandered back to my vehicle, for a nice hot cup of tea and a chocolate digestive. This cup of tea and a chocolate biscuit after a shoot, seems to be something of a theme with me doesn't it? And which I can only imagine, must be something akin to being like a post-coital cigarette used to be seen in the old days. Whereby as soon as the shooting part is over and I feel photographically sated, I instantly feel the need for a cup of tea and a biscuit... |
|
 |
|
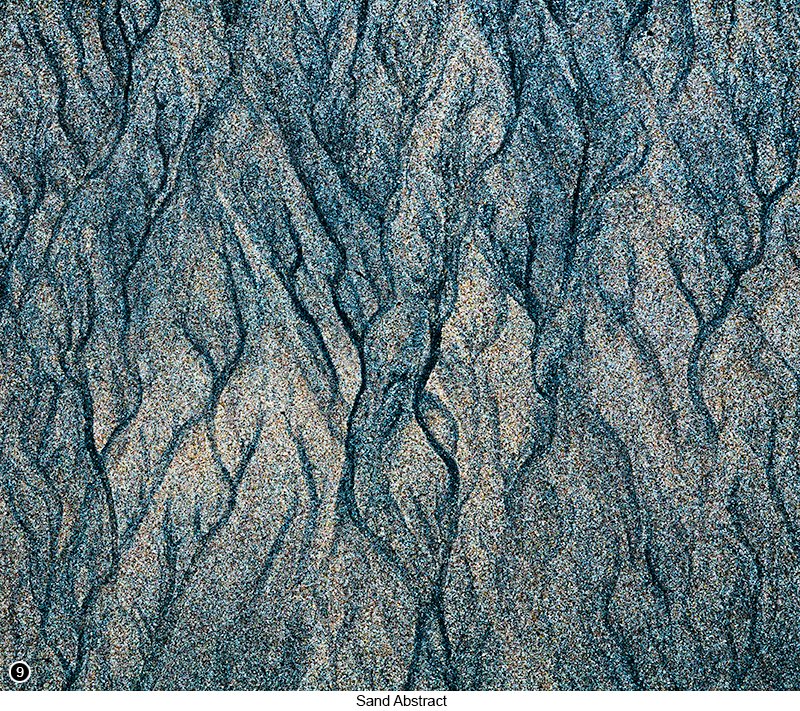
Tip: how to easily calculate the amount of time you will have, before any sunset hits its peak and how to do so the moment you arrive at any given scene, where you hope there is going to be a sunset taking place. You may already know this trick of course, but for those of you who don't - if your are an average sized male, then by holding up your fingers in the horizontal plane in front of your eyes and then aligning them so that the bottom edge of your lowest finger, is parallel to and running along the horizon. If you then add together 20 to 25 minutes for the width of each of your fingers, all the way up to where the top edge of one of your fingers, aligns with the bottom edge of the sun, this will give you an approximate timescale of just how long you have, before the sun hits the horizon and the sunset gets into full swing. If you are an average sized female, then do the same thing as described above, but allow around 17 to 20 minutes per finger. Obviously if the sun when you first arrive at the scene, is higher above the horizon than the width of four fingers, then just stack the fingers from your other hand on top and continue counting. ...and, if you run out fingers after stacking both hands on top of each other, then you have obviously arrived here far to early for a sunset, but none the less I commend you for being so keen to get started. So in the meantime, why not break out your medium zoom (24 - 105) or macro lens if you have one and have a wander around looking for abstract shapes in the sand, as shown in SHOT 9 below. But still only walking in places away from the burn, that will not ruin your later shots when the sunset does begin. |
|
 |
|
Exif information for each of the numbered shots shown throughout this chapter --1 - Canon EF16-35/2.8L USM, 1/8th Sec, f/16, ISO 100, Focal Length 20mm, taken on 7th Nov at 15:50 --3 - Canon EF16-35/2.8L USM, 1/100th Sec, f/16, ISO 200, Focal Length 18mm, taken on 13th Nov at 09:23 --4 - Canon EF16-35/2.8L USM, 30 Sec (with 10stop ND), f/16, ISO 400, Focal Length 28mm, taken on 8th Nov at 15:42 --5 - Canon EF16-35/2.8L USM, 1.6 Sec (-/+ 2 stop bracket), f/16, ISO 100, Focal Length 16mm, taken on 8th Nov at 15:52 --6 - Canon EF16-35/2.8L USM, 3.2 Sec (-/+ 2 stop bracket), f/16, ISO 100, Focal Length 31mm, taken on 8th Nov at 15:56 --7 - Canon EF16-35/2.8L USM, 8 Sec (-/+ 2 stop bracket), f/16, ISO 100, Focal Length 25mm, taken on 8th Nov at 16:01 --8 - Canon EF16-35/2.8L USM, 30 Sec (with 5 or 6 105mm flashes, using a deep blue gel), f/16, ISO 100, Focal Length 23mm, taken on 8th Nov at 16:12 --9 - Canon EF24-105mm f/4L IS USM, 1/10th Sec, f/11, ISO 400, Focal Length 80mm, taken on 8th Nov at 16:21 |
|
If you have enjoyed reading these 'Extra' chapters to my Guide Book and think you might also enjoy reading 79 more chapters across 270 pages, that also includes more than 340 Fine Art quality images, along with detailed descriptions and large scale maps to guide you to the exact location of where I took each and every one of them and which then goes onto discuss the techniques and tools I used to process them, but where everything is written in plain easy to understand English? Then please consider buying the Book. |
|